Imagining A Watercolor Winter Landscape
There are many variations on this watercolor winter landscape scene that you can come up with if you use a little imagination. Try variations with a different horizon line, change the size and position of the cabin and the other elements such as the trees or figures. You can use your finished paintings to add a personal touch to your holiday celebrations. Whether you are making cards and tags, decorating your home, or simply looking for a fun and festive activity to enjoy.
Using A Limited Palette
Using a limited color range in a painting can have several advantages, depending on your goals and the effect you want to achieve. Here are a few of the benefits:
- Simplicity: Using a limited color range can help to simplify your painting and create a cohesive, unified look. By focusing on a smaller number of colors, you can avoid the distractions and distractions that can be caused by too many competing hues.
- Cohesiveness: A limited color range can also help to create a sense of unity in your painting. By using a limited palette, you can create a harmonious effect that ties all of the elements of your painting together.
- Emphasis: A limited color range can also be used to draw attention to specific areas of your painting or to create emphasis on certain elements. By using a smaller number of colors, you can highlight the most important parts of your composition and create a stronger visual impact.
- Mood: The colors that you use in your painting can also impact the mood and atmosphere of your scene. Choosing a limited color range helps create a specific mood or atmosphere that helps to set the tone of your painting. In this case, cool colors i.e blues and purples are an obvious choice for a winter scene.
Overall, using a limited color range can be a useful device for creating a cohesive, harmonious, and impactful painting. Whether you are working in watercolor, oils, or another medium, experimenting with different color palettes can help you to achieve the look and feel that you want in your artwork.
Materials List
Paints
Ultramarine Blue: Winsor & Newton | Daniel Smith
Cerulean Blue: Winsor & Newton | Daniel Smith
Prussian Blue: Winsor & Newton | Daniel Smith
Alizarin Crimson: Winsor & Newton | Daniel Smith
Paynes Gray: Winsor & Newton | Daniel Smith | Daniel Smith
Dioxazine Purple: Winsor & Newton | Daniel Smith
Brushes
Synthetic Squirrel Flat Brush Buy From Amazon
Princeton round detail brush 9650R-2 Buy from Amazon
Rigger Brush Buy from Amazon
Paper
Arches Watercolor Paper Block, Cold Press, 9″ x 12″, 140 pound Buy from Amazon
Miscellaneous
Adjustable desktop easel Buy From Amazon
Misting spray bottle Buy from Amazon
Easy release painters masking tape Buy from Amazon

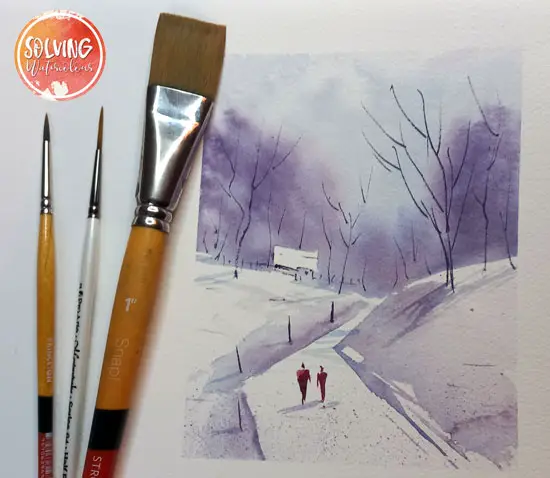
Step by Step Watercolor Winter Landscape
Easy Watercolor Winter Landscape Scene Step by Step
Painting the sky
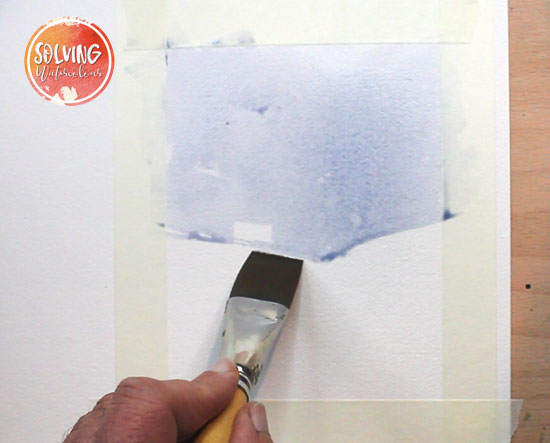
To start your watercolor winter landscape scene, begin by painting the sky using a 1″ flat brush and a light blue color such as Cerulean Blue. We will use the wet-on-wet technique to create a hazy, atmospheric effect As you paint the sky, think about the direction of the light and how it will affect the appearance of any clouds and the overall mood of the scene. As you paint the sky, remember to leave a small rectangular shape unpainted to represent the cabin in the background.
Adding background trees
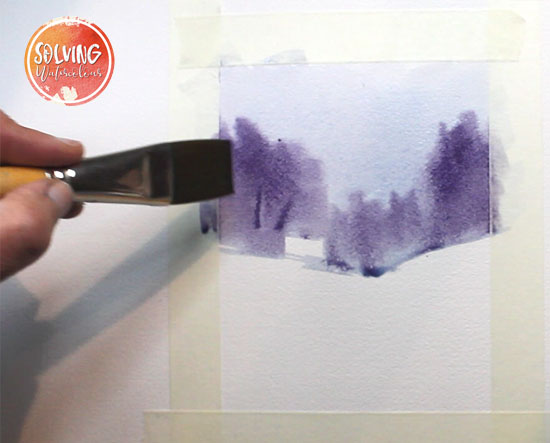
Once you have painted the sky, you can begin to add in the background trees. To create a violet color, mix together Paynes Gray, Alizarin Crimson, and Ultramarine Blue. Or if you prefer you can use Dioxazine Purple but you may need to reduce the intensity of it with Paynes Gray. Then, while the sky is still wet use paint some rough tree silhouette shapes allowing the colors to blend and mix together as you go. Carefully paint around the white cabin shape. Add some texture to the trees by spattering clean water with a toothbrush on them.
Painting a visual Lead-in
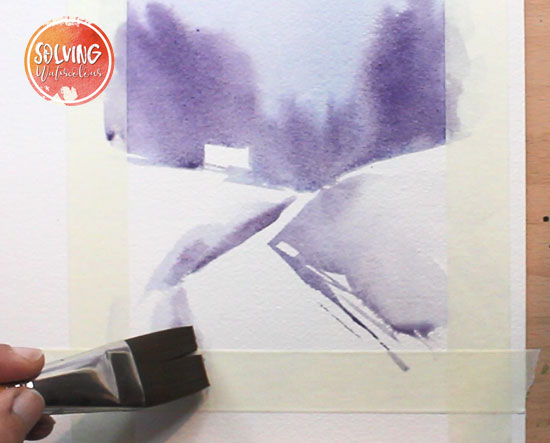
Before you move on to the next stage of your painting, it’s important to allow the paint to dry completely. You can use a hairdryer to speed up the drying process, or simply wait for the paint to dry on its own.
Once the paint is dry, use your flat brush to paint in the shadows that define the path. You can use the same violet color as the background trees, this creates a sense of depth and dimension and leads the viewers eyes into the painting. As you paint the shadows, think about the direction of the light and how it will affect the appearance of the path and the surrounding landscape.
Add some trees

Next, you can add in some thin bare trees to the midground of your painting. To create a darker violet color, mix together Paynes Gray, Alizarin Crimson, and Ultramarine Blue in a creamier consistency than you used for the background trees. Then, use a rigger brush to paint the trees, starting with the trunks and then adding in the finer details of the outer twigs and branches. In the image above I’ve used the dry brush technique add some texture by breaking up the tree trunk.
Add cast shadows
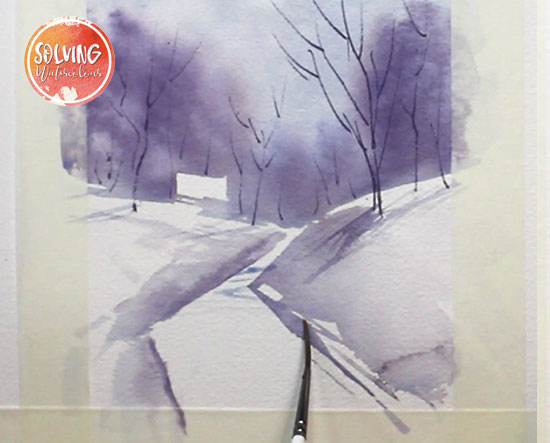
Think about the direction of the light and the shape of the ground how it will affect the appearance of the shadows cast by the trees. You can use a lighter blue such as a Ultramarine thinned down to a “Tea” consistency.
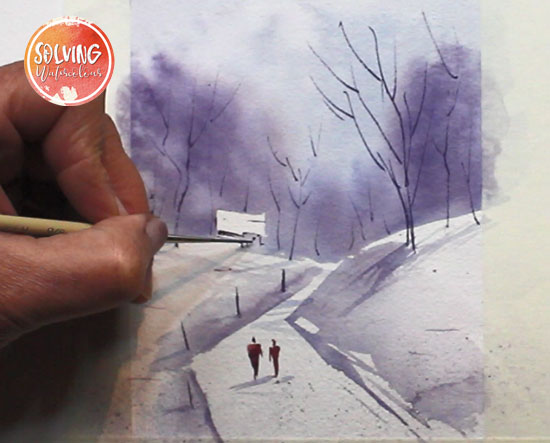
Add some simple figures
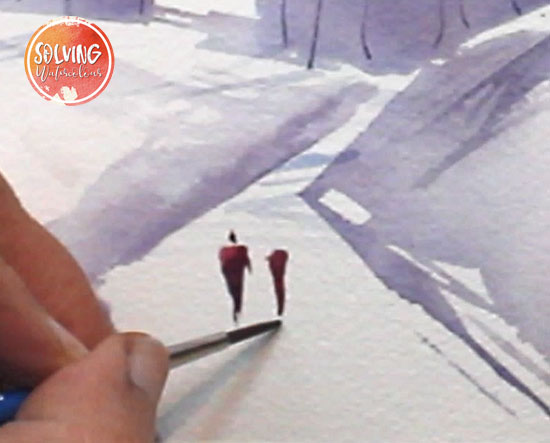
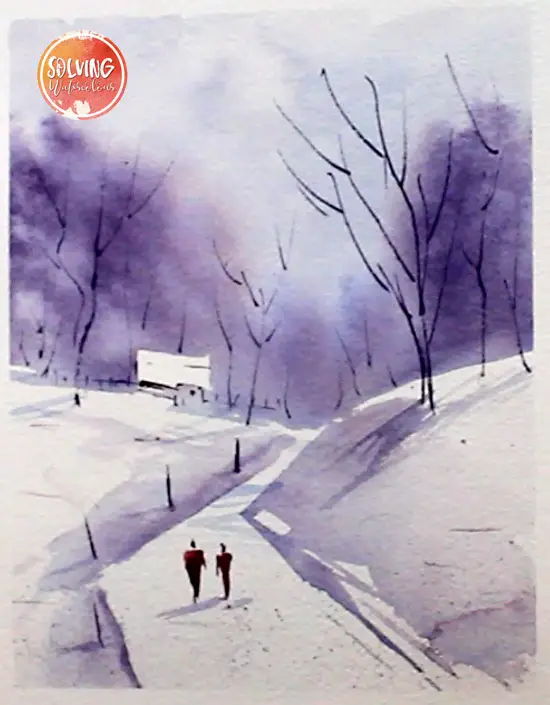
To bring your watercolor winter landscape scene to life, you can add in some small, simple figures in the foreground, with a small round detail brush. I’ve used a touch of Alizarin Crimson and blended it into violet to give the impression that the figure on the left is wearing some type of red jersey. Try leaving some areas unpainted to create highlight. I like to leave a tiny little gap between the head (Basically just a small dot) and the shoulders.
Add final details
To finish your winter watercolor landscape scene, you can add in some small dark details such as a line of fenceposts and small details on the cabin. These details will help to add realism and depth to your painting, as well as drawing the viewer’s eye towards the midground and background elements of your scene.
To add the fenceposts, use a small brush and a dark blue or violet color to paint in the posts, one at a time. You can paint them in a straight line or in a zig-zag pattern, depending on your preference. As you paint, be sure to leave some areas unpainted to create highlights and add depth to the scene.
To add small details to the cabin, you can use a similar technique. Use a small brush and a dark blue or violet color to paint in the details, such as windows, doors, and roof lines. You can also use a dry brush technique to create texture and depth in the wood and other materials.
I added some texture to the foreground by spattering some speckles of dark paint in the foreground with the toothbrush.
Finally, step back and take a look at your painting as a whole. Make any final adjustments or touch-ups as needed, and then you’re finished! With a little patience and practice, you can create a beautiful and realistic wintery watercolor scene that you can be proud of.
Once you have completed your painting of an imaginary winter scene, there are many different ways that you can use it to create festive Christmas cards, gift tags, and other holiday decorations. Here are a few ideas:
Print your painting onto cardstock to create holiday cards. You can use a high-quality printer or take your painting to a local print shop to have it professionally printed. Once you have your prints, you can cut them to size, fold them in half, and add any additional embellishments or details as desired.
Create gift tags by printing your painting onto small pieces of cardstock and cutting them out. You can add a hole punch and some ribbon or twine to hang them from gifts, or you can simply attach them to the wrapping paper with a bit of tape.
Turn your painting into a holiday ornament by printing it onto clear acetate or plastic and cutting it out. You can then attach the ornament to a ribbon or cord and hang it on your tree or in a window.
Or you can simply frame them and give them as gifts.
Watercolor Winter Landscape: Watch The Video
Useful Links
How to Paint a Loose Watercolor Landscape

You always provide helpful diagrams and illustrations.
I try! Thanks