When painting a portrait. Success or failure is usually decided before you’ve even put your brush to paper. So, before I delve into the mechanics of painting a portrait, let’s look at the drawing stage in detail, as that’s where 95% of portraits succeed or fail.
Art Supplies List: Here are the main art supplies I used for this portrait painting and drawing tutorial.
Faber-Castell 4B Pencils Buy on Amazon
Da Vinci Paint Brush, Round Quill New Wave Synthetics, Size 2.
Buy on Amazon
Winsor & Newton Professional Watercolour Tube Set. Buy on Amazon
Pro Art Hake Brush. Buy on Amazon
Princeton round detail brush 9650R-2 Buy on Amazon
Arches Watercolor Paper Block, Cold Press, 9″ x 12″, 140 pound Buy on Amazon
Artists Desktop Easel Buy on Amazon
Drawing Faces

Producing a convincing portrait is one of the most difficult artistic challenges there is. With landscapes, you have a lot of margin for error but when it comes to faces, everyone is an expert on how they should look.
Reading faces and facial expressions is something that’s been hard-wired into us from birth. For this reason, even a non-artist can instantly tell when a portrait looks wrong, it’s just instinctive. They may not be able to tell you specifically what is wrong but they will know that something is off.
When it comes to portraits, it’s really important to invest time getting the drawing part right. I’ve got some tips and strategies that will help you with that and if that’s not enough for you then I’ve got a great downloadable short cut for you at the very end of this post that will allow you to forget all about the bothersome drawing part and cut straight to the chase!
Keep A Sketchbook
It’s obvious really but if you want to draw faces well, then you need to draw a lot of faces. I recommend keeping a sketchbook and drawing faces at every opportunity. Aim to draw 10 faces a day. It doesn’t matter if you’re drawing from photos or from life.
When drawing a face, or anything for that matter, always start with the largest shapes and work your down to the smallest. It can be tempting to start with the eyes, as that is where our attention is immediately focused but it’s incredibly difficult to draw a face this way and keep everything in proportion.
I think the biggest challenge to overcome when drawing a face is to learn how to represent the three dimensional in two dimensions. The first step in this process is to let go of learned symbols and really start to observe.
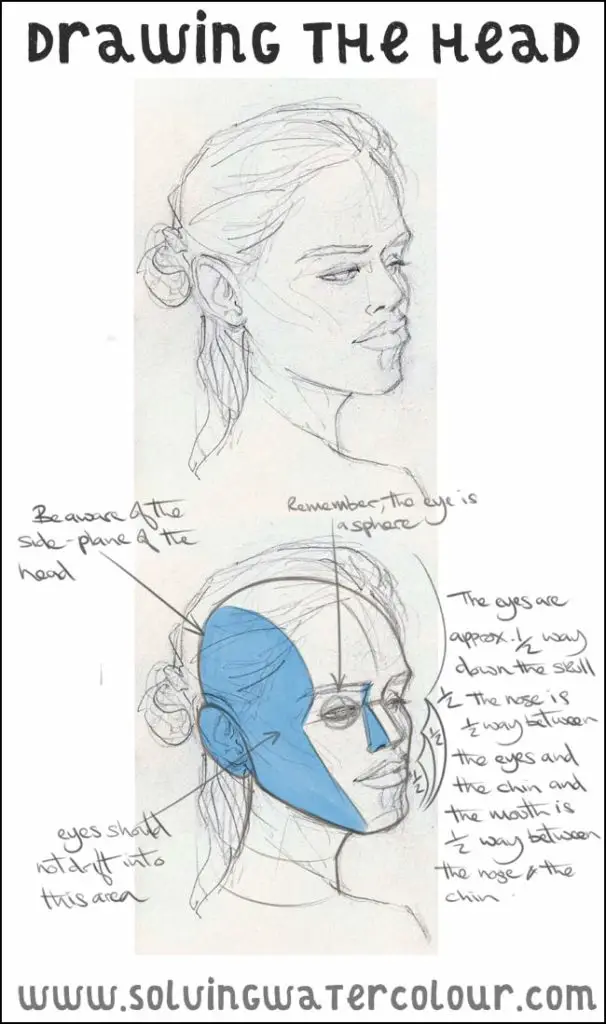
Drawing The Head
I’m talking about the proportions of an idealised head here. It’s the slight variations in these proportions that gives people their own unique appearance. Idealised proportions are useful to memorise though, because we can use them as a guide to check that we aren’t wildly deviating from reality.
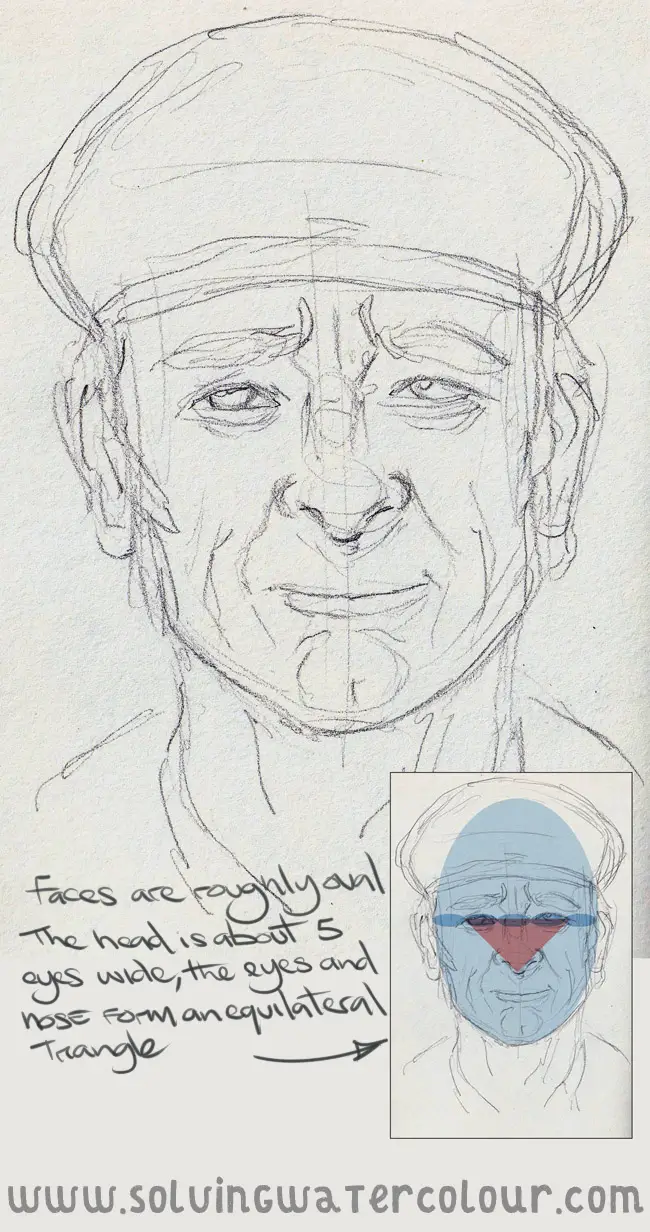
A head is essentially an oval. If you draw a horizontal line bisecting the oval, this is the eye line, the top of the ears also touch this line. If you draw another line halfway between this one and the bottom of the oval (The tip of the chin) this is where the tip of the nose should be. Half the distance between the tip of the nose is where the mouth should be. The head is on average about five eyes wide.

Tips For Drawing Eyes
The eyes are arguably the most important part of a portrait. If you get them wrong the whole portrait will look wrong.

Remember that the eyes are round and three dimensional, yet they are often depicted as flat almond shapes. When drawing eyes really observe how the skin of the eyelids wraps around the eye. As the head turns sideways the circle of the iris becomes more oval and so does the pupil.
Light generally comes from above forming a small highlight in the top darkest part of the iris and illuminating the bottom half of the iris.
Establish an eye line before drawing the eyes. I always draw a line curving around the skull and have the eyes sit on that line. It’s easy to end up with wonky looking eyes at different heights if you don’t do this.
A common mistake is placing the eyes too high up the forehead. This happens because the hairline tends to create the impression that the eyes are higher than they actually are.
Build up both eyes at the same time by drawing one line at a time and alternating between each eye as you draw them, as opposed to drawing one to completion and then drawing the other. You will find that your eyes end up looking much more balanced and natural this way.
Eye drift is an easy mistake to make when drawing the head in 3/4 profile. It’s when the eye is drawn too close to the ear. The solution is to clearly define where the side plane of the head is located and don’t let the eye drift over the line.
The Nose
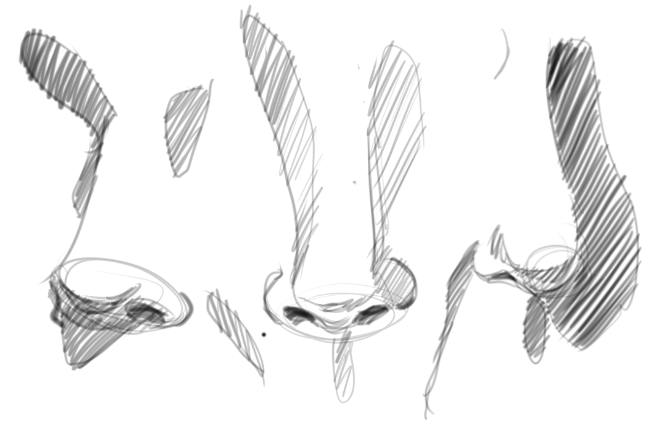
Don’t try to define the nose entirely with an outline. Noses are mostly defined by the shadows on them and the shadows they cast. The darkest part of the nose is usually the nostrils. On the bridge of the nose, a strong light on one side will cast an equally strong shadow on the opposite side. Soft lighting will create very soft shadows. Don’t forget that there is often a small shadow under the tip of the nose.
In the drawing of the girl below. I’ve shown the original drawing and underneath that, I’ve overlaid the same drawing with the planes of the head. The side plane is highlighted in blue. Notice also, that there is a subtle perspective to the eyes. The eye that is furthest away is drawn slightly smaller than the nearest one.
Painting A Tonal Sketch
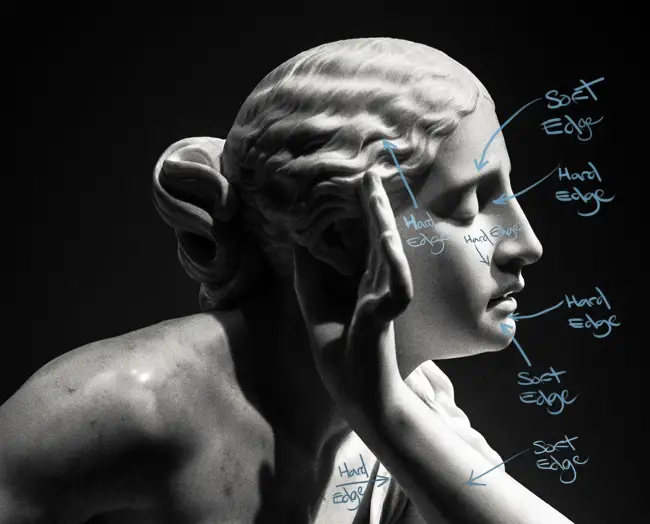
Controlling The Edges Of Shadows
One of the things that makes painting a portrait particularly difficult in watercolour, is the combination of hard and soft edges often within the same shape.
Edges of shadows can be soft on one side and hard on the other. This presents a problem, because we generally control the type of edge by judging the moisture content of the paint and the paper. This gives us a hard edge when painting wet on dry, a softer edge when painting wet on damp and a completely smooth (But difficult to control) transition when painting wet into wet.
If you’re not familiar with this concept please read this post on watercolour techniques and the rest will make a lot more sense.
These hard/soft compound edges are an extra level of complexity to deal with. So let’s make life a bit easier for ourselves and forget about colour completely for now. We’re just going to think about our painting as a collection of shapes of different tonal values and varying types of edge.
Shapes which contain both types of edges call for an additional technique. Keep a second brush handy loaded with pure water. When you want to soften an edge on one side only, you can paint into it with the water brush and diffuse only that edge.
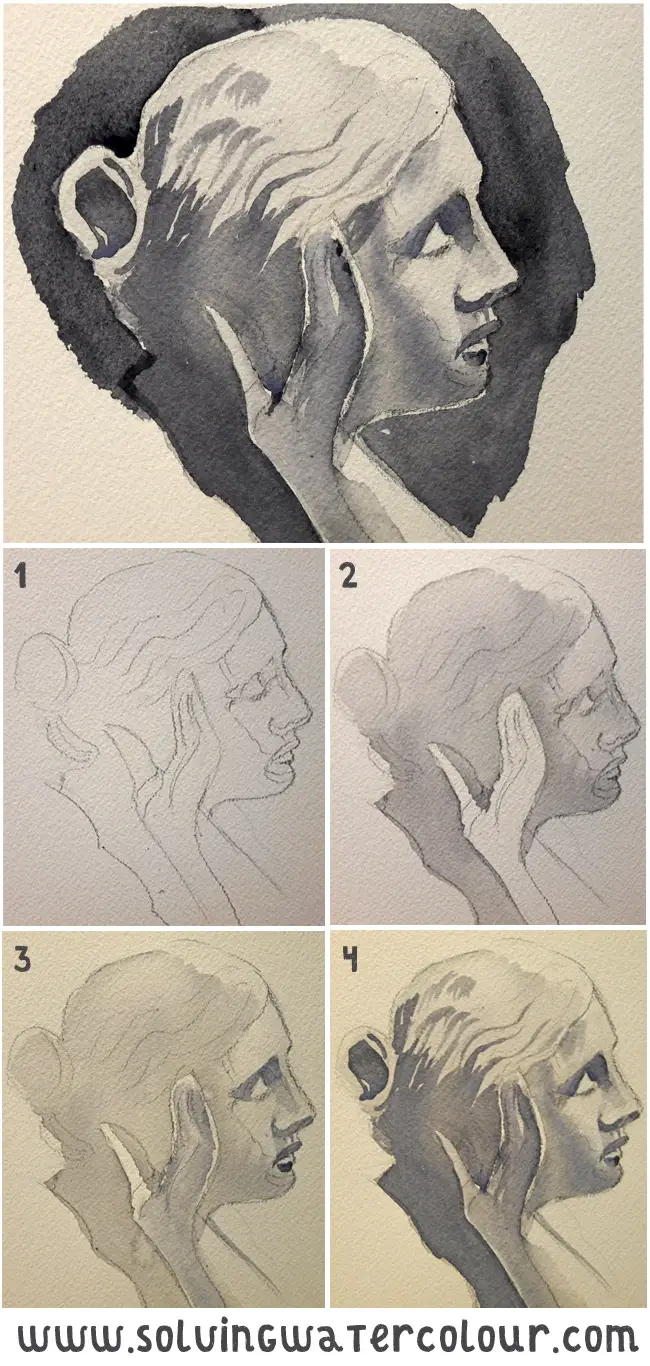
Below is my rough tonal watercolour sketch of the statue image above, all done in Paynes Gray. My general general approach was to build up layers of tonal washes and get most of the soft edged shadows laid down first by painting wet in to wet. Then I Let it dry completely, before wetting it again and dropping in a bit more tone to strengthen the shadows where needed.
Remember, it’s important to make sure that everything is totally dry before applying additional washes or you will disturb the existing wash and get back runs (Cauliflowers) forming. If you haven’t done so already, please read my post on watercolour mistakes and how to fix them.
- I lightly out lined the shadow shapes and wet the entire sketch with clean water. I left the areas where I wanted a hard edge i.e. around the hairline, around the hand and the highlight on the eyelid.
- Laying in a thin wash of tone.
- Wetting the hand shape and applying a thin wash of tone to it.
- When the wash was completely dry I wet everything again, before dropping in some more Paynes Gray for that diffuse shadow on the side the face. Then I let the whole thing dry again.
The final stage was adding in the hard edged shadows, around the lips, underside of the nose etc by painting a thin wash of tone, wet on dry.
Painting Portraits In Colour
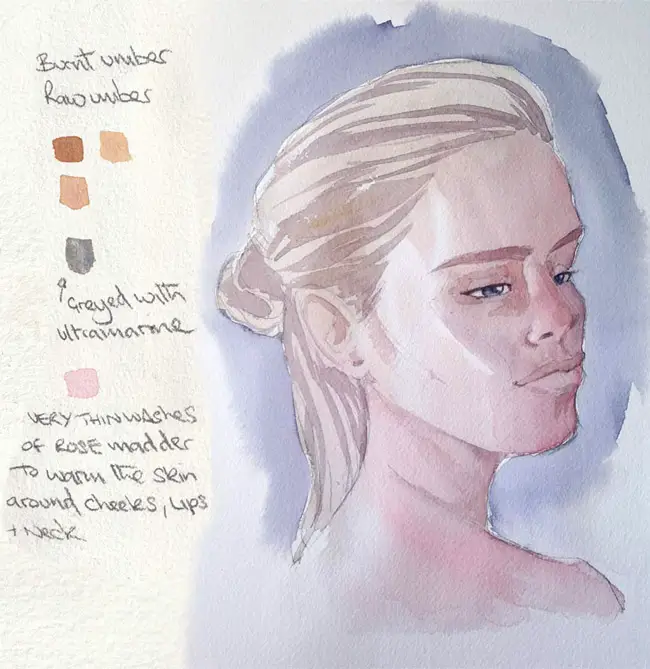
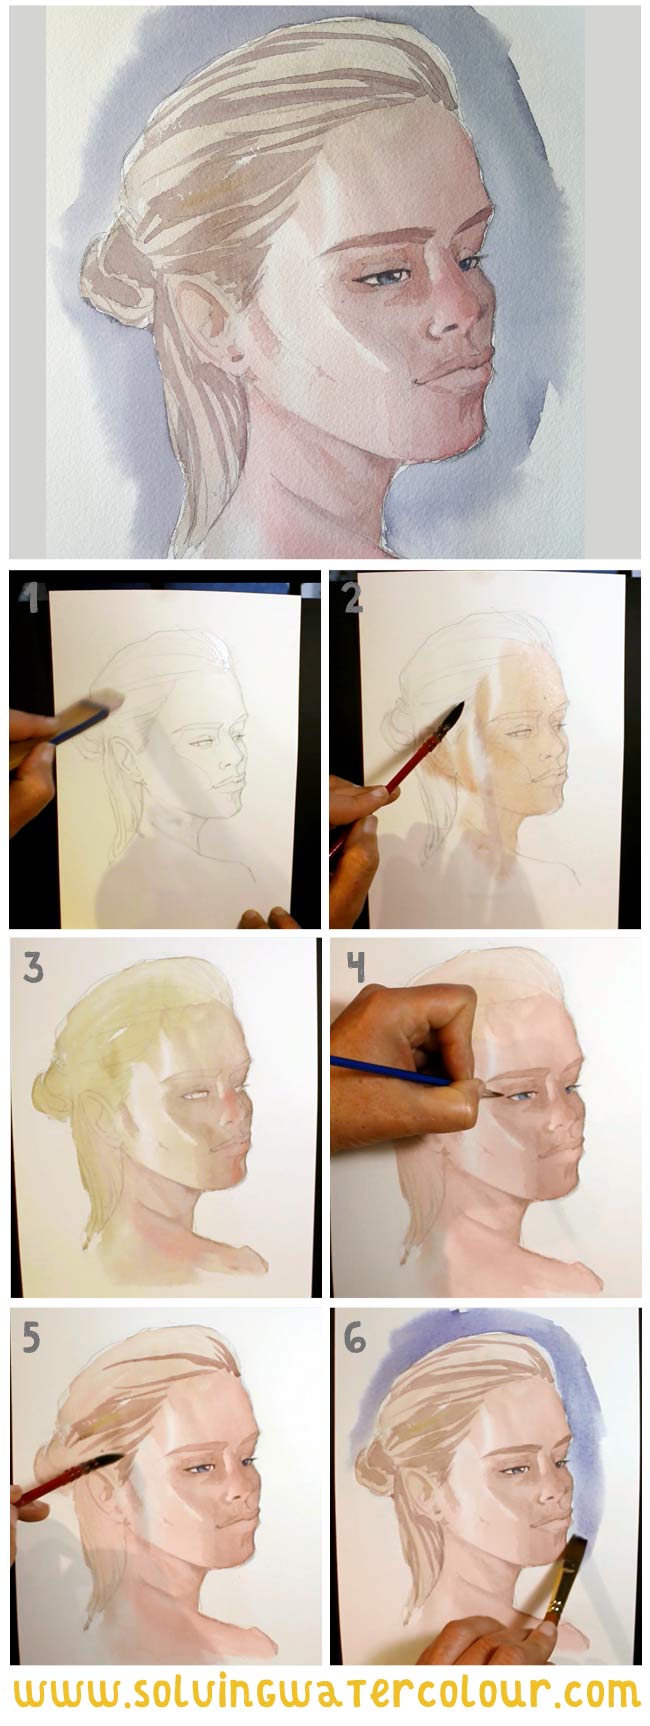
Portrait Of A Young Woman
Once you’ve got a drawing you’re happy with and you’ve done some rough tonal sketches, it’s time to think about colour.
Colour is probably the least important consideration, as any colour will be accepted by the viewer as long as your tonal values are correct.
In the portrait of the young woman above. I’ve just gone for a straightforward, conventional approach and tried to approximate the actual skin tones I was seeing.
I used thin washes of warm earth colours. Raw Sienna, Cadmium Red, Burnt Umber and Rose Madder. In the shadow areas, I cooled and darkened my mix with a little Ultramarine.
In the images below, I’ve shown the step by step progression of this portrait. When painting youthful features, the less lines and hard edges there are, the more youthful the skin will appear to be. So again, I’m painting most of the shadows wet into wet first, as that will tend to produce the smoothest transitions.
- Wetting the whole area with clean water.
- Painting a thin wash of a mix of Raw Sienna, Burnt Umber and Cadmium Red. With a thirsty (Relatively dry) mop brush, I lift out the big highlights on the side of the face. I then allow the whole thing to completely dry.
- Wetting the front of the face and adding a wash of colour with a little added Ultramarine. All the soft edged shading is complete now.
- Using a small detail brush on the eyes and eyelashes.
- Using a No.2 Squirrel hair mop brush to add the hard edged hair shapes. I also add some very thin washes of Rose Madder to the nose, lips and shoulder.
- Wetting around the head and adding Ultramarine background colour wet into wet.
Remember that the soft areas of the face (Cheeks, ears, lips tip of the nose and neck will tend to be warmer in colour temperature i.e redder, as there is more blood under the surface of the skin. The bonier areas such as the forehead will tend to be cooler i.e. slightly more blue. Subtle details like this will add life to your portraits.
For me though, the most important details are those little eye highlights. Make sure you preserve those little white dots, as it will really make all the difference. Don’t stress too much though if you lose them you can always paint them back in with a spot of opaque white gouache.
Watch the YouTube video of me painting this portrait in timelapse.
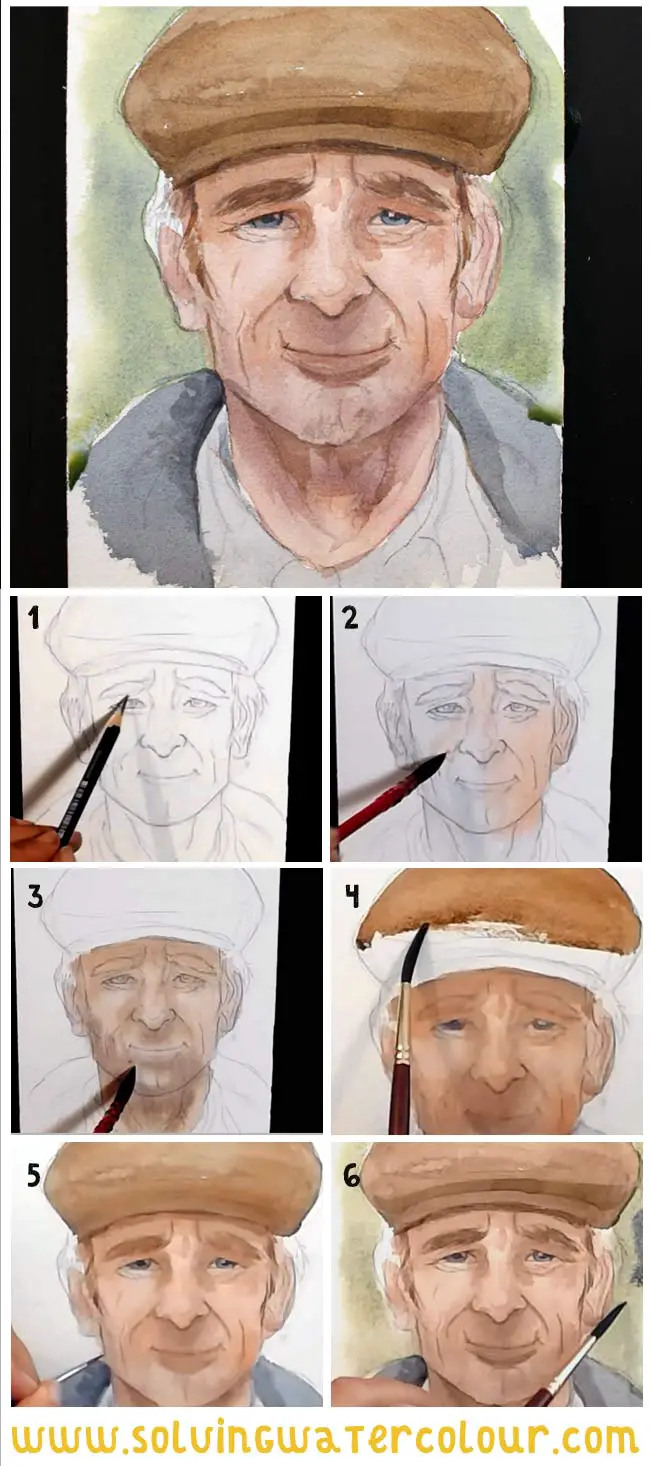
Portrait Of An Old Man
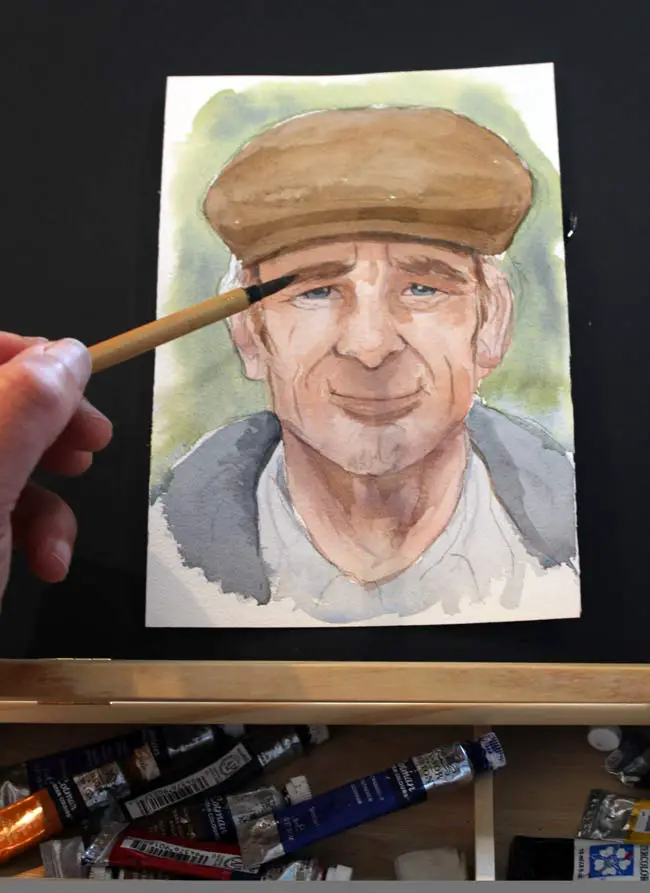
This portrait of an old man followed the same basic method that I’ve already outlined. In this case though, I’m not painting unblemished youthful skin, so I was less concerned with creating smooth wet in to wet transitions and was able to get away with using more hard edged shadow shapes.
Have a go at painting these portraits yourself. Don’t worry if your drawing skills are not up to speed yet. As I mentioned at the start of this post. Drawing is difficult, it takes years of practice.
Repetition is the key when it comes to learning a new skill. My advice is. Focus on one challenge at a time. Download the free PDF files of my portrait sketches that go with this tutorial. You can simply print them out onto A4 sheets of watercolour paper and paint over them as many times as you like.
N.B. Always use the rear feed tray of your printer. That way you’ll avoid thick watercolour paper jamming up your printer. Inkjet printer ink is water soluble so I would recommend drawing over the prints in light pencil first. Laser prints are not suitable for this. The resulting prints are not water soluble but the high temperatures that are needed, also render the paper unusable unfortunately. I use a fairly cheap Canon Pixma inkjet printer myself. Like this one and have never had any problems.
I hope you enjoyed this tutorial. Please leave a comment below and let me know what your biggest watercolour painting challenges are.
Recommended reading
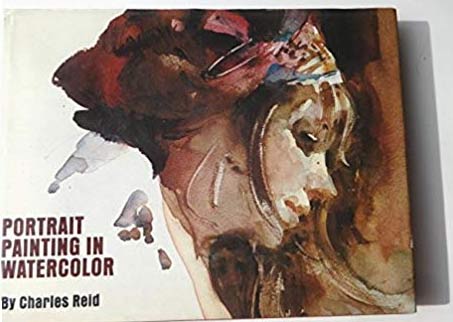
Portrait Painting in Watercolor By Charles Reid is a classic book from 1973. But it’s still available to buy used. Buy on Amazon
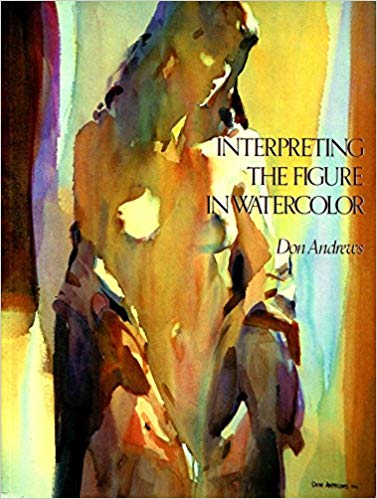
Interpreting The Figure in Watercolor By Don Andrews
I recently bought this book and really enjoyed learning about Don Andrews’ process for producing his wonderful loose figure paintings. There’s so much great information in here. Buy on Amazon.