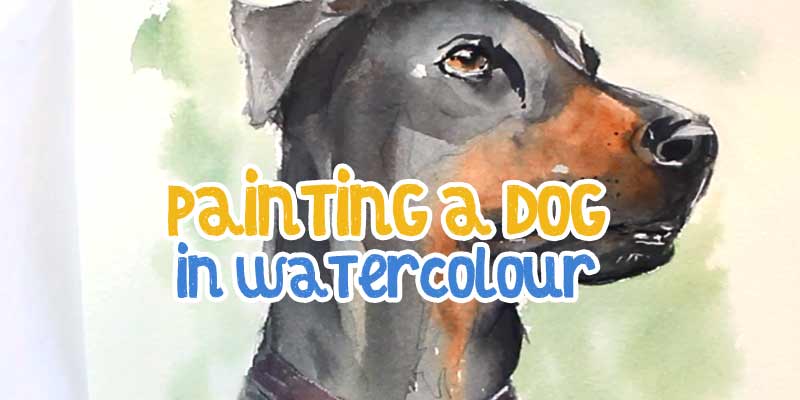
Further to my recent posts about horses and cats. I thought I’d continue with the animal theme and look at how to paint a dog in watercolor. Now I don’t actually own a dog, I found the reference photo (Below) on pexels.com.

If you’d like to follow this tutorial but need some help with the drawing, you can download a pdf file of my drawing here. Print it on to a sheet of A4 watercolor paper. Remember, when printing on to thick watercolor paper, always use your printer’s rear tray. Using your printer’s cassette tray could cause a jam as the thick paper has to bend round the printer’s rollers.
Materials List
Paint
Ultramarine Blue: Winsor & Newton | Daniel Smith
New Gamboge: Winsor & Newton | Daniel Smith
Paynes Gray: Winsor & Newton | Daniel Smith
Burnt Sienna: Winsor & Newton | Daniel Smith
Brushes
Princeton round detail brush 9650R-2 Buy from Amazon
Winsor & Newton Series 150 Bamboo Round #6 Buy From Amazon
Paper
Arches Watercolor Paper Block, Cold Press, 9″ x 12″, 140 pound Buy From Amazon
Miscellaneous
Easy release painters masking tape Buy from Amazon
Adjustable desktop easel Buy From Amazon
Planning In Advance
Understanding how water, paper and paint interact with each other is the first step in planning your painting and really only comes with practice. In this blog post I list the techniques you should be familiar with. Have a look and practice them on scrap paper if you’re not sure about anything.
Study the photo and try and rehearse painting it in your mind first.
Do small postcard sizes rehearsal paintings first to indentify problem areas before you start on a larger painting.
Having a good drawing as your starting point also reduces the guesswork
Apart from the greens in the background, there are only two colors used in this painting, Paynes Grey and Burnt Sienna. As always, the tricky part is to get the right balance of hard and soft edges. In the the first washes, I wanted to allow them to blend. This means painting wet into wet and allowing the two colors the freedom to run into each other.
The danger with wet into wet, is that the colors can and will run into each other somewhat uncontrollably. That’s part of the challenge of watercolor but it’s also part of the fun. When you’re not totally in control of the process you have to work quickly and anticipate problems. It can be frustrating and exhilarating in equal measure.
An alternative method would be to paint the lightest color first i.e. Burnt Sienna. Allow it to dry and then paint the Paynes Grey. It will work but will create distinct and unnaturally hard-edged blocks of color that will end up resembling a painting by numbers picture rather than the loose fresh watercolor painting that for me, is the heart and soul of the medium.
To minimise the paint flow and give yourself a chance, I would suggest keeping the angle of our painting to a maximum angle of thirty degrees. The paint will still flow downwards but not so quickly and uncontrollably.
How To Paint A Dog In Watercolor Step By Step
Steps 1 – 4
I carefully wet inside the lines of my drawing but left a thin line of dry white paper around the eye. This isolates the eye from everything else. This is important because I want to keep the eye pure Burnt Sienna, with no Paynes Grey at all. That small thin barrier of white paper around the eye will ensure that none of the surrounding Paynes Grey will bleed into it.
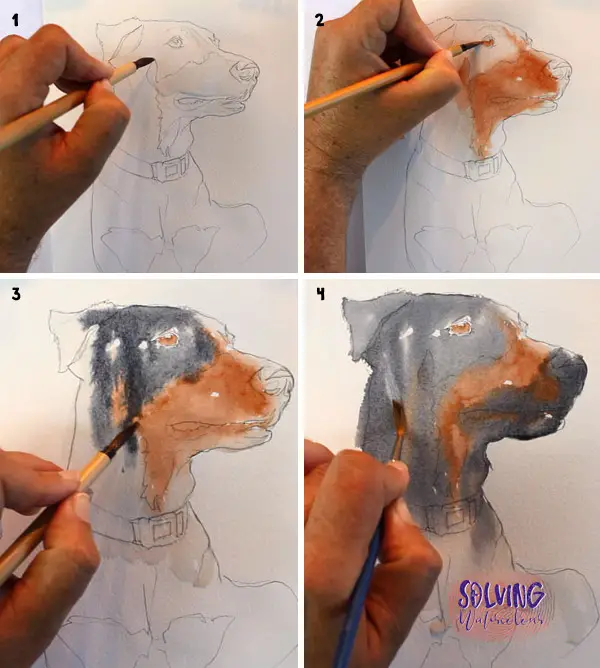
As I bring the wash down I lift out a couple of highlights from the side of the dog’s head with a “Thirsty” round brush. i.e. the brush is clean and only slightly damp. You may need to do this several times so keep a clean rag or some tissue to hand to wipe the excess paint from the brush.

Steps 5 – 8
To complete the initial wash, I dropped in some Burnt Sienna, gently touching the Paynes Grey and allowing the two to blend.
With the initial wash complete it’s time to allow everything to thoroughly dry.
Using a Bamboo brush I add a few shadows with a thin wash of Paynes Grey, under the ear and around the top of the head and muzzle. For the detailing around the eye I swapped my Bamboo brush for my small round detail brush and used a creamier consistency of Paynes Grey. Preserving that little pure white highlight in the eye (Pic 8) is what really brings a portrait to life.
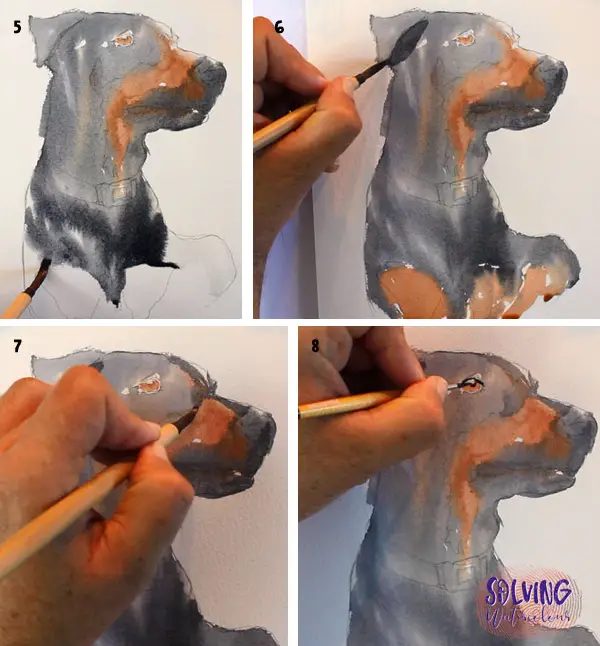
Steps 9 – 12
I added a few more dark lines with my detail brush such as the dark line of shadow on the mouth, the shadows on the nose and under the lower jaw (Pic 10). This is where the painting really starts to come into focus and you may feel a strong urge to start adding black outlines all around your subject. Resist this urge at all costs! Remember, we are just adding a few shadows not inking a cartoon. Think of the direction of the light and the darkest thickest shadows will only be found on the side of the object facing away from the light.
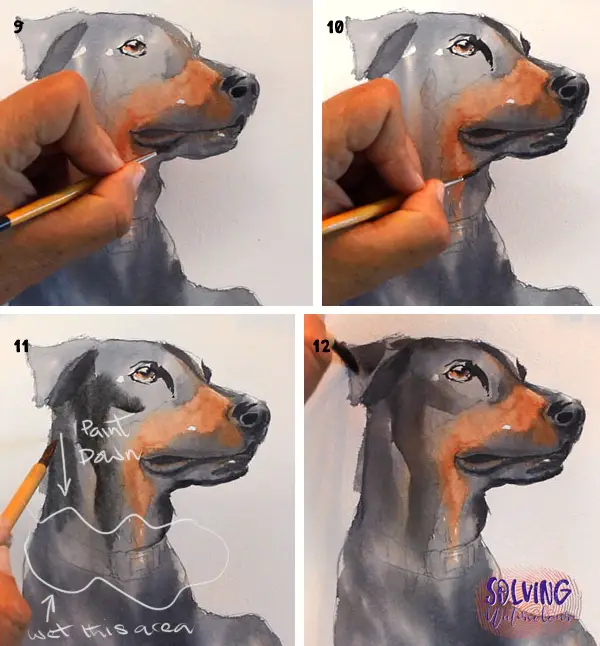
For the shadows on the side of the head, some hard edges are present but I want the shadows to soften and blend out in areas as well. You can take a clean brush and paint some clean water in the areas where you want the shadow to soften out, then take your other brush loaded with paint and paint down into the wet area (Pic 11). Alternatively, you can use two brushes, one loaded with paint and the other with clean water and just soften the edges with the clean water brush. Use whichever method works best for you. I tend to use a combination of both.
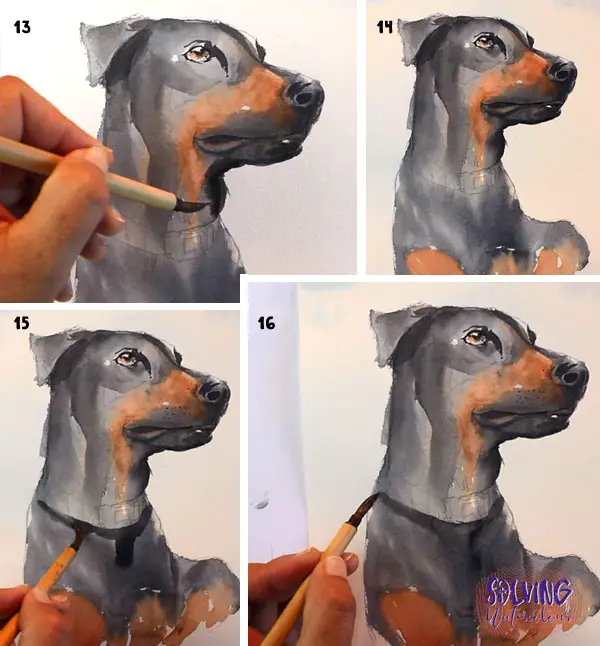
Steps 13 – 16
The shadows on the lower section under the dog’s jaw and collar need to be strengthened, so it’s a similar process of wetting the area with clean water and painting into it.
I added a few little dark spots of Paynes Grey around the muzzle with the detail brush.
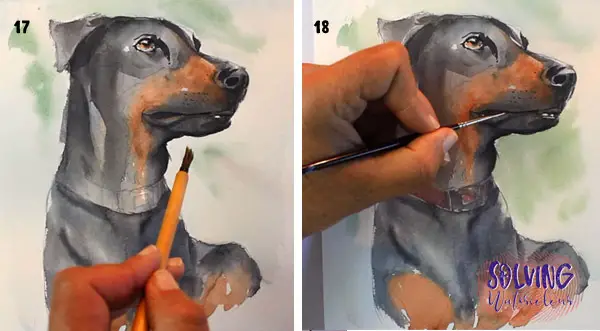
Steps 17 – 18
I decided to leave the collar until last. In the photo, the collar is white with red patterning but in my rehearsal painting the color red, together with highly contrasting white, was drawing way too much attention to itself, so I decided to keep it low key and muted.
Sometimes a detail that works perfectly well in a photo looks all wrong in a painting and it’s not always obvious what it will be, or why. Don’t be afraid to alter the things you feel aren’t working for you.
For the hazy impression of a background that wouldn’t be too distracting, I wet around the dog and dropped in a few subtle greens mixed from combinations of New Gamboge and Ultramarine.
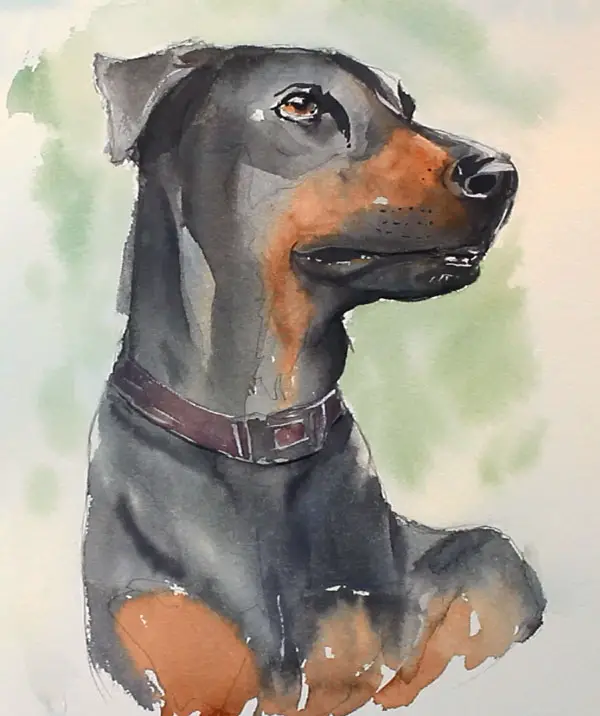
So here’s the final painting below. I felt that a few tiny highlights were needed around the muzzle to indicate teeth and hair and as the paint was too dry too scrape out with a palette knife, I compromised and flicked in a little bit of Titanium White.
I hope you’ve enjoyed this tutorial and feel inspired to have a go at your own pet portrait. Let me know in the comments how it goes.
Watch The Video
Be sure to check out these posts as well
