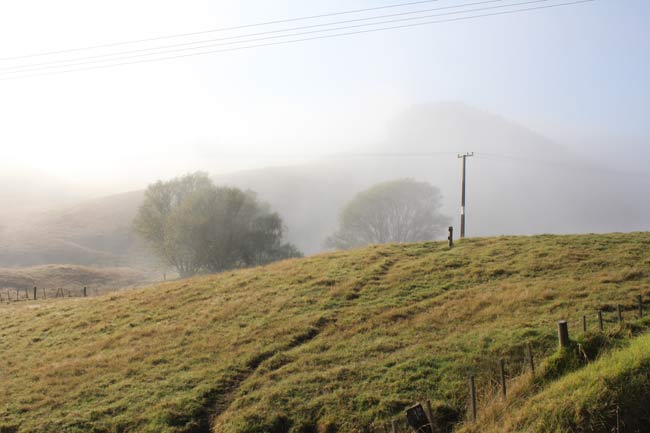
Misty landscapes are great fun to paint in watercolour. The ephemeral nature of mist means that you have to be quick to capture it. I took the photo above last week at about 8 A.M. within half an hour the mist had completely disappeared. O.k I didn’t actually go and grab my paints as I had my camera handy but nevertheless, the subject of mist is one that plays to all of watercolour’s strengths. i.e. Working quickly and loose impressionistic subject interpretation.
I’ve uploaded a timelapse video of this painting in progress. to my YouTube channel it may help you to view this first.
In this post I’ll cover –
- Atmospheric perspective and the illusion of distance.
- Loose painting techniques.
- Abstraction and creative interpretation
- Mixing natural looking greens.
- Wet in to wet and wet on dry painting techniques.
- Thumbnailing tonal and colour roughs
Materials List
Ultramarine Blue: Winsor & Newton | Daniel Smith
Pthalo Blue: Winsor & Newton | Daniel Smith
Cerulean Blue: Winsor & Newton | Daniel Smith
Cadmium Yellow: Winsor & Newton | Daniel Smith
New Gamboge: Winsor & Newton | Daniel Smith
Burnt Umber : Winsor & Newton | Daniel Smith
Alizarin Crimson: Winsor & Newton | Daniel Smith
Paynes Gray: Winsor & Newton | Daniel Smith
Brushes
No. 2 Squirrel Hair Mop Brush Buy from Amazon
No.4 Squirrel Hair Mop Brush Buy From Amazon
Synthetic Squirrel Flat Brush Buy From Amazon
Paper
Arches Watercolor Paper Block, Cold Press, 9″ x 12″, 140 pound Buy from Amazon
Miscellaneous
Misting spray bottle Buy from Amazon
Easy release painters masking tape Buy from Amazon

Roughs and Thumbnails
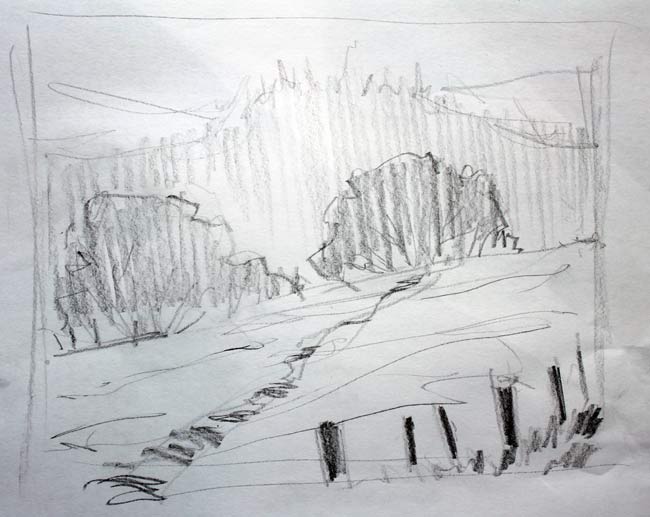
I’ve mentioned before, that it’s always worth spending at least some time planning your painting. What this means in practice is tonal and colour roughs.
A tonal rough can simply be a little pencil sketch like the one below which literally took two minutes to produce. You are simply working out your composition and where your lights, darks and midtones will be in the painting. It’s always a good idea to separate each part of your painting into three distinct tonal areas and assign each of these tones to the foreground midground and background.
I discuss this concept in much more detail in this post on painting landscapes from photos.
One of my hobbies is playing guitar in a covers band. Painting is very much like giving a musical performance along with the anxiety.
You arrange your paints, put your jar of clean water out, lay out the colours on your palette and prepare to perform on your pristine white paper. So producing small rough paintings and drawings will help alleviate your “Stage fright”.
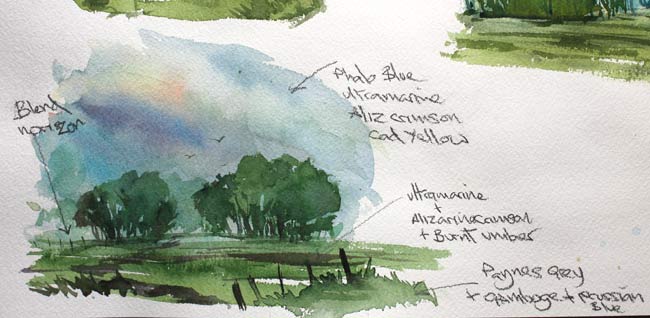
Producing a series of small (Business card size or postcard size) colour roughs will help you to loosen up experiment creatively. In the colour rough shown below, I started to play with the idea of colours showing through the grey mist so I started to add reds yellows, blues and greens wet into wet into my initial background wash.
This produced a “Happy accident”. I ended up with an effect that looked like sunlight pushing through the mist. This wasn’t intentional on my part, it was just something that magically appeared out of an attempt to liven up the background. The lesson here is , you don’t have to create a literal interpretation of your photograph.
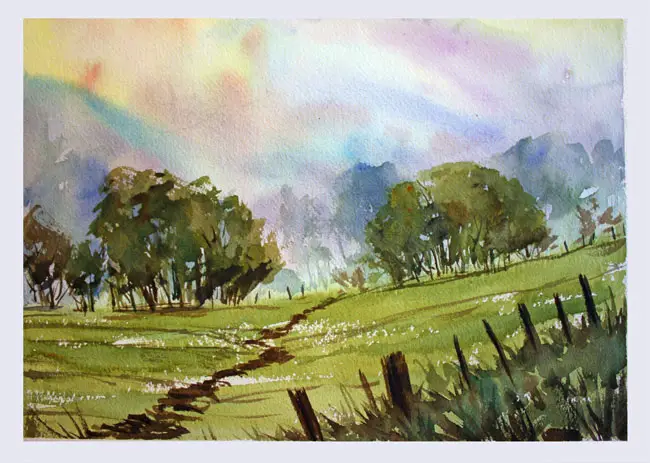
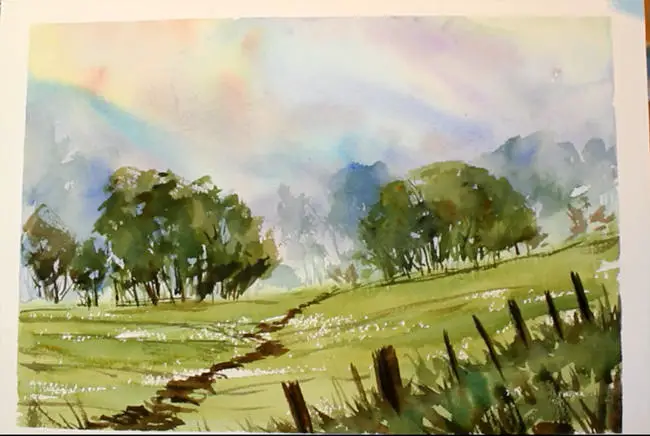
Here is the final painting below. As you can see it looks quite different from my reference photo but the main elements are present. Artists are not recorders of reality we are interpreters and editors of reality, in that sense all art is abstract to some degree.
So let’s go through the painting process step by step.
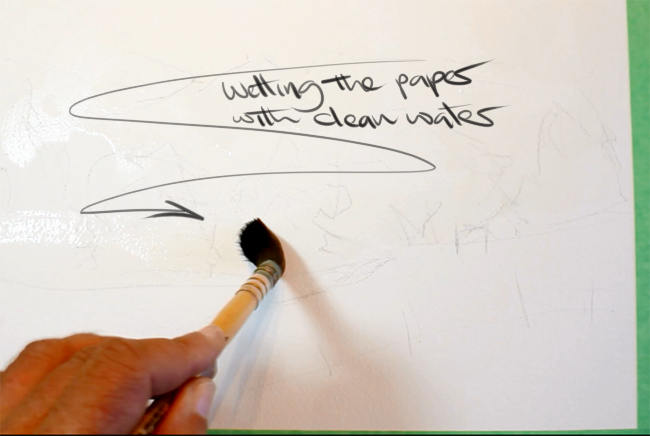
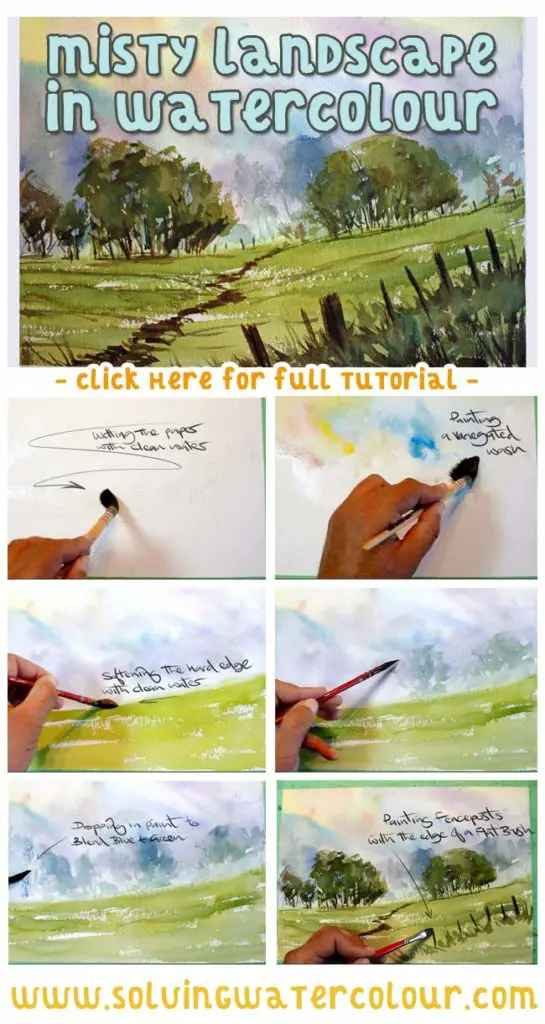
Step 1: Painting A Variegated Wash
A variegated wash is simply a wash of paint that blends multiple colours. I began by painting strokes of clean water on my paper. Rather than completely wetting the paper I painted a series of random S-Curves. When I come to apply paint having the paper partially wet and partially dry will create a nice mix of hard and soft edges.
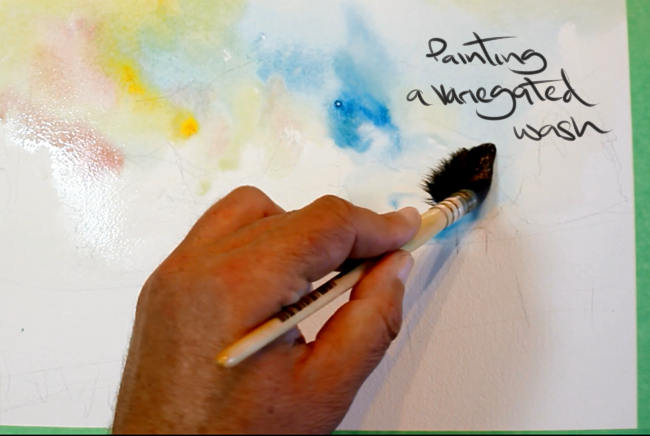
I started dropping in different colours and blending them. It’s important to carefully to clean your brush thoroughly between applications of paint and be cautiousabout what colours you place next to each other. For instance, I was careful not to mix complementaries together such as red and green. Complementaries cancel each other out and create dull neutral colour mixes. Analogous colours are fine though and can be mixed freely.
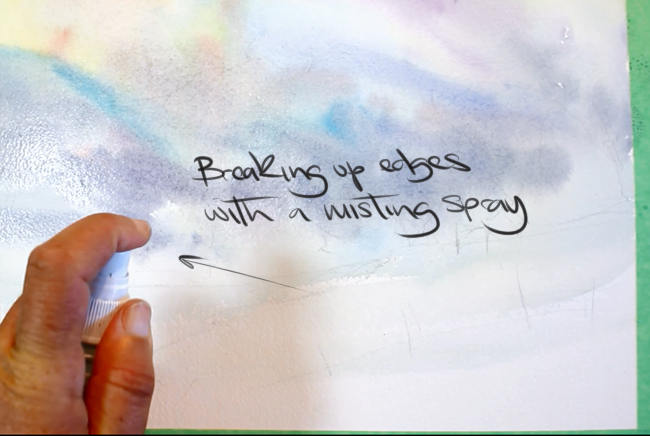
I was definitely free-styling at this point. Just mixing paint on the paper and seeing what happened. With no real plan in mind other than to create some interesting atmospheric effects. When some of my edges got a bit too hard, I was able to hit those edges with spray from my water misting bottle.
As you can see the colours became much more subtle and muted as they dried so don’t panic if your colours seem way too bright at first. To be honest I wish I’d gone brighter in this early stage.
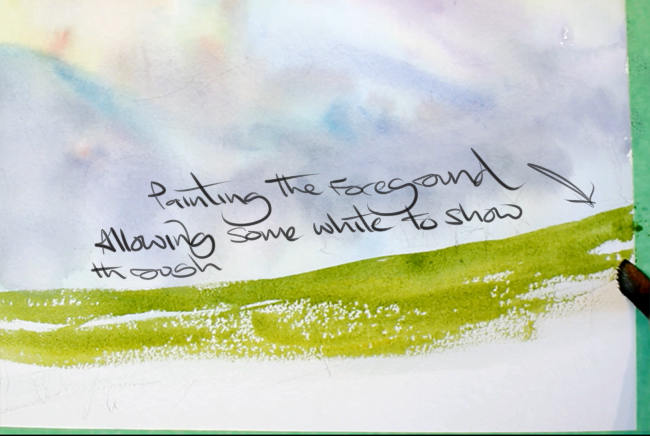
Step 2: Painting the Foreground
Once my background was completely dry, I painted the foreground. If I had strictly followed the rule of painting from lightest to darkest, then I should have painted the midground next but in practice the foreground is completely separate from the background, so it wasn’t going to make much difference and I wanted to establish a definite base line for my trees to sit on.
Mixing Greens
As you can see in the image below, I dragged my brush across the paper allowing the strokes too break up and allow speckles of white paper to show through. This creates liveliness and texture. I also mixed a range of greens on my palette.
Prussian Blue and New Gamboge make a gorgeous warm natural looking green. I actually placed blobs of New Gamboge, Prussian Blue, Ultramarine, Cadmium Yellow and Paynes Grey on my palette and freely mixed between these allowing them to blend in varying degrees but not enough to become one big homogenous puddle of colour. It’s the variation of shades of green that creates a natural looking effect. Try mixing greens greens this way instead of relying on tubes of pre-mixed green.
For more mixing recipes and specifically how to mix greens please refer to the colour mixing post that I mentioned earlier.
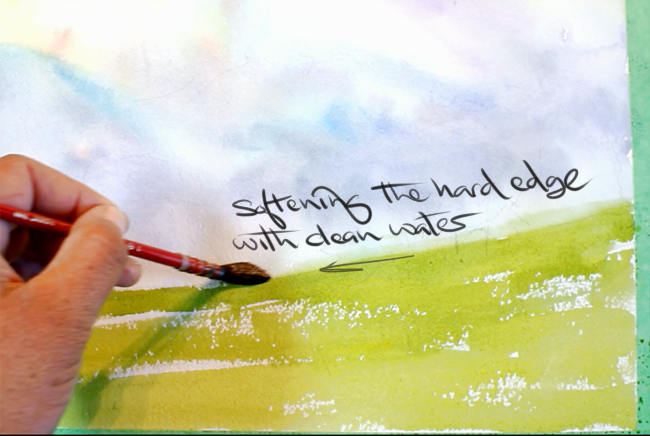
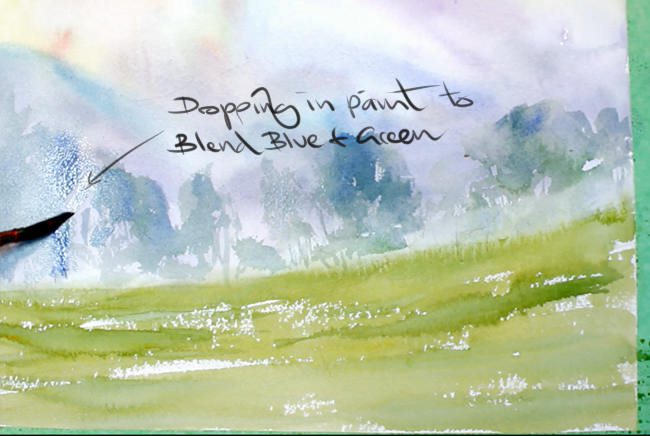
Mist tends to cling to the ground, so before my foreground completely dried I wanted to soften that hard edged foreground. Blurring the separation between foreground and background was simply a matter of taking a brush loaded with clean water and pulling it across the edge.
Step 3: Painting The Midground
Atmospheric Perspective
Atmospheric perspective or aerial perspective is the effect that the air itself has on the way objects appear to the observer. To put it simply, the atmosphere has the effect of making objects appear bluer in colour, lighter in tone and more blurry as they recede into the distance. Mist heightens this effect even more.
To create the illusion of distance in my painting I’m going to add a line of trees in the midground. They aren’t there in my photo but I think they will help add depth to the painting, so I’m going to put some in. Never let reality get in the way of a good painting! The midground trees are going to be bluer, lighter and much less distinct than the foreground trees will be.
Painting a Line of Midground Trees
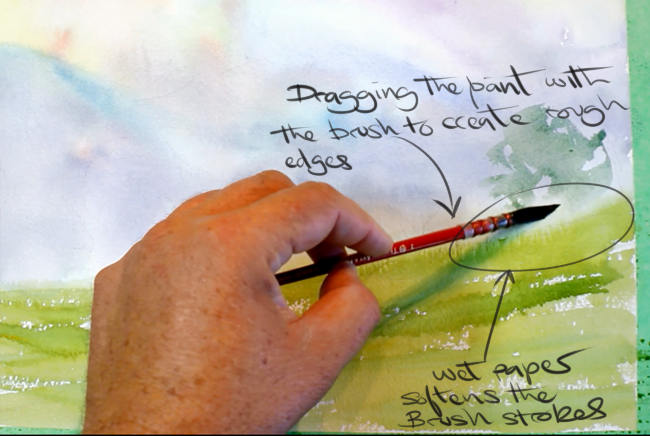
A squirrel hair mop brush is perfect for painting loose lively trees. Dragging the brush on it’s side instantly creates loose impressionistic but believable foliage. A good quality Mop brush retains a perfect point which is ideal for painting the thin lines of branches.
To enhance the effect of trees blending into the mist, I needed to soften the hard edges of the trees. So I took another brush loaded with clean water and and just touched portions around the edges of those trees. Notice also how the trees faded out around the base as I painted them into the still wet paper at the border of foreground and background.
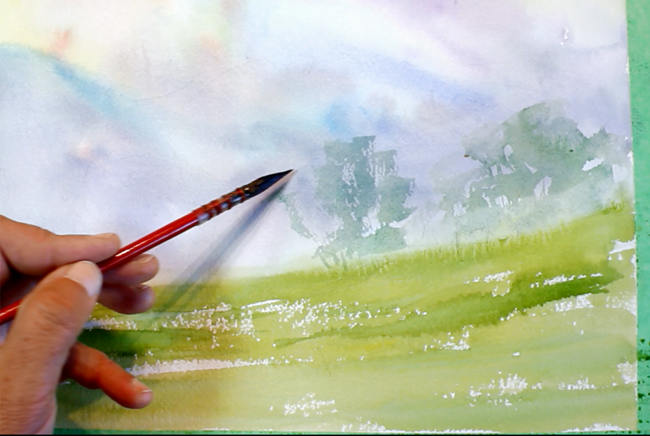
In the image below, I’m dropping a little more more blue into the trees wet in to wet and just allowing it to blend in with little or no brushing.
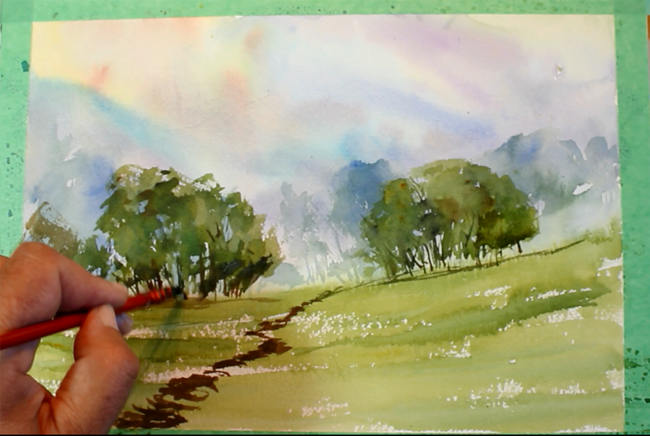
Step 4: Painting The Foreground
The foreground tree were painted in exactly the same way as the mid ground trees. Dragging with the squirrel hair mop brush and painting in the branches with the pointed tip.
The foreground of course is greener and darker than the misty indistinct background. Although the light is very diffused, it is coming from above and that will create shadows on the underside of the trees and on the ground directly underneath them, so it’s important to have a darker mix of green on hand to drop in. Which is what I’m doing in the image below.
The muddy track, painted with a mix of Burnt Umber, Alizarin Crimson and Ultramarine gives the painting a lead -in, directing the viewer’s eye in towards the group of trees on the right.
I’ve added some fence posts and grass creating for the immediate foreground. So there are now four distinct levels of depth all together. A flat brush is perfect for creating short straight lines like this.
You could of course use a round brush here but the flat brush has a knife like precision that’s perfect for regular geometric shapes.
To enhance the sense of depth even more, I’ve reserved my darkest darks for the immediate foreground. The mix of paint here was a dark green mixed from a combination of the yellows and blues that I mentioned earlier, along with some Paynes Grey and warmed up with some Burnt Umber.
It’s almost black but it’s not black. As I’ve said before, pure black is best avoided as it’s rarely found in nature and thus tends to stick out like a sore thumb.

That’s all for this post. Why not give it a go and let me know how you got on in the comments section below?
If you found this post useful be sure to check out these posts on landscape painting too.
How To Paint A Glowing Autumn Landscape
How To Paint A Winter Landscape
How To Paint A Vivid Forest Watercolor Scene
Easy Watercolor River Painting
Pro Tips For Plein Air Watercolor Painting
How To Paint A Loose Watercolor Landscape
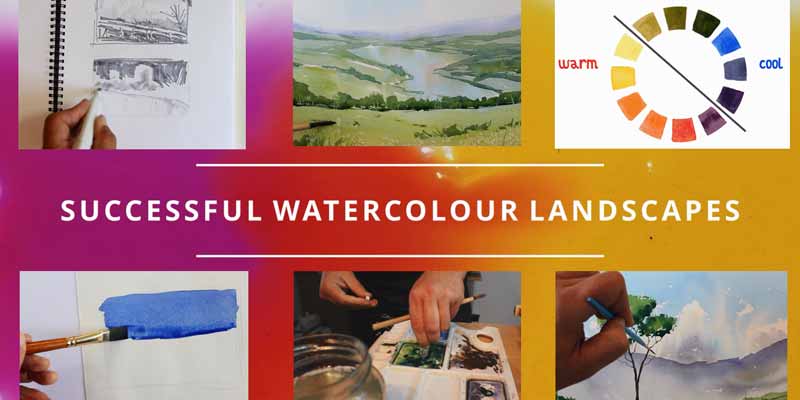
Successful Watercolour Landscapes: Online Course