Do your flat washes turn out streaky, stripy and patchy, often with unwanted”Cauliflowers”? When I began learning watercolor I could never seem to get a consistent even spread of color. If by chance, a wash did turn out well, it was a complete mystery to me how I’d done it. It was only when I went right back to basics that I realised what I had been doing wrong. In my desperation to run before I could walk, I’d overlooked some basic steps.
To paint a perfect watercolor flat wash every time, you need these five things. The appropriate brush for the job, a generous amount of paint, the right amount of water dilution (Think weak tea), a tilted surface to rest your paper on and a reasonably brisk speed of application. The most important factor of all though is maintaining a good bead. I’ll explain about the bead in a moment.
- What Is A Flat Wash?
- Choose The Right Brush For Painting A Flat Wash
- Mix Enough Paint
- Use Tubes Not Pans
- Paint On A Tilted Surface
- Painting The Flat Wash
- Troubleshooting Problems with Flat Washes
- Controlling The Amount of Water
- Keeping Your Work Area Clean
- Alternative Flat Wash Brush Techniques
- How Watercolor Paper Quality Affects Your Flat Washes
- Do You Need To Stretch Watercolor Paper?
- Other Types Of Wash
What Is A Flat Wash?
O.K, let’s go right back to basics. Quite simply, a flat wash is a consistent and even area of diluted color. In watercolor, this will often be a large background area such as the sky or the sea but washes can and are used everywhere in watercolor painting. Painting a consistent flat wash was something was something that I struggled with for months when I first began to learn watercolor painting.
Choose The Right Brush For Painting A Flat Wash
O.K, Put that rigger away! It’s for painting thin lines (e.g ship’s rigging) no use at all for flat washes. Seriously though, there’s no point in using a teeny tiny little brush for painting a wash. You need a large brush that holds a decent amount of water. You have plenty of options available. I routinely swap between a round brush, a flat brush, a hake brush and even a Chinese brush.
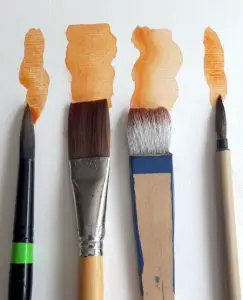
So how big does your brush need to be? That depends on the size of the area you need to cover, of course so it will vary. My hake brush is about an inch thick. But I don’t tend to paint on paper larger than 12″ x 16″. That will probably change in the future though and then I’ll probably go for a larger brush. A good rule of thumb is to go a bit larger than you think you need to, For more on Brushes, see this post “What brushes do I need for watercolors“.
Mix Enough Paint
This is a really important step. Successful watercolor requires a certain amount of thought and planning. Some artists have a tendency to resist this in the belief that it somehow kills spontaneity and free expression. I find that free expression will flows much more easily when you’re not panicking about technicalities, such as mixing and color matching on the fly. Watercolor provides ample opportunity for free expression and all those happy accidents we artists love to experience but remember this isn’t oil painting. Watercolor is a fast, lively medium and a bit of forethought will save you a lot of precious time.
So mix plenty of paint first and get it to a nice runny consistency, like I said, weak tea. Painting with too little paint is called a “Starved Palette”. Keep it vibrant, not thin and washed out. Watercolor dries a lot lighter than it looks at first, so don’t worry if it appears too dark initially.
Use Tubes Not Pans
I prefer to use tubes of paint instead of pans and a large palette with deep wells. The English painter, Ron Ranson, used a wide hake brush and a big plastic butcher’s trays for palettes. If you try and paint with a large brush on small pans you will probably end up getting unwanted color on your brush and you’ll watch in dismay as your lovely Azure blue sky turns a sickly green. It’s a bit like trying to clean a floor using a mop and a cup. It could in theory be done but why would you want to? Tubes are just quicker and easier to use and you don’t have to wet them first to get them flowing. Pans do have their place though, I often use a light portable set of pans for quick plein air studies.
Paint On A Tilted Surface

As I said, a 15 to 30 degree angle is about right. Why angle it like this? When your painting surface is angled your paint flows down with gravity, ie down, not up, or sideways and that predictability is useful as I will demonstrate. Also as the paint flows down, the wash tends to even itself out. If the angle is too steep though, the surface tension will break and unwanted drips will tend to occur.
If you want to tape your paper down, you’ll need something stable and flat. You could use a draughtsman’s board or if you want to keep it cheap and cheerful. A plywood board propped up with a book will do, I sometimes just use a lever arch file to rest my watercolor block on.
Painting The Flat Wash
Load your brush well with paint. Hold the brush down towards the towards the tip of the handle and pull it across the paper in a straight sweeping line. Try to paint with your whole arm rather than just from the wrist and keep the stroke light but confident. Don’t try and cover too much distance in one stroke or your brush will start to run dry. If the consistency of your paint is right, a bead of water will form at the bottom of the line you just painted. Remember I mentioned the bead earlier? The bead is your friend. As long as there is a bead, you can continue to extend the wash down the paper until it’s finished. Keep a consistent amount of paint on your brush and keep painting, brushing from side to side and pulling it way down the paper. You may need to control the amount of paint on your brush by blotting it occasionally, then you can use it to soak up some of a bead that’s getting too wet. Leaving the bead to pool and dry will also cause a noticeable stripe at the base of your wash.


kitchen roll on hand just in case. Once the bead is dry, you won’t be able to add any more to it without causing a visible stripe. So painting smoothly and reasonably quickly is the key.
Troubleshooting Problems with Flat Washes

Watercolor is considered by many to be the most difficult medium to work in. Success is heavily dependent on getting everything right first time. And it’s mostly true. Once you’ve made a mistake there’s very little you can do to correct it. You can try and re wet the wash and paint over it but painting color over a dry wash will make it darker. Disturbing the surface of the paint with a brush can lift patches out of some areas and deposit it in others often making things worse. It’s always noticeable to some degree and the painting very quickly starts to lose it’s freshness if you try and rework it too much. So remember. When painting watercolor in general, an ounce of prevention is better than a pound of cure.
Controlling The Amount of Water
As I’ve already covered. If the bead dries up on you before you finish painting the wash, this will inevitably lead to uneven paint coverage, full of streaks and patches. One thing you can do while painting, is to keep a spray mister bottle on hand and lightly spray drying areas with water to keep them damp. Beware though. The paint will start to bloom and spread in all kinds of unpredictable ways. This isn’t necessarily a problem if you are painting fluffy cumulonimbus clouds in a hazy sky but it’s a big problem when trying to preserve the hard edges of, for example, a mountain range, or the side of a building. Masking fluid can of course be used to retain hard edges but masking fluid can cause it’s own complications, such as smudges and tearing up of the paper surface on removal.
Cauliflowers (Also called back runs) are caused when a wet area is painted over with paint that contains more water than is on the paper. There are definite “Danger Zones” to be watchful for in watercolor painting. When the paper is “Puddle Wet” you are in a safe zone the paint can be manipulated without fear. “Bone Dry” Paper is also a safe zone you can add a glaze over the top or re wet it and continue painting. When the paper is starting to lose it’s shine, this is the greatest danger zone. Adding weak tea consistency paint at this point will tend to cause back runs. To avoid this, you will either need to wait for the wash to dry completely, or thicken the consistency of your paint significantly. A creamy thickness can work or maybe even just straight out of the tube.
Keeping Your Work Area Clean
Stray hairs and other bits of debris can cause problems when painting flat washes. I tend to work at the dining table and my children are very messy eaters. So it’s important to give things a good clean up with a damp cloth and organise your work space before you start working. Keep your painting area well organised and free of clutter. If you have pets, hairs can easily find their way onto your painting. Hake brushes that I’ve bought tend to shed hair like a mangy cat. At least they do until they’ve been used quite a few times. If you find offending debris in the middle of beautiful flat wash the best thing you can do is just leave it alone and wait for the paint to completely dry before making any attempt to remove it.
Alternative Flat Wash Brush Techniques
One problem inherent in the flat wash method that I’ve outlined above is simply. i.e simply painting in even horizontal strokes is that banding can sometimes occur. Some watercolor artists paint in a cross pattern or radiate their washes out in a star pattern. This avoids banding and minimizes paper buckling but creates the problem of trying to juggle several beads at once. I personally prefer to paint in horizontal strokes but then I haven’t practiced the other methods much. It’s definitely worth trying them out though to see which works best for you.


How Watercolor Paper Quality Affects Your Flat Washes
Watercolor Paper comes in a range of brands, textures, weights and formats. Cheaper papers are made from wood pulp and will absorb water and pigment much faster than high quality 100% cotton papers making it more prone to streaks and runs. Sizing is the substance that is applied to a paper in order to retard its absorbent properties. The amount of sizing can vary from brand to brand. After using ridiculously cheap wood pulp papers for about a year ( It probably wasn’t even really watercolor paper except in appearance and I suspect it had no sizing whatesoever) and wondering why my washes lacked all vibrancy I switched to good quality 100% cotton papers such as Winsor and Newton and Arches and suddenly saw a massive improvement. I recommend using good quality 100% cotton watercolor papers every time. Cheap papers are o.k for learning but at some point you need to make the leap to a good quality paper if you want to improve.
The papers weight. i.e thickness, is a major factor. If you are using a thinner paper then you may need to stretch it first before you begin to paint on it. Painting flat washes on thinner unstretched watercolor paper will tend to lead to buckling or “Cockling”. I recommend painting on at least 300gsm (140lb) paper. If I use a thinner paper than this the buckling tends to become unmanageable, leading to puddles, pools and inconsistent drying.

Do You Need To Stretch Watercolor Paper?
I’ll let you into a secret, I never stretch my watercolor paper. Firstly, I don’t like to feel tentative about starting a painting. An expensive piece of pristine white watercolor paper is already intimidating enough. To stretch paper, it is necessary to tape it to a board with masking tape and wet evenly with a sponge, then allow it to dry naturally or you use a hairdryer. I’ve gravitated to Arches watercolor blocks for general use, as it’s a great quality paper and it can be bought in in a “Block” (Each sheet glued on four sides). When the paper is in a block like this buckling tends to be minimal on 300gsm weight and non-existent on 600gsm.
However, as a general rule, If you are using watercolor paper thinner than 300gsm (140lb) then you probably need to stretch it first before you begin to paint on it. Painting flat washes on thinner unstretched watercolor paper will tend to lead to buckling or “Cockling”. If I use a thin watercolor paper the buckling tends to become unmanageable, leading to puddles, pools and inconsistent drying.
Cold Pressed Vs Hot Pressed. Cold pressed paper has a medium textured surface and is the most commonly used type of paper. Hot Pressed paper is smooth. It is more difficult to get an even flat wash on hot pressed paper than on cold pressed. One needs to resist the temptation to go back in with your brush and attempt to even out the wash. Pre-wetting the area in which the wash is going to painted can help with this.
Other Types Of Wash
Two other types of wash that you need to have in your toolbox are the Graduated (Sometimes called Graded washes) washes and Variegated washes. A graduated wash is where a wash evenly transitions from a darker shade to a lighter one, such as in painting a sky for instance. A Variegated wash is a wash that contains one or more transitions into different colors I’ll discuss how to achieve those washes those in more detail in another post until then “Happy painting”.
If you need some help trying to select appropriate art supplies for your needs I’ve put together a list of my recommended art supplies.

The most comprehensive yet clearly understandable presentation of this basic procedure.
Thanks Will!