
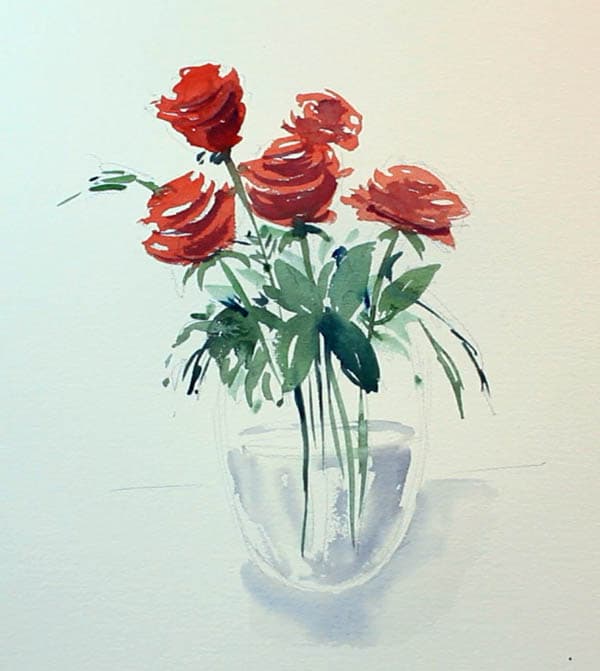
This loose painting of a vase filled with roses can be done with only one or two brushes in less than ten minutes.
In this post I will cover the following:
- How to Paint loose watercolor roses
- Rough Sketching Tips
- Wet in to wet techniques
- Colour Mixing & Theory
- Lost and found edges
Materials List
Ultramarine Blue: Winsor & Newton | Daniel Smith
Pthalo Blue: Winsor & Newton | Daniel Smith
Paynes Grey: Winsor & Newton | Daniel Smith
New Gamboge: Winsor & Newton | Daniel Smith
Rose Madder: Winsor & Newton | Daniel Smith
Alizarin Crimson: Winsor & Newton | Daniel Smith
Brushes
No. 2 Squirrel Hair Mop Brush Buy from Amazon
Princeton Neptune Synthetic Squirrel Round Brush Buy From Amazon
Paper
Arches Watercolor Paper Block, Cold Press, 9″ x 12″, 140 pound Buy from Amazon
Miscellaneous
Easy release painters masking tape Buy from Amazon

Reference Image
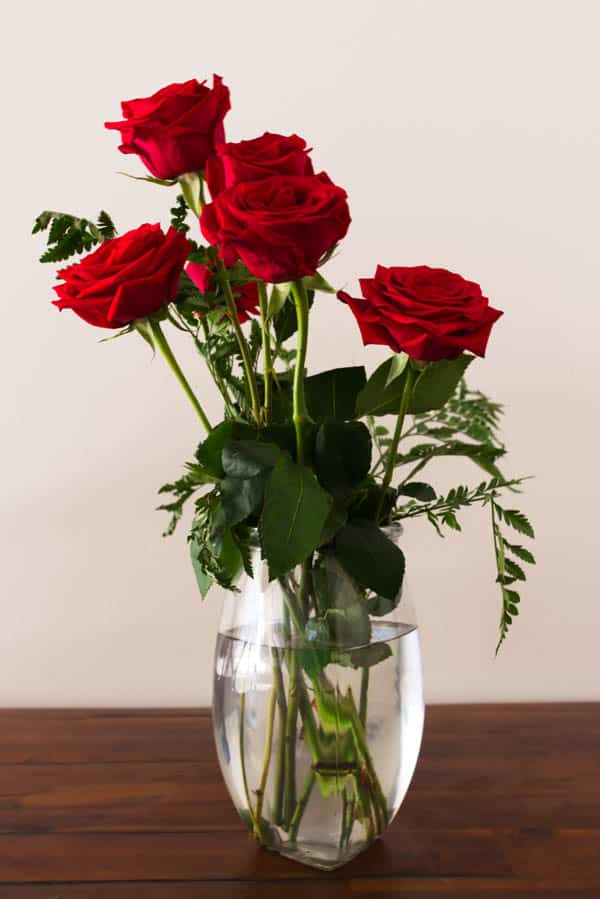
I found this image of a vase of roses on the free image site pexels.com which is a great source of reference photos if you’re ever stuck for an idea of what to paint.
Sketching The Reference Photo
If the subject has enough complexity, it can be useful to start from a sketch. A loose painting needs a loose sketch though, or you may be tempted to put in too much detail, or follow the sketch too closely.
Put in enough detail to know where all the elements should be placed but leave it rough enough to encourage you to do most of the drawing with the paint brush.
It seems a bit counter intuitive but loose painting becomes easier when you’ve done some planning. Planning allows you to focus on the painting rather than the techniques.
Tip: The way you hold your pencil influences the way you draw. Holding it like you would write with a pen will usually result in stiff lifeless drawings. Holding it like a brush encourages you to be loose and spontaneous. Try it!
Pre-Mixing Colors
When you mixing your colors in advance, it leaves you free to simply paint. This particular painting is obviously dominated red and green. Red and green are complementary colors and in this recent blog post I wrote about this particular color relationship, so I won’t repeat it here. Suffice it to say, red and green is a striking color contrast that immediately draws attention.
Green can be quite overpowering, so to add some subtlety and variation to the painting I mixed up a range of greens from light to dark. My light to mid – greens were mixed from New Gamboge and Ultramarine and my dark green was mixed from New Gamboge and Pthalo Blue.
Painting Colored Shadows
Local Color: The color of an object as it appears in normal lighting conditions. E.G. A yellow lemon, a red shirt etc.
Perceived Colour: The effect of colored light and reflected light on an object.
Shadows are rarely just shades of grey, they are colored by reflected light from the environment, from the objects that cast them and the local color of the object that they fall on .
So how do we best paint a convincing shadow?
Simply adding grey or black to make a darker version of the colour can sometimes work but in general this will just create unconvincing dull looking shadows.
Unless they are modified significantly by light from the surrounding environment, shadows that appear on an object tend to be cooler (ie bluer) and darker versions of that object’s local color. So by adding the coolest or darkest adjacent color we can create shadows which are still colorful and vibrant.
To make this a bit easier to understand. In the diagram below, I’ve laid out the color wheel in a straight line.
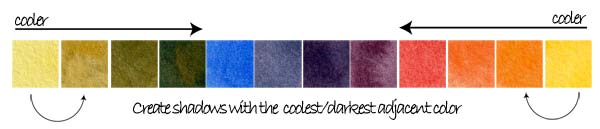
So when we come to paint the shadows on the roses we need to look to the coolest adjacent colour to red, which is violet.

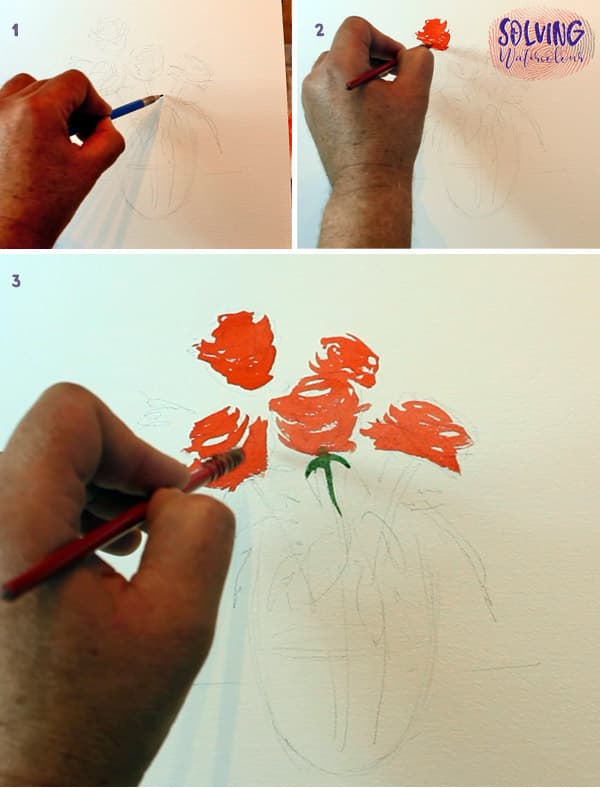
- Begin with a light sketch of the reference photo. I used a mechanical pencil with an HB lead.
- Mix up plenty of Rose Madder, then with a No.2 mop brush start painting the heads of the roses with short curving strokes.
- Carry on painting the rest of the roses in the same way making sure that you leave some white space between the strokes.
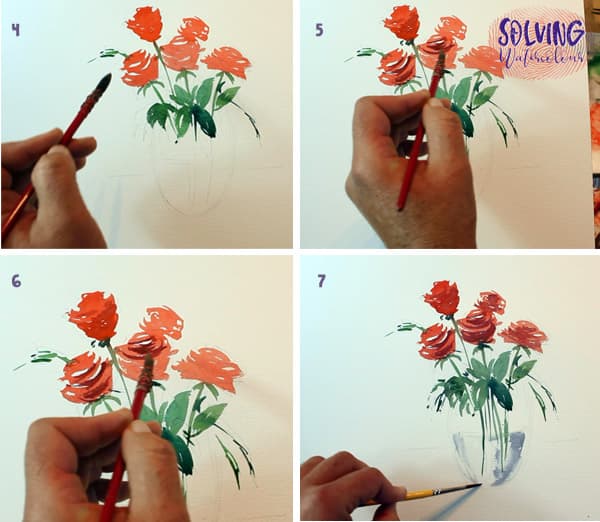
- I began adding stems and leaves with my mid-green, occasionally adding some darker greens for variation.
- Alizarin Crimson is a darker and cooler red than Rose Madder, so mixing this with a little Ultramarine pushed it towards the necessary shadow violet shadow color.
- Start paint the shadows on each of the roses.
- Using a small round brush dragged downwards paint the blue watery reflections within the vase.
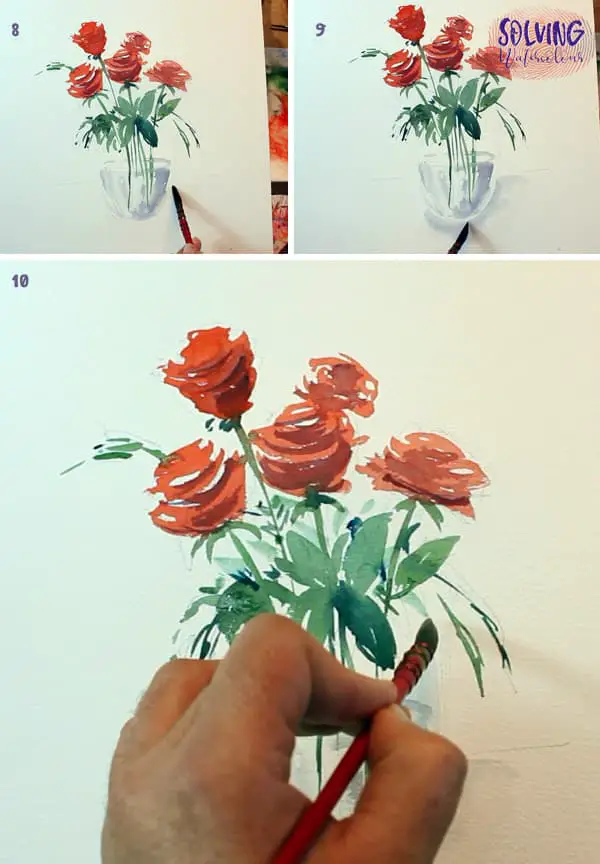
Painting The Vase
Glass and water are colorless , but they can be defined by shadows and reflections rather than painting an outline around the shape vase itself .
- I start by painting clean water where the shadow cast by the vase will be.
- Painting into and up to the edge of the water line with a little Paynes Grey mixed with Ultramarine, creates a diffused shadow and a “Lost and found” edge which suggests the presence of a vase.
- Finish the painting by adding a few more leaves and ferns where necessary.
Watch The Video
Need more help with this? Watch the full real-time video of this painting from my YouTube channel.
If you found this post useful you may also be interested in the following posts.
How To Paint Loose Watercolor Flowers
How To Paint Cherry & Apple Blossoms
How To Paint Fall leaves

I’m a beginning watercolourist. I tend to paint too tightly, so I thought these roses would be a good exercise for me. The video was very helpful – to see how you hold your brush and how you paint your strokes. I painted these roses this afternoon, and I tried to emulate the way you did your painting. Thanks for making this tutorial and the video!
Thanks for the comment Vivian, glad to know you found it helpful