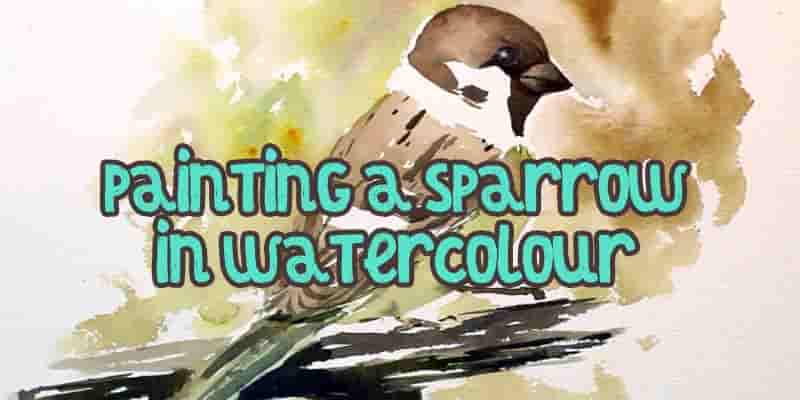
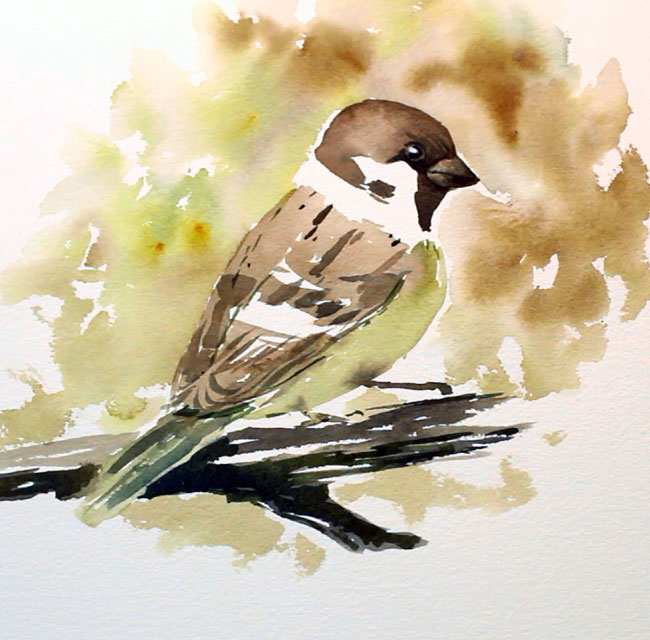
In this tutorial I’ll take you step by step through the process of how to paint loose watercolor birds using the example of this sparrow below.
In this post I will cover:
- What loose watercolors are
- How to paint in a loose style
- Color harmony
- Wet in to wet painting
Materials List
Ultramarine Blue: Winsor & Newton | Daniel Smith
New Gamboge: Winsor & Newton | Daniel Smith
Burnt Umber : Winsor & Newton | Daniel Smith
Alizarin Crimson: Winsor & Newton | Daniel Smith
Paynes Gray: Winsor & Newton | Daniel Smith
Brushes
No. 2 Squirrel Hair Mop Brush Buy from Amazon
Synthetic Squirrel Flat Brush Buy From Amazon
Princeton Neptune Synthetic Squirrel Round Brush Buy From Amazon
Da Vinci No.4 Petit Gris Round Mop brush Buy From Amazon
Winsor & Newton Cotman 111 Round No.3 Buy From Amazon
Paper
Arches Watercolor Paper Block, Cold Press, 9″ x 12″, 140 pound Buy from Amazon
Miscellaneous
Easy release painters masking tape Buy from Amazon

What Are “Loose” Watercolors?
A loose watercolor painting is one that is painted quickly and freely with lively brush strokes. In a loose paintings, the aim is to try and capture the essence of a subject in broad spontaneous strokes, as opposed to a slow painstaking photographic detailed rendering.
Successful loose watercolor paintings have an appealing freshness and energy about them that is particularly suited to this medium.
How To Paint Loosely
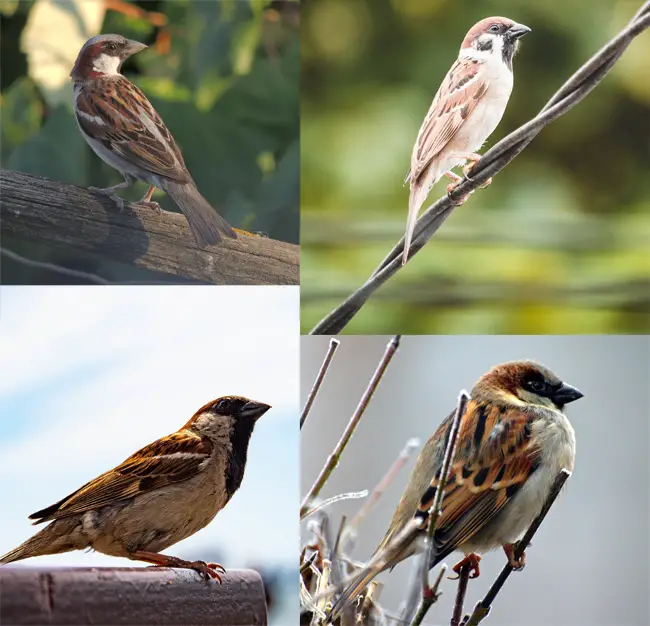
Understand Your Subject
Drawing the subject in pencil first will help you to paint it. A drawing is like the framework of a building and the painting is like the cladding. I would suggest that developing drawing ability is actually more important than painting in many ways.
Build Your Confidence Through Repetition
Loose painting is confident painting, and the best way to build up your confidence in anything is to do it over and over again. Don’t be afraid to paint something five, six or as many times as you need until you can do it consistently. Repetition is particularly useful if you’re trying to paint in a loose style.
You will find that after running through the painting process several times you will begin lose your hesitancy. Your brush strokes will become bolder and faster. You will find yourself adding flourishes and experimenting rather than being afraid to make a mistake.
The trick is to paint smaller versions first. Start at credit card size and work up before attempting to paint on a larger scale. Spending a few minutes at a time on mini-paintings will become an easy warm up for you whereas spending hours will become tiresome and drain your enthusiasm.
Drawing With A Brush
The outline sketch that we normally draw is a bit like an architects plan. The more information that is present in the drawing, the less that we have to spontaneously create on the fly in the painting stage. If we draw a very tight detailed sketch, all we essentially have to do is color it in at the painting stage. In that sense, the pencil drawing can end up becoming a crutch to lean on.
Try taking away the pencil altogether and just draw with your brush. You may feel a bit like a trapeze artist without a safety net at first but with time and confidence it will become spontaneous and fun.
Simplify The Details
Focusing on the largest shapes first will help you simplify the painting. Concentrate on the positive and negative shapes. To put it simply, the positive shapes are the darks and the negative shapes are the lights (Or areas that you are going to leave completely white). Once you have the basic shapes in place, you can work your way progressively down to the small details.
Limit Your Brush Strokes
This is a great practice to develop anyway. Think about every brush stroke you make. Is it necessary? Is it adding anything to the painting, or are you just floundering, making mindless marks? Every brush stroke you make is like adding words to a story.
Try and tell that story concisely and you will be communicating clearly. So think before you brush. Will the next marks you plan make support the story or just end up being random noise?
In general your watercolor paintings will always look better, fresher and more spontaneous, the less brushing that you do.
Know When To Stop
Knowing when to stop, is the dilemma that every artist faces. It’s particularly important to be mindful of overworking your painting as a watercolorist because of it’s additive nature.
Adding watercolor paint is like salt in cooking. You can always add more but you can’t take it away. Err on the side of doing too little, rather than too much.
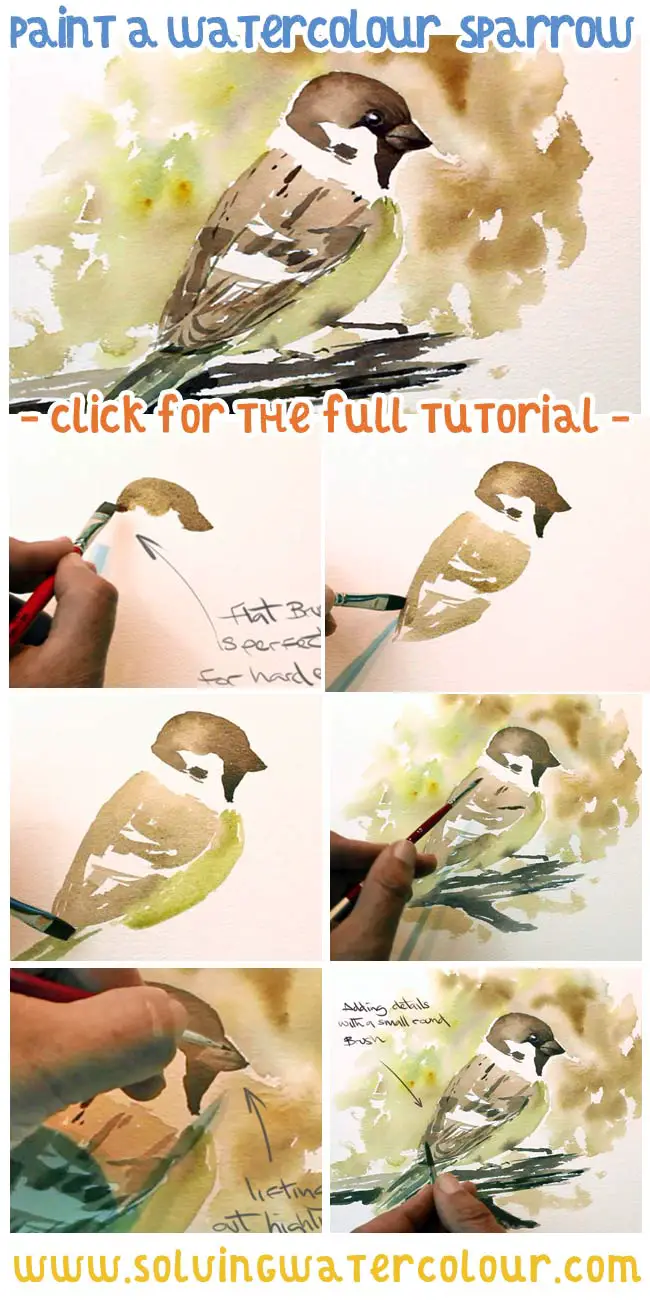
Painting A Sparrow Step By Step
Total painting time for this was about twenty minutes not including drying times.
Male sparrows have patches of dark rich chocolate color. Burnt Umber is a good starting point but to really give the color a lift try adding a little Ultramarine Blue and Alizarin Crimson.
Practice Studies
I did no pencil drawing at all for this painting but as I’ve previously mentioned, I didn’t just go in cold. I did some pencil studies to understand the basic shapes then I did several small warm-up paintings experimenting with a couple of different brushes.
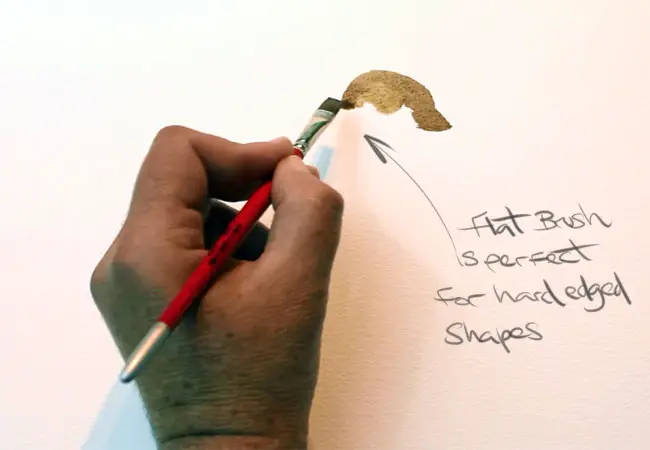
A round brush works well for most watercolor painting techniques, it’s basically the Jack of all trades of watercolor brushes. However for the mixture of round and angular shapes that constitutes a bird’s silhouette, I found that for me, a flat brush was really the perfect match.
I would really encourage you to test this for yourself though, as you may disagree, or find something that works much better for you. A short dagger brush for instance, may be an even better option.
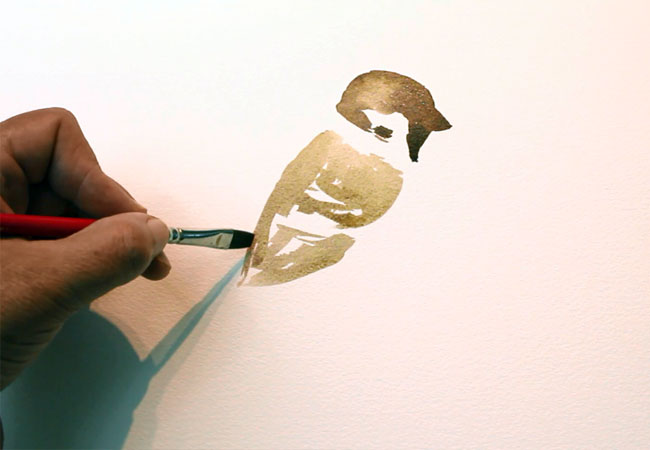
I continued painting the largest shapes with my flat brush. I’ve only painted two colored shapes, The patches of white space between them what I previously referred to as negative shapes .
Using Negative Space
When you place two shapes slightly apart from each other, you create the optical illusion of a third shape in between them. The eye reads these negative shapes as part of the whole. There is enough visual information there for your brain to literally fill in the blanks. There’s no need for me to paint the line of the neck.
I’ve also left some white space on the body to indicate the shape of the wings.
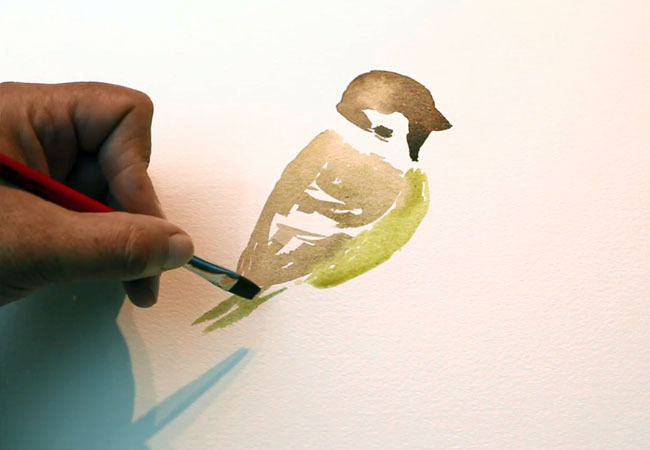
The next large shapes that I painted were the bird’s breast and the branch that it’s perched on.
I used a very dilute pale mixture of New Gamboge and Ultramarine for the green blue breast and tail feathers, and a combination of Burnt Umber and Ultramarine Blue for the branch.
To paint the bird’s legs, I used the edge of the flat brush. See how the legs bled into the body creating little shadows for me on the underside of the bird’s body. I love it when a watercolor starts to paint itself! Allowing these moments the opportunity to happen is all part of the fun of letting go that you need to do when painting loosely.
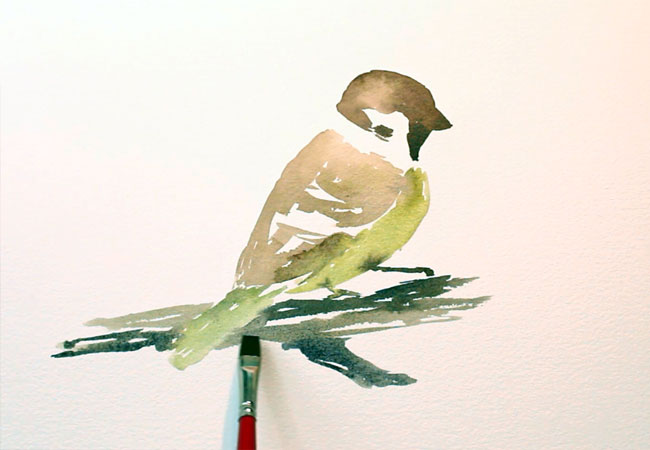
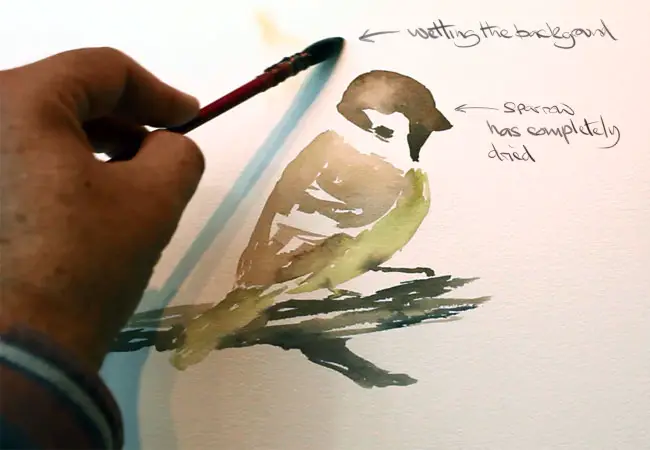
Up until now, I’ve painted mainly hard edged shapes with wet paint on to dry paper. When it came to painting a loose background for the Sparrow, I just want to create the impression of foliage and trees. Painting wet into wet is the ideal technique for creating impressionistic indistinct backgrounds.
I needed to wait for the sparrow to completely dry first, as I want to keep the contrast between the clean hard edges of the bird and the soft edges of the background.
Taking a small mop brush, I wet the area around the sparrow. These patches of water were placed fairly briskly and randomly, though I did take care to avoid wetting the sparrow by painting around it.
I didn’t want my background to bleed into sparrow, though a little is acceptable as I don’t want a solid looking hard edge around the sparrow as that would create a white “Halo” or give it a “Pasted on” look.
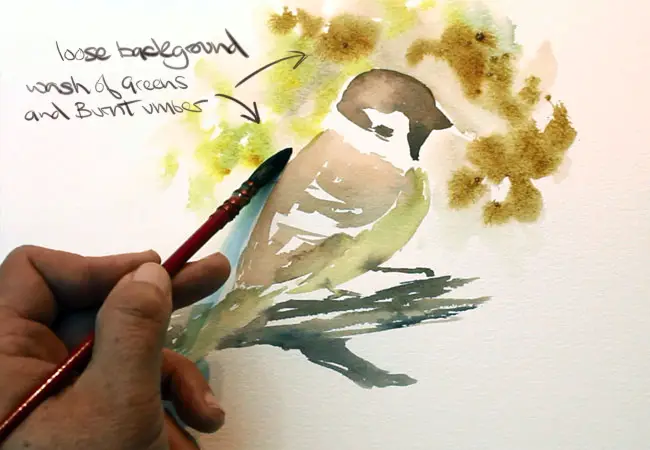
Creating Color Harmonies
I made sure that I had plenty of Burnt Umber, New Gamboge and Ultramarine Blue to drop in, to my wet in wet wash, creating a range of browns and greens that can flow and mix together.
The greens and browns that this painting primarily consists of, are harmonious colors. This means that they are close together on the color wheel.
Secondary & Tertiary Colors
Green is a secondary color, meaning that it’s made by mixing together two primary colors.
Brown, while not usually indicated on the color wheel is actually very close to green. It is a tertiary color. Meaning, a color that is made by combining two secondary colors or a secondary and a primary in this case green and red.
Limiting your palette to harmonious colors in this way, can be a useful way of unifying your painting.
For more about color theory and mixing watercolor paint please take a look at this previous post, which covers the subject in depth.
Lifting Out Highlights
I had painted a solid block of color for the bird’s head so in in order to create some highlights on the beak and around the eye, I took a small dagger brush and lifted out some of the color in those areas.
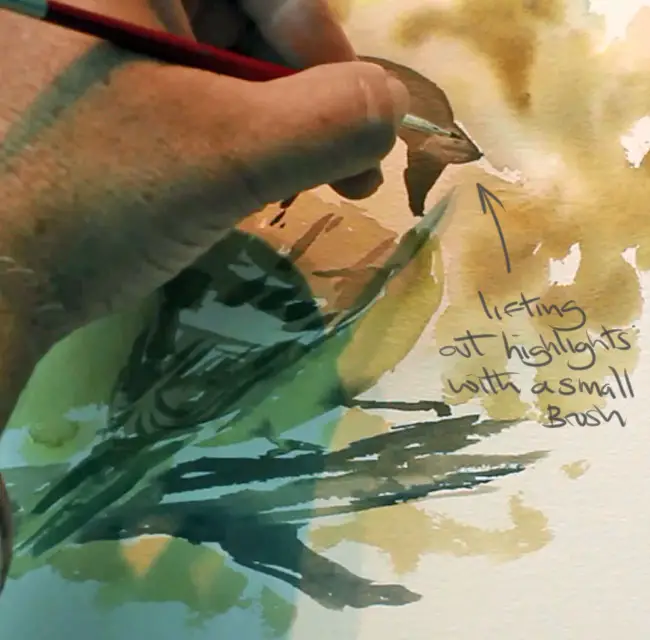
To lift out color, wet your brush with water and dab it on a paper towel or cloth to remove the excess water. Scrub the area of color firmly with the damp brush and pick up some of the paint on the brush and wipe it off on the towel. Repeat this until you have lightened the area sufficiently.
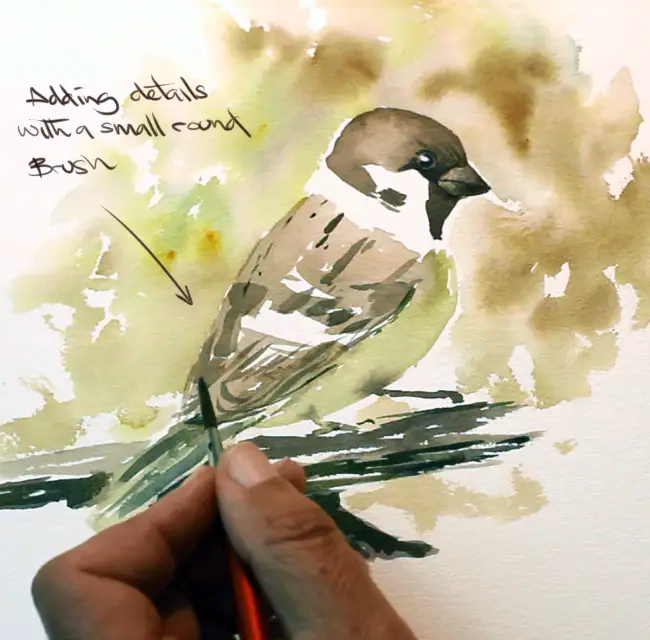
Once I had my highlights lifted out, I allowed everything to dry thoroughly before going in with my darkest darks (Burnt Umber plus Paynes Grey) and added the little details around the beak and eye. My eye highlight was still a bit dull but I soon fixed that with a tiny spot of Titanium White applied straight from the tube.
Final Details
Once I had added all the main shapes of my bird and washed in my loose wet in to wet background, the penultimate stage was to indicate some dark feather markings with a small round brush. Again, I did this quite loosely and freely. I didn’t want to get too bogged down in the details.
Adding these little marks is quite fun. The process is a bit like writing with an old fashioned ink pen. Some artists call this doing “Calligraphy” . This final stage of a painting tends to bring it all together and adds a nice touch of strong contrast. which can be addictive.
Yes, it can be easy to get a little carried away with this part. So as I’ve said be sparing and be mindful of when to stop.
That’s about it for this post on how to paint loose watercolor birds. Don’t forget to check out my YouTube channel for updates. Below is the timelapse video of this painting.