By it’s very nature, water is always changing its appearance. In this post, I’m going to look at various examples of water in typical natural states in the landscape and offer some practical approaches on how to paint water in watercolor.
Some painters have delved deeply into understanding the physics behind the light refractive properties of water, but don’t worry, I won’t be doing that today! Just practical techniques you can start using immediately.
In this post I’ll cover:
- How to paint still water
- How to create the illusion of transparency
- How to paint wave and ripple patterns.
- How to paint convincing reflections
- Practical color mixing suggestions.
Materials List
Ultramarine Blue: Winsor & Newton | Daniel Smith
Prussian Blue: Winsor & Newton |Daniel Smith
Pthalo Blue: Winsor & Newton | Daniel Smith
Cerulean Blue: Winsor & Newton | Daniel Smith
Lemon Yellow: Winsor & Newton | Daniel Smith
Cadmium Yellow: Winsor & Newton | Daniel Smith
New Gamboge: Winsor & Newton | Daniel Smith
Burnt Umber : Winsor & Newton | Daniel Smith
Alizarin Crimson: Winsor & Newton | Daniel Smith
Paynes Gray: Winsor & Newton | Daniel Smith
Brushes
No. 2 Squirrel Hair Mop Brush Buy from Amazon
No.4 Squirrel Hair Mop Brush Buy From Amazon
Synthetic Squirrel Flat Brush Buy From Amazon
Princeton Neptune Synthetic Squirrel Round Brush Buy From Amazon
Da Vinci No.4 Petit Gris Round Mop brush Buy From Amazon
Winsor & Newton Cotman 111 Round No.3 Buy From Amazon
Paper
Arches Watercolor Paper Block, Cold Press, 9″ x 12″, 140 pound Buy from Amazon
Miscellaneous
Misting spray bottle Buy from Amazon
Easy release painters masking tape Buy from Amazon

What Color Is Water?
I know. Obvious trick question. Water has no color. Water is only visible at all because of a) what’s in it, b) what can be seen through it and c) what it reflects.
As a beginner painter, It can be tempting to reach for that tube of blue paint because that’s what we always used as a symbol for water when we were children and it worked for us then, right?
So let’s become mature painters and go beyond the symbol and try and see what’s really there.
When painting water you have to consider the surrounding environment as much as the water itself. Water will only be blue if the sky above it is blue and even then the blue will be modified by the position of the sun, the amount of mud, weeds and other sediment present.
Painting Still Water
Painting a still body of water forces us to look at how it blends with the environment.
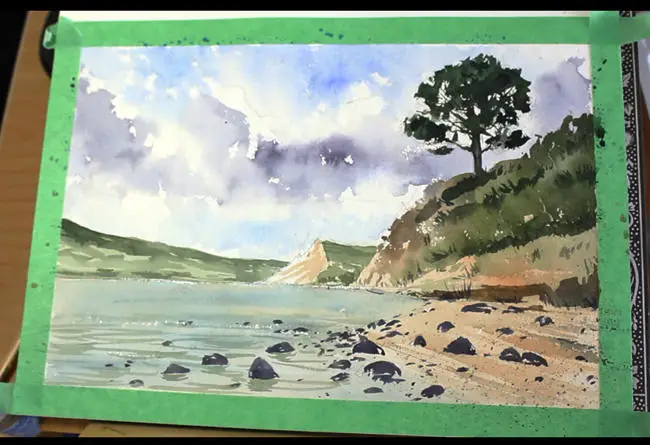
I live near the Kaipara harbour in New Zealand. It’s a large natural harbour, full of muddy water, treacherous sandbanks and sharks. As it is mostly surrounded by land, Kaipara Harbour doesn’t get much in the way of waves. The painting below was done from a recent photo I took.
My YouTube video shows the whole process, but for now let’s just focus on the water painting stage.
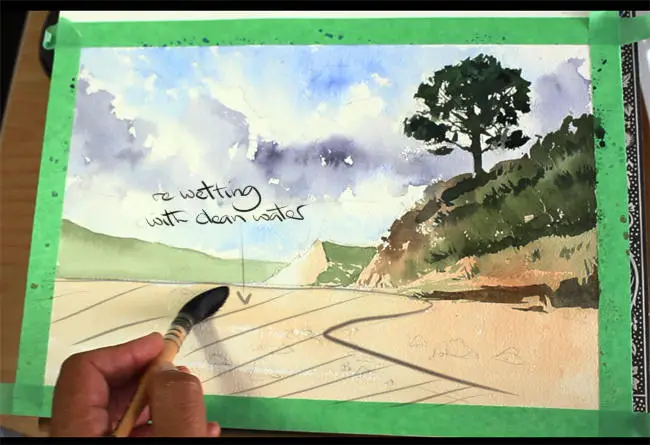
In the image above, you can see that I had painted a lot of the background already, including a pale wash of burnt umber covering the lower third of the paper, where the water will be.
I allowed the paper to dry completely.
Once watercolor paint is completely dry, it is stable. This means that it can be painted over again and the new layer of paint will sit happily on top of the old without mixing in to form unwanted color combinations.
There were some dark clouds in the sky but plenty of blue too. The water had a distinctly green tinge to it in the deeper parts.
Shades of Turquoise and Olive were present probably due to a high amount of vegetation in the water and the muddy bottom was also visible in the shallower areas, so I wanted some of that Burnt Umber to show through here and there.
Watercolor is for the most part, a transparent medium but not all watercolor paint is equally transparent.
I mixed a turquoise-green from Prussian Blue and Lemon Yellow which is a blue-biased semi-opaque yellow. This opacity allows me to partially hide the Burnt Umber underpainting and also allows it to be partially revealed in selected areas.
I began by wetting the area where I was going to paint the water with a large mop brush and began to paint wet into wet with my turquoise-green mixture.
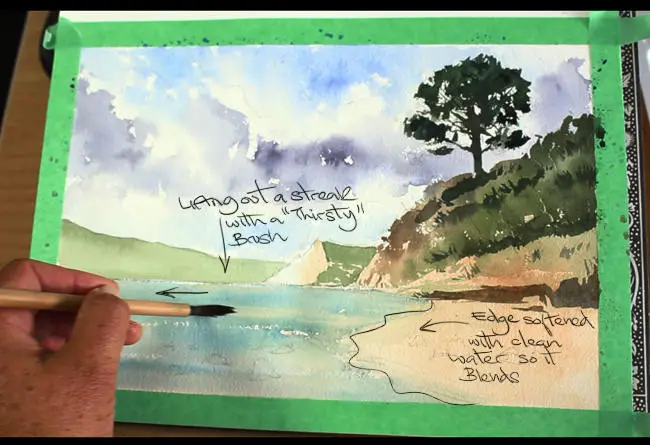
In order to avoid a hard edge of turquoise forming at the water line, I made sure that I softened that edge with clean water from another brush.
I then lifted out a couple of streaks with a partly dry (Thirsty) bamboo brush. This allowed some of the underpainting to show through.
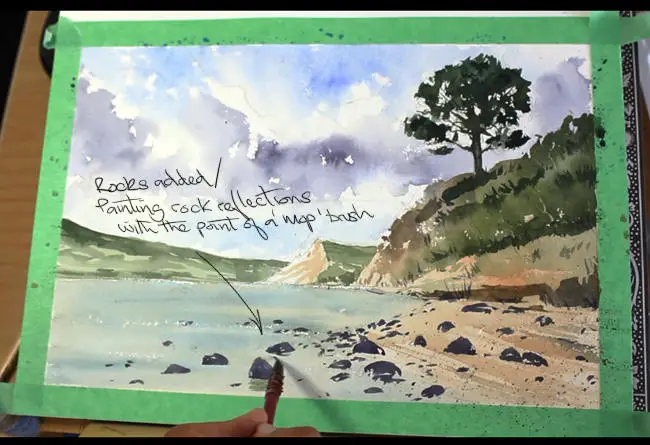
For the stones and rocks in the foreground, I mixed a cool dark neutral from Ultramarine, Paynes Grey and Alizarin Crimson. The sharp point of a small mop brush was perfect for painting the stones. I also added some spatter for additional texture.
To complete the illusion of water, all that was needed now was to add some gentle ripples and reflections around the rocks with the same mop brush.
Reflections of dark objects in water are usually significantly lighter than the objects themselves and take on the color of the water to some degree.
Watch the full time lapse painting video below.
Painting Ripples & Reflections


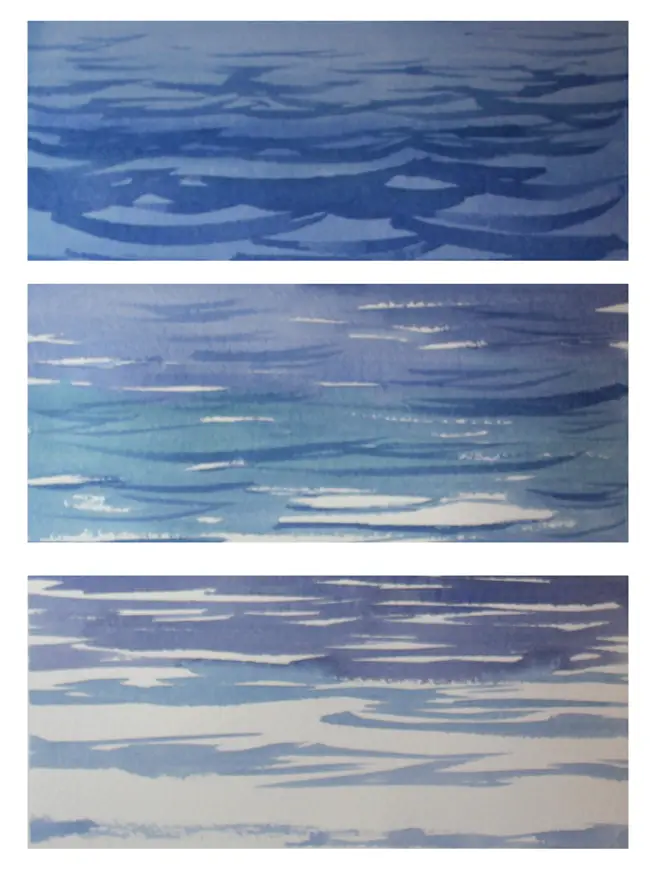
The sequence of images above shows step by step how to build up the illusion of reflection on gently rippling water.
Step 1: You can think of water as a mirror positioned on the plane of the horizon reflecting the sky.
Clear blue sky fades dark blue to faint pale blue at the horizon To enhance that effect I first painted a wash that graduates from Ultramarine Blue at the top to nothing then graduates back to Ultramarine Blue at the bottom.
A graduated wash is painted in the same way as a basic flat wash but with more water added to each stroke in order to make the color fade out a bit more with each pass.
Flat washes and graduated washes should be painted with the paper at an an angle so that the paint naturally flows down the paper.
You can turn the paper upside down in order to paint the second graduated wash but make sure the first wash is relatively dry or you will find that gravity will cause your initial wash to start flowing the wrong way.
Step 2: After painting in two land masses. The painting was allowed to thoroughly dry. To create the effect of a blurry reflection, I wet the paper beneath the closer land mass with a Hake brush.
Step 3: Just before the shine goes off the paper, I began to paint a mirror image of the closer land mass underneath it, allowing it to gently diffuse. This was painted with a muted lighter shade of the same purple gray that I used for the land.
Steps 4, 5 and 6: Taking a round brush that forms a good point, I began to paint in curving arcs of Ultramarine. Working from the bottom of the paper up toward the horizon line.
It was important to make the lines of ripples progressively smaller and tighter as I worked my way upwards. This helps to reinforce the illusion of distance by adding perspective. (Things get smaller as they get further away).
Steps 7 and 8: Painting the dead tree poking out of the water in the foreground was the final step. Placing the dark tree in the immediate foreground gave the painting a strong focal point and reinforced the illusion of depth.
All that was needed to finish things off was to lift out some paint from the tree and add a bit of textre to it. I then painted in a rippling reflection underneath it.
Painting Waves & Rough Sea
In the previous example, I showed how you can create the effect of wave movement on the sea by painting curving strokes over the top of a graduated wash.
To give the impression of rougher sea, all that is needed is to leave larger and larger white gaps between the curving strokes to give the impression of breaking waves and rougher sea.
Take a round brush that forms a good point and try experimenting with different wave patterns like in the example below. As an exercise try taping off a series of “Windows” on a sheet of paper and practicing with different brush strokes.
In the seascape below I’ve tried to create the impression of a rough choppy sea by increasing the amount of white as the sea gets closer to the shore when it basically becomes one big mass of white foam.
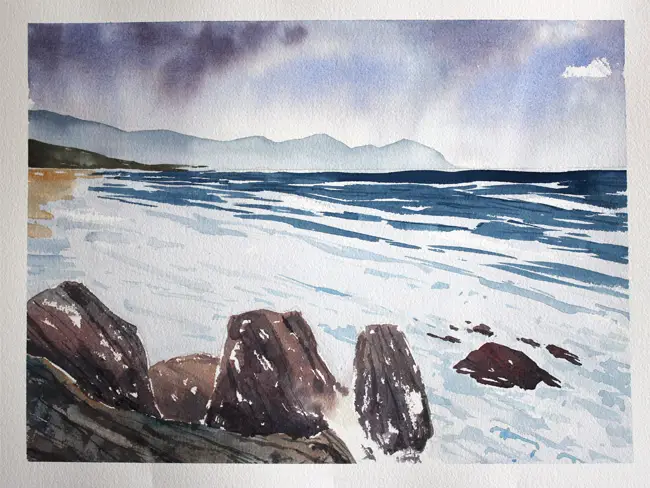
To create the impression of waves crashing on the rocks I made sure to strategically leave areas of unpainted white paper.
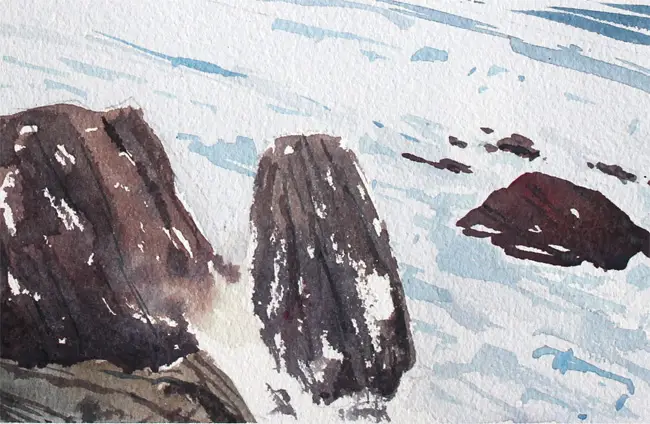
In the detail of the seascape below, I wanted to give the impression of white sea foam spraying between the two rocks. I used a small piece of tissue to dab out some of the wet paint around the base of the rocks.
How To Paint A Breaking Wave
Waves are created by energy travelling from storms. When the wave hits shallow waters the wave it begins to peak, becoming unstable and folding over on itself and finally breaking. The impact of the breaking wave creates a mass of white foamy water and spray.
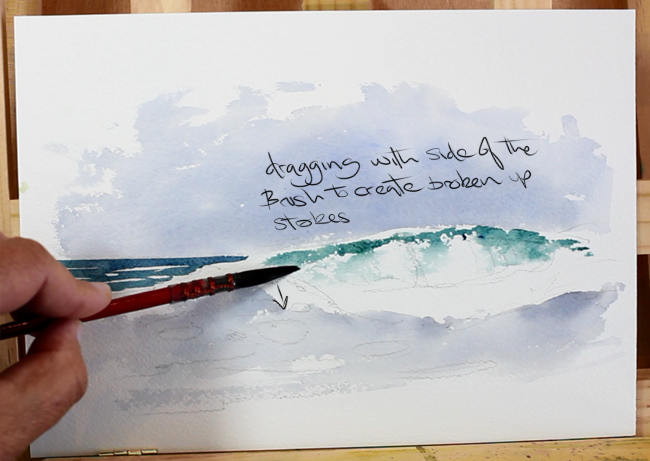
In the sequence of images below I’m attempting to capture that dramatic moment when a wave folds and breaks.
I began by painting the sky above the wave with a pale wash of Ultramarine. Then, I painted a shadow underneath the wave with a wash of Ultramarine, mixed with a little Paynes Grey.

For the sea and the wave itself, I loaded my mop brush with a mix of Prussian Blue, Paynes Grey and New Gamboge.
Dragging downwards with the brush held horizontally to the paper creates an uneven broken up stroke on the textured paper, giving the impression of crashing foam
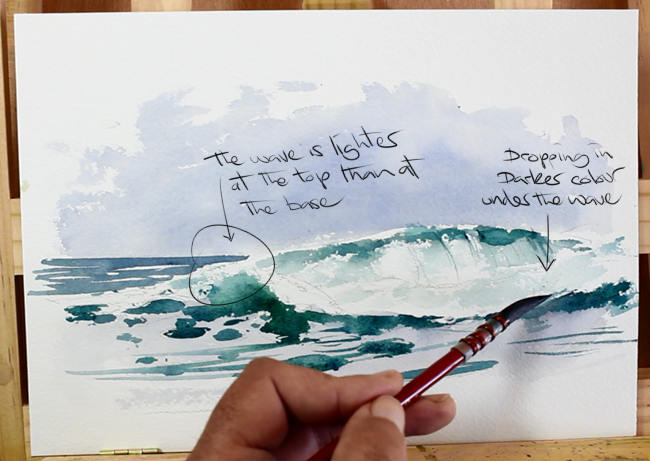
Foam from previous waves gets sucked up the face of the next breaking wave and forms “holes” and patches of clear water.

The light source is coming from above so the top of the wave will tend to be lighter than it’s base. To create this effect, drop in darker color wet into wet at the lower section of the wave. You can also lift out color from the top of the wave to lighten it there.
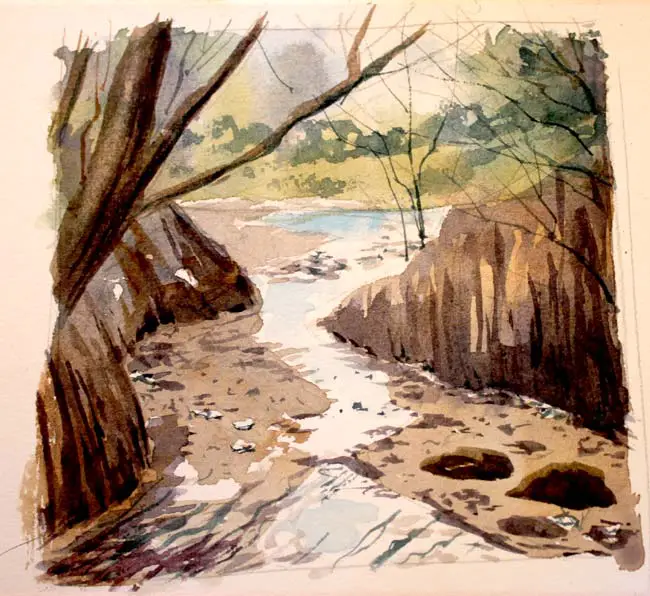
Painting Streams & Rivers
Streams and rivers are very useful composition devices to use in landscape paintings. They are a great way to lead a viewer’s eye into a painting.
The bright reflective nature of water presents a great opportunity for creating drama and visual interest through the use of strong contrasts and negative space.
I began with a variegated wash for this painting from my sketchbook. The stream is simply a white zig zag. I will be leave it more or less untouched throughout.
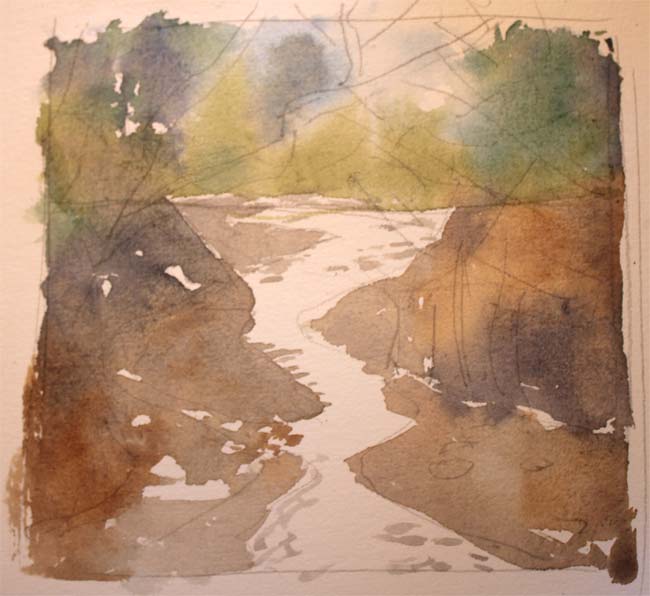
With the initial washes laid in. I built up the rest of the painting in layers of increasing contrast.
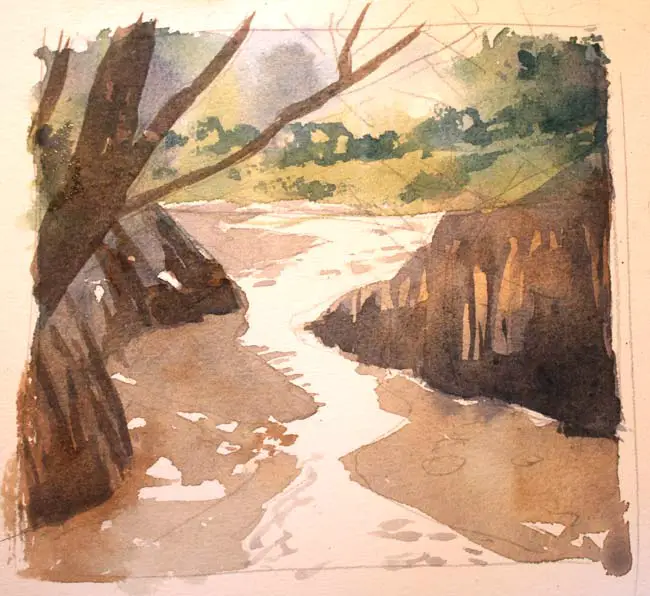
In the final stages of the painting I added the smaller details such as thin branches and small stones etc. As you can see, it wasn’t necessary to add much color to the stream at all. There is just a tiny spot of reflected blue sky in one area. The eye has no trouble interpreting the negative space as a stream of water.
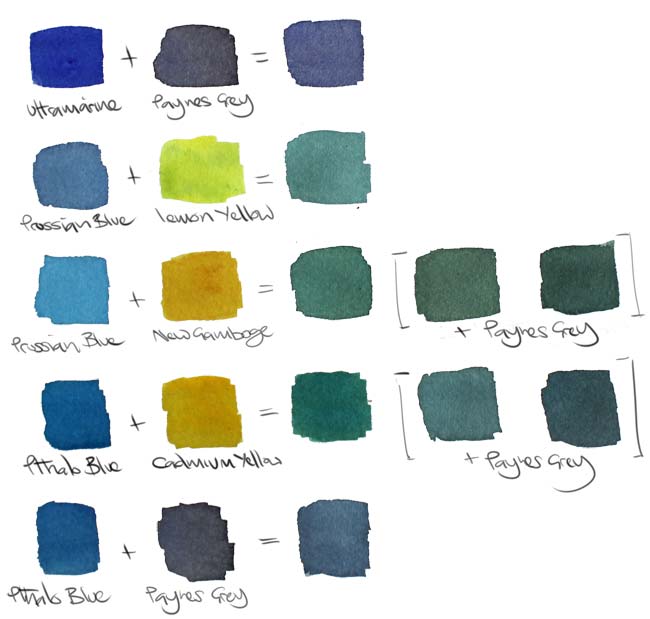
Painting Water: Color Suggestions
Below are some suggestions for color mixing combinations that you can try. Many of these were taken directly from the examples that I’ve been covering in this post. As you can see.
Paynes Grey can be very useful for muting blues and greens which might be a little too bright and garish straight out of the tube. Try experimenting with your own color palettes and see what you can come up with.
My How To Paint Water in Watercolor Videos
If you found this post useful, I recommend reading my post about painting seascapes and beaches, as an additional help.
Also, check out this post about painting reflections on still water, which details a relatively simple and fun example using wet into wet painting techniques.
