
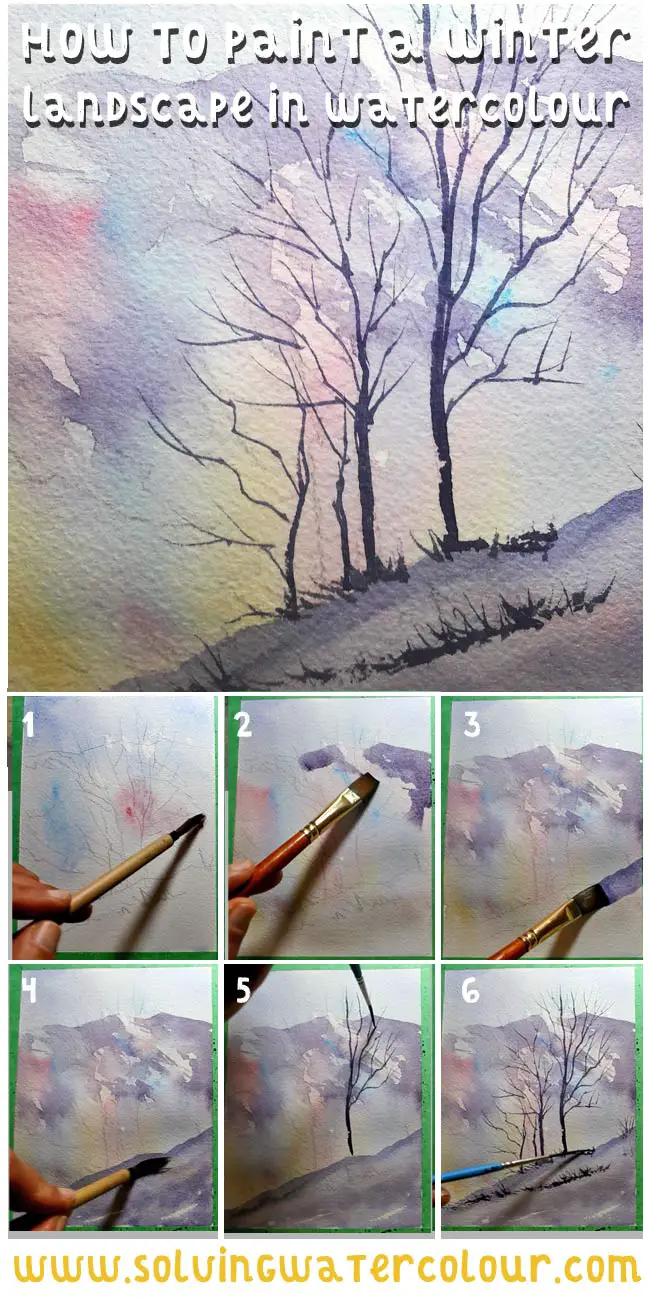
In this post I’m going to look at two examples of how I paint icy winter landscape scenes in watercolour and walk you through them step by step. In these paintings I’m using a limited palette mostly from colours on the cool side of the colour wheel (No surprises there) but I also want to show you that it’s possible to introduce some subtle bright colour variations to add interest to your painting.
Materials List
I’ve linked to where you can purchase the paints and the other art materials I used from Amazon.
Cerulean Blue: Winsor & Newton | Daniel Smith
Ultramarine Blue: Winsor & Newton | Daniel Smith
Prussian Blue: Winsor & Newton |Daniel Smith
Paynes Gray: Winsor & Newton | Daniel Smith
Burnt Umber : Winsor & Newton | Daniel Smith
Cadmium Yellow: Winsor & Newton | Daniel Smith
Alizarin Crimson: Winsor & Newton | Daniel Smith
Rose Madder: Winsor & Newton | Daniel Smith
Dioxazine Purple: Winsor & Newton| Daniel Smith
Brushes
Da Vinci Paint Brush, Round Quill New Wave Synthetics, Size 2.
Buy from Amazon
Mop Brush (Princeton Artist Brush Neptune, Series 4750, Quill Synthetic Squirrel, Size 4) Buy From Amazon
Winsor & Newton No.6 Round Bamboo Brush (Great for grass and foliage) Buy from Amazon
Rigger Brush ( For thin tree branches etc) Buy from Amazon
Winsor & Newton Cotman 3/8″ Flat Brush Buy From Amazon
Paper
Arches Watercolor Paper Block, Cold Press, 9″ x 12″, 140 pound Buy from Amazon
Misc
Easy release painters masking tape Buy from Amazon
Watercolour Palette Buy from Amazon
Please click here for a complete list of my recommended art supplies.

How Do You Paint White Snow & Ice?
This is a bit of a trick question. It’s rare that you ever see anything that is purely white, or purely black for that matter. Some watercolour “Purists” would never dream of using white paint. They would prefer to leave areas of white paper untouched as it has more “Sparkle”.
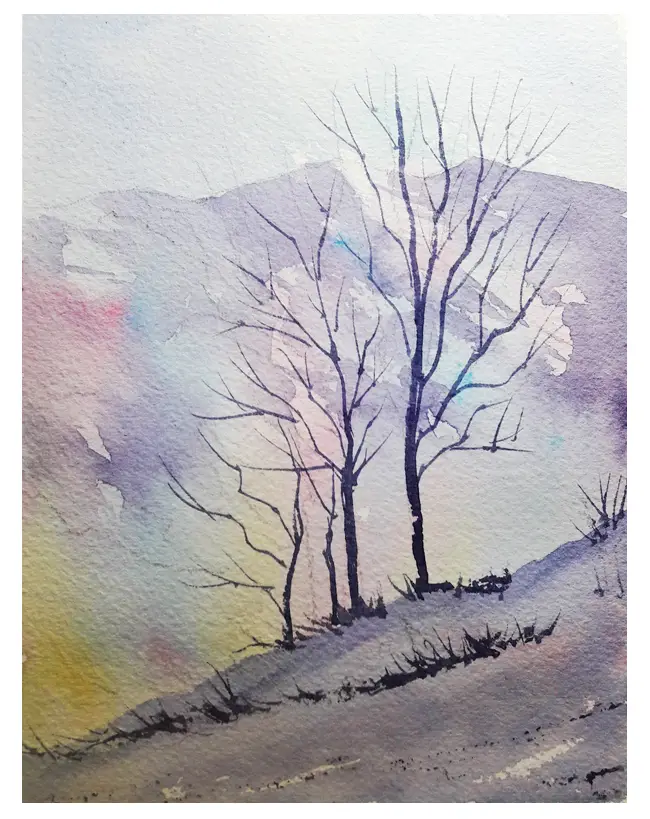
This snowy mountain landscape scene literally has no white in it at all. I’ve used a bright triad of Rose Madder, Cerulean Blue, and Cadmium Yellow together in a wash which completely covers the paper. I’ve contrasted this colourful wash with shades of cool purple mixed from Prussian Blue, Alizarin Crimson and Paynes Grey.
For an in depth explanation of colour wheels, triads and colour theory in general please read this post.
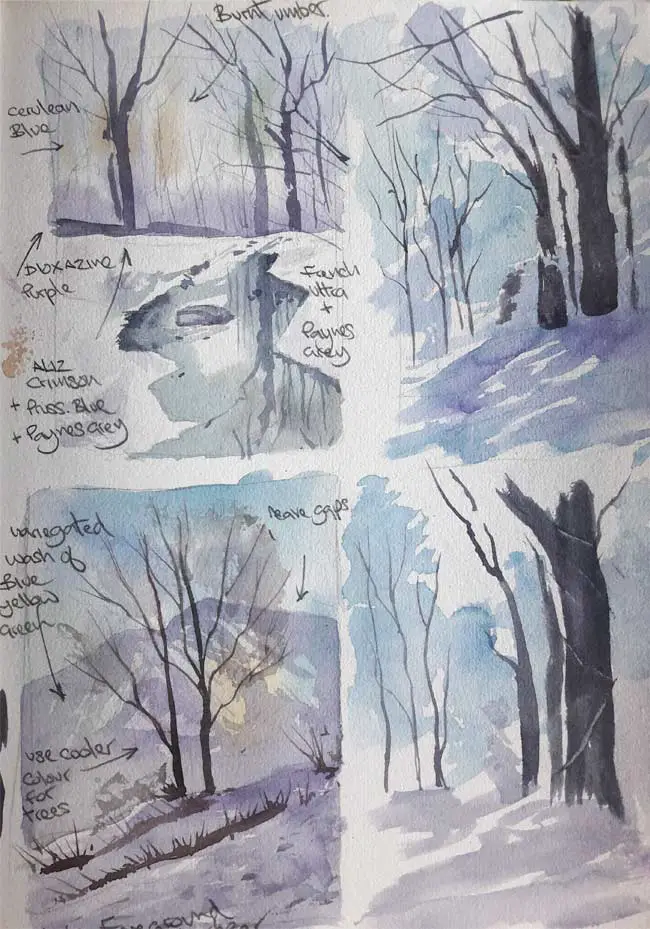
Colour Notes & Sketches
Before beginning any painting, I recommend always painting a smaller version of it first with annotations to remind yourself of your thought processes and the colour mixes that you used. Below are my colour roughs for the paintings in this post.
Step 1: Painting A Colourful Variegated Background Wash
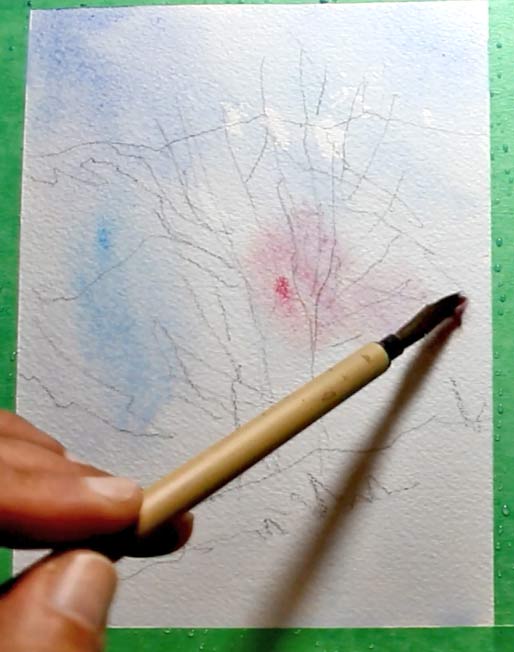
I began with a very rough sketch of the scene. Just enough information to give me the placement of the trees and mountain and snow drift in the foreground.
With a bamboo brush, I started painting from the top down with a loose wash of Cerulean Blue. Occasionally dropping in a little Ultramarine in to the wet wash to give some variation to the sky.
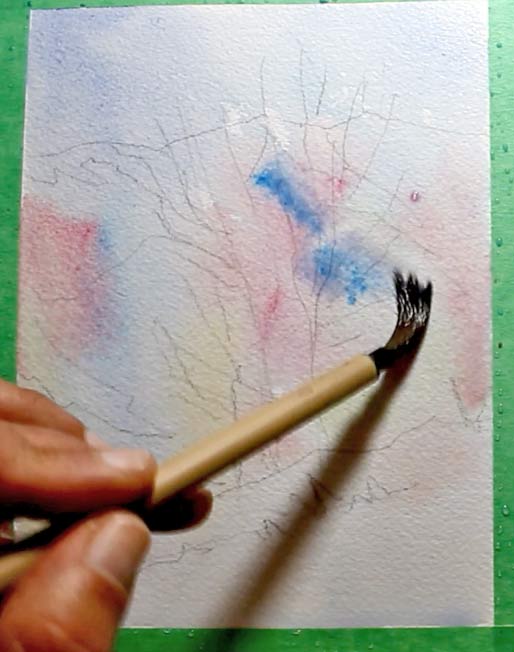
I could have painted this whole scene in monochromatic shades of blue but I want to liven things up with a splash of colour. I chose a triad of Rose Madder, Ultramarine Blue and Cadmium Yellow. As long as the tonal values are correct it’s possible to be quite free and easy with colour choices. Once this multi-coloured wash is completed I allowed it to dry completely.
As usual, I’m working in a predictable order.
Tip: I angle my paper at about 25 degrees and paint with the downward flow of water from top to bottom and from the background to the foreground and from dark to light.
There can be exceptions to these rules of course. The background of your painting may not always be the lightest part in which case it may make more sense to leave it till last. Did you know there a six possible value patterns that can apply to a painting that has a background midground and a foreground. To learn more about that. Take a look at this previous post on landscape painting where I explain it in more detail
The next step will be to add the mountain.
Step 2: Painting The Mountain
Tip: Remember; Timing is everything in watercolour painting. It’s time to make an artistic choice here. Do I want to make the mountain soft and blurry? If so, I would wait a minute or two, while the paper dries slightly but is still fairly moist and then paint the mountain which would diffuse and blur slightly giving an out of focus effect but not so much that it runs bleeds uncontrollably.
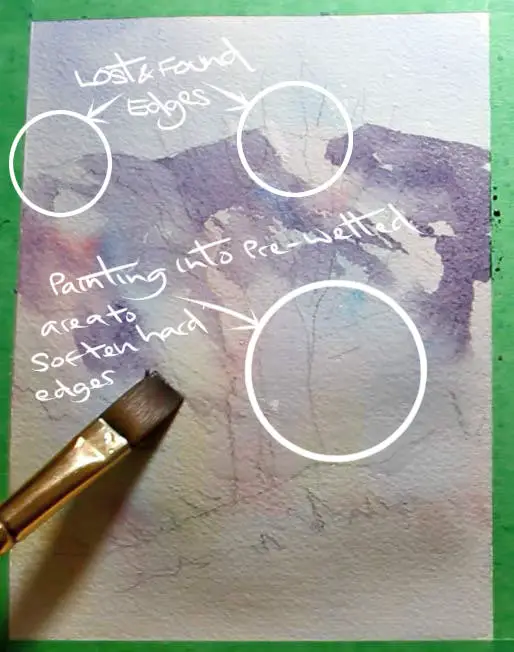
I actually want a nice crisp hard edge to the mountain, which fades and softens as it reaches the base. To achieve this I have to wait until the paper becomes absolutely bone dry.
I took my bamboo brush again and brushed on some clean water somewhat randomly around the bottom of the mountain. This way, as I paint into it, the hard brush strokes will soften out and blend. Notice also, that I’ve left some unpainted gaps at the top of the mountain, to indicate light on the snowy peaks. This creates those highly contrasting “lost” and “found” edges which work so well in watercolour painting.
Tip : My multi-coloured wash has faded back about 25%. It’s an important point to remember, that if you paint something that’s a bit too dark, or excessively bright, just let it dry before you panic. It’s probably going to be just fine once it’s dry.
For the mountain, I made up a mix of a cool purple from Alizarin Crimson, Prussian Blue and Paynes Grey. If it needed warming up in places, I added a little more Alizarin Crimson or Dioxazine Purple to the mix. I chose a flat brush for the mountain, I find it gives much better control than a round brush for those hard angular strokes.
Step 3: Painting The Foreground
The snowy bank in the foreground is painted with the flat brush again with a stronger mix of the same purple I used for the mountain.

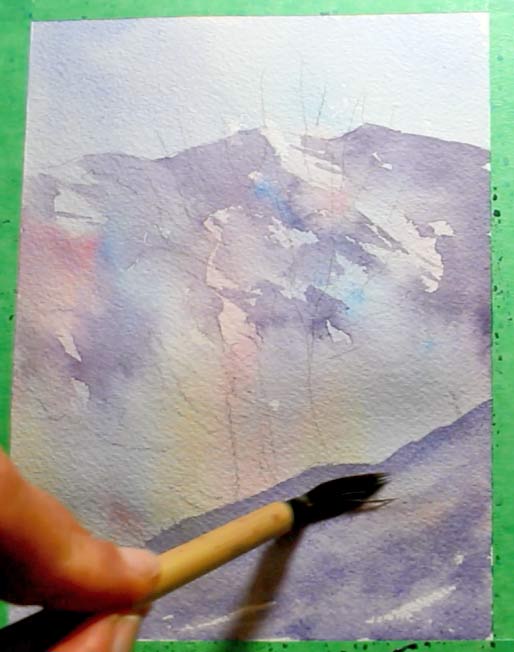
I didn’t want the foreground to be a solid block of colour. So I created some highlights in the foreground by dragging the semi-dry brush across the textured surface of the paper which leaves some unpainted spots.
I then used the bamboo brush to create some softer edged highlights by lifting out some colour from the foreground.
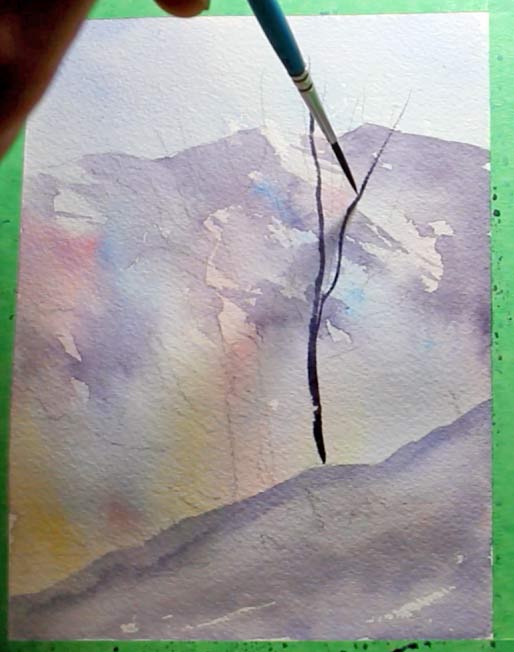
Step 4: Painting the Trees
Step 5: Painting Texture & Details
Reaching the fine detail or “Calligraphy” stage is always a relief. To use a house building analogy. You know at this point that all the foundations have been laid and the structure is complete. All we’re doing now is choosing the cushions and putting ornaments on the shelves.
Having said that. Don’t relax so much that you make a silly mistake like I did! In an earlier draft of this painting, I managed to mess things up because I didn’t wait long enough for my painting to completely dry. I watched in dismay as my fine delicate little tree branches smudged and blotched as I painted them onto the still wet paper. Lesson learned.
I’m using a stronger mix of my cool purple this time. I used a round brush for the tree trunk and a rigger brush for branches. I turned the rigger on it’s side and dragged and flicked in the patches of grass and flecks of sticks and other debris. It’s always good to put a bit of texture in the foreground to enhance the depth of your painting with the illusion of a little fine detail here and there.
Winter Landscape Painting No.2
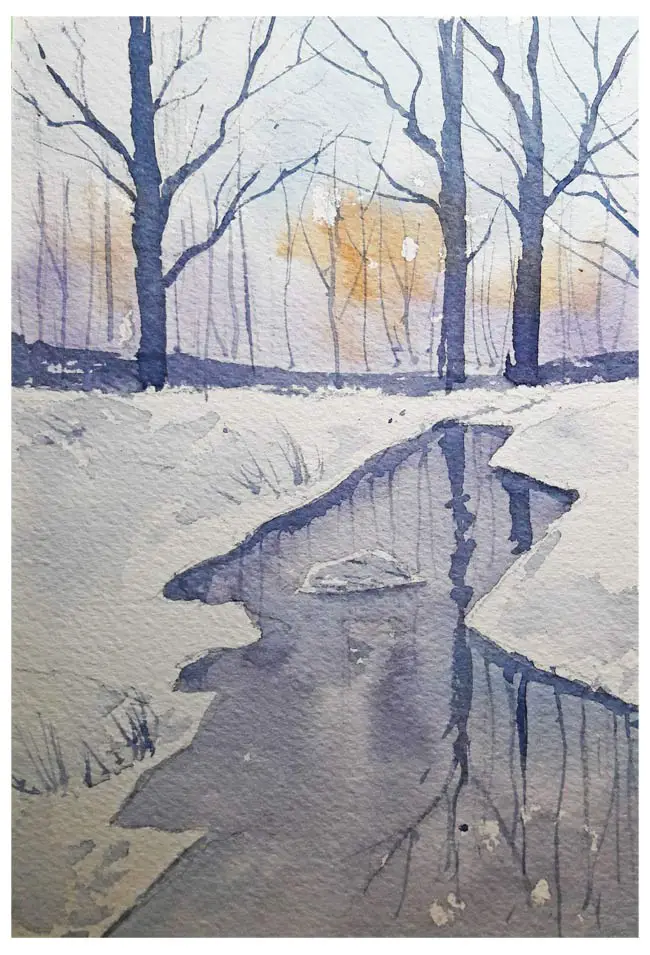
The painting above was painted almost entirely in shades of blue. I also included a little dilute Burnt Umber this added a hint of warmth and contrast, in the suggestion of blurry trees seen through the mist in the distance.
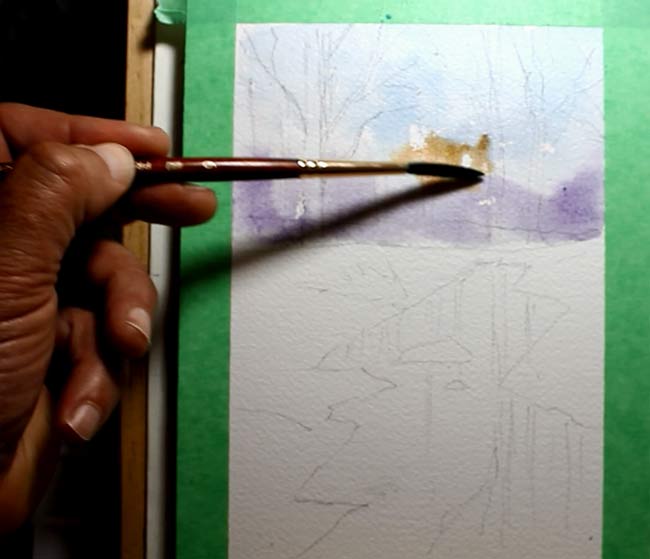
Step 1: Sky & Background Trees

Above. I used a round brush to and added a pale Cerulean Blue sky and the suggestion of blurry background trees painted wet into wet with Dioxazine Purple. Dioxazine Purple is a purple which although a predominantly cool colour leans more towards the warm side of the colour wheel than my cool purple ( Prussian Blue, Alizarin Crimson and Paynes Grey mix).
Below. Adding a touch of weak Burnt Umber for contrast.
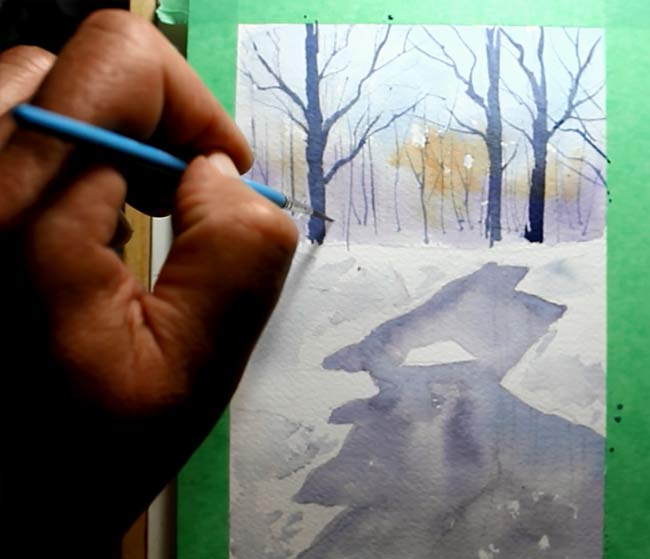
Step 2: Adding a Lead-In
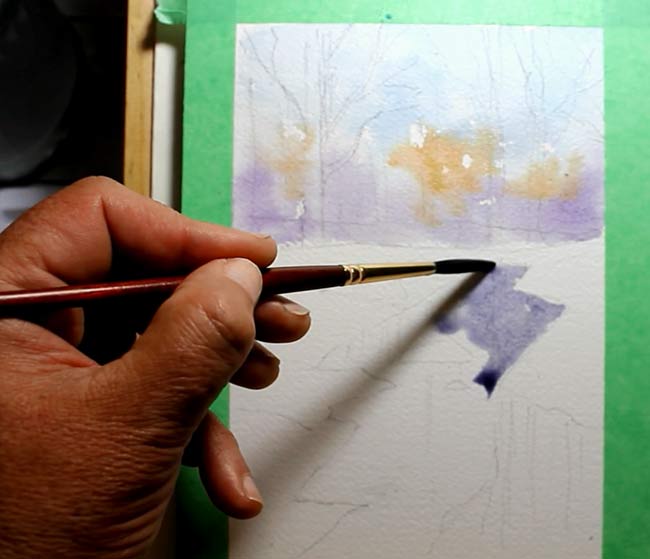
I started painting in the river. I wanted a particularly cool colour for the river which will show the reflection of the background trees and provided the picture with a “lead-in” i.e. a compositional device to lead your eye into the picture.
The mix of Prussian blue, and French Ultramarine I initially used was a bit too vivid so I dulled it down with a touch of Paynes Gray.
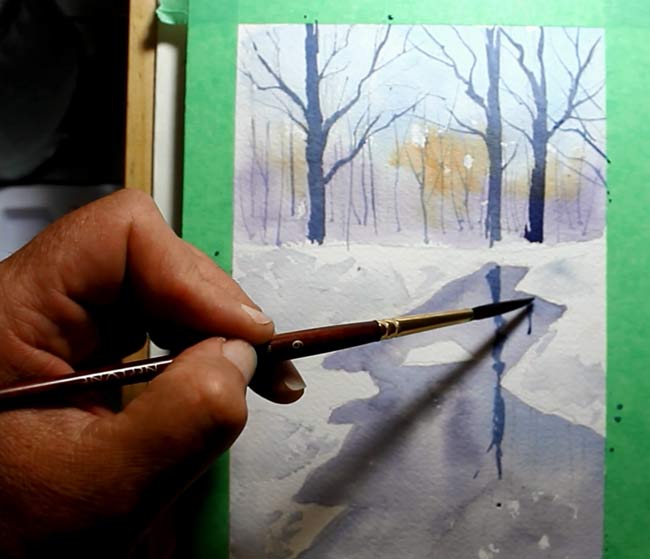
I took some of the same blue mix as used in the river. I diluted it further and added some pale blue shadows to the snow by dragging across with a round brush.
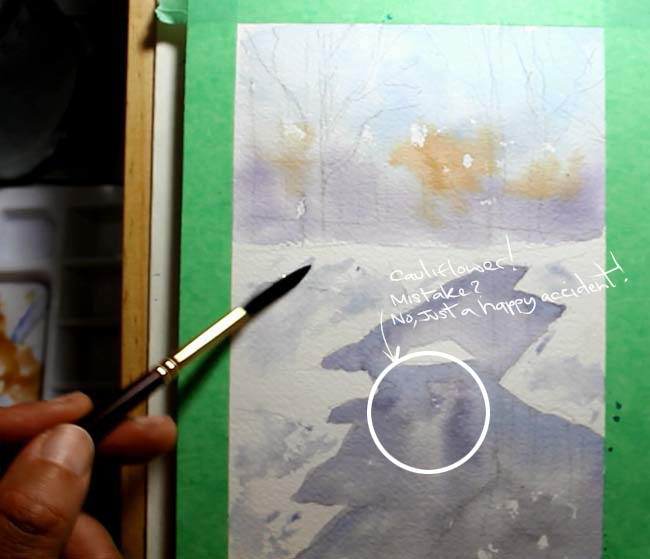
Notice that “Cauliflower” that formed while painting the river. If you’re not familiar with the term. A cauliflower, or back run, occurs when you paint wet into wet paint with a wash that contains more water than is already present on the paper.
The end result is a cauliflower-like pattern of hard edges that forms when the paint dries. This is usually considered to be a bad thing but in this case it gave the river water a semi frozen appearance which I couldn’t have planned. This is what we call a “Happy accident” One of the reasons I love watercolour so much, is that it’s a very dynamic medium and these happy accidents tend to occur frequently as a result.
Step 3: Midground Trees & Tree Reflections
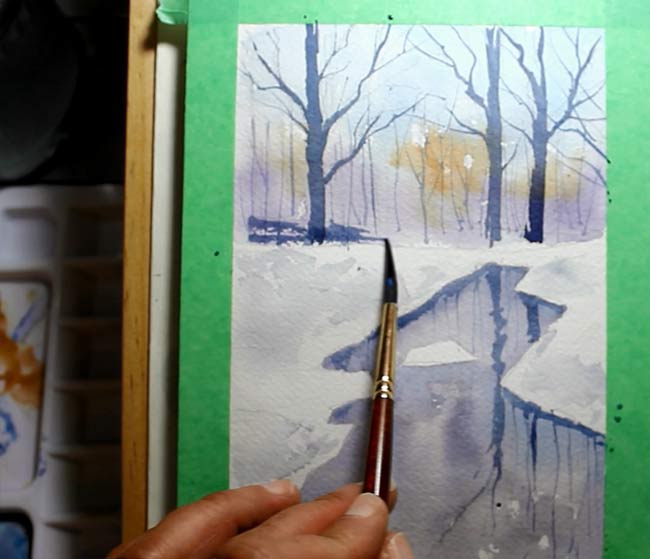
There’s not too much to say about this part of the painting. The process of painting the trees was exactly the same as in previous example. A round brush for the thicker tree trunks and rigger for the thin branches. This is an example of a painting where the midground rather than the foreground, is the darkest part of the painting.
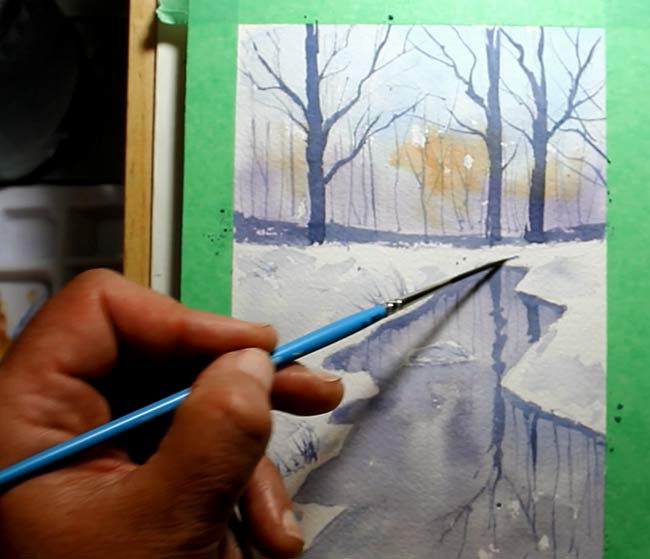
I finished the painting by adding some tiny textural details with the rigger.

I hope you enjoyed these examples. Let me know in the comments below if you have any suggestions for future posts or questions that you want to ask.
If you found this post useful be sure to check out these posts on landscape painting too.
How To Paint A Glowing Autumn Landscape
How To Paint A Vivid Forest Watercolor Scene
Easy Watercolor River Painting
Pro Tips For Plein Air Watercolor Painting
How To Paint A Loose Watercolor Landscape
Successful Watercolour Landscapes: Online Course

Cant wait for your watercolor class in 2020. Your instructions are always so clear and helpful. I like how you mark on the painting example the color or if wet or dry.
Debbie
Thanks for the feedback Debbie. I’m glad you’re finding it helpful