
Let’s take a look at how to paint simple buildings in watercolor. Buildings can be a challenging subject for the watercolor artist, as the regular structure of a building requires particular attention to considerations such as perspective and lighting. These are not difficult to learn but they do tend to cause quite a bit of confusion to those encountering the concepts for the first time.

How To Draw A Simple Building
A lot of painting problems can be solved at the initial drawing stage. Before we learn how to paint simple buildings in watercolor we need to learn how to draw them first. It helps to think of buildings in terms of very simple shapes. Let’s start with a basic cube. To draw the cube in perspective, we first need to establish where the horizon line is going to be.
The position of the building in relation to the horizon line determines where the observers eyeline is. Next, add a square shape and mark a point anywhere on the horizon line. This point is called the vanishing point. This type of drawing is called a “One-point perspective” because there is one vanishing point. It is possible to have more than one but let’s keep it simple.
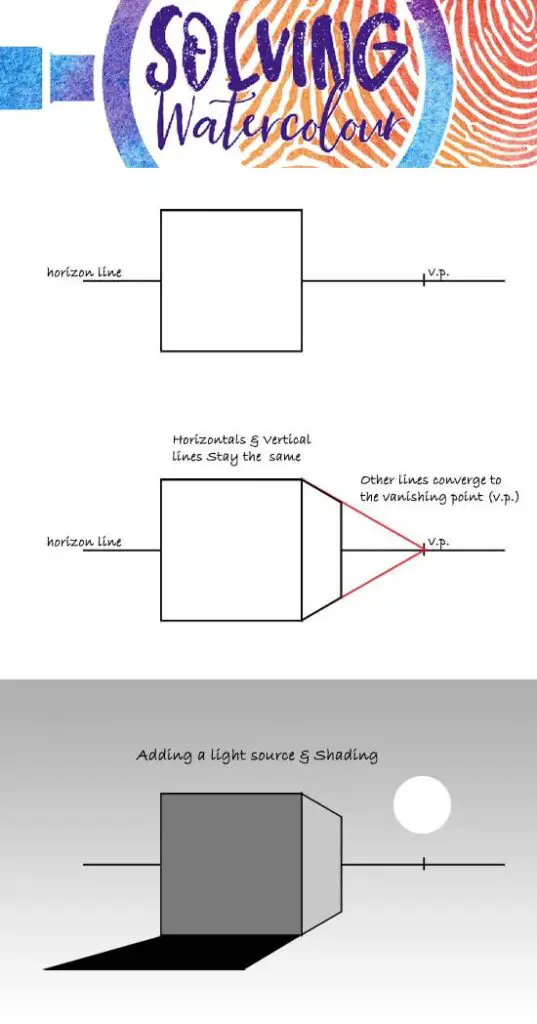
To draw the cube in perspective, take a line from the top and bottom of the building and project them to the vanishing point. Draw another vertical line between the vanishing point between the square that fits between the convergent lines.
Notice that horizontal lines and vertical lines always stay vertical when drawn in perspective only the length and width will change.
Add shading by placing a light source somewhere in the scene. The sides of the building facing directly away from the light source will be darkest and the cast shadow will be the darkest shadow of all. Remember that the cast shadow also needs to be in perspective.
Once you have the basic cube in place it’s not difficult to add windows and a roof using the same principles. Always start from the largest, simplest shape and then add the smaller details in order of size.
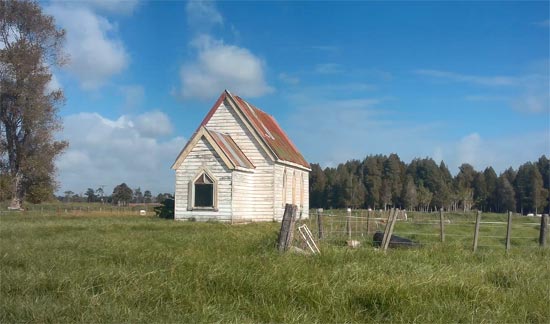
Old Chapel Building
This old wooden building is about an hours drive from where I live. I don’t know much about it but it’s quaint appearance caught my eye as it looks like it looks like it may have once been a small village chapel.
Materials List
Ultramarine Blue: Winsor & Newton | Daniel Smith
Pthalo Blue: Winsor & Newton | Daniel Smith
Dioxazine Purple: Winsor & Newton | Daniel Smith
Cadmium Red: Winsor & Newton | Daniel Smith
New Gamboge: Winsor & Newton | Daniel Smith
Burnt Umber : Winsor & Newton | Daniel Smith
Burnt Sienna: Winsor & Newton | Daniel Smith
Paynes Gray: Winsor & Newton | Daniel Smith
Brushes
Winsor & Newton Series 150 Bamboo Round #6 Buy From Amazon
Rigger Brush (For thin tree branches etc) Buy from Amazon
1″ Hake Brush Buy from Amazon
Synthetic Squirrel Flat Brush Buy From Amazon
Paper
Arches watercolor paper block, cold press, 9″ x 12″, 140 pound Buy from Amazon
Miscellaneous
Easy release painters masking tape Buy from Amazon
Adjustable desktop easel Buy From Amazon

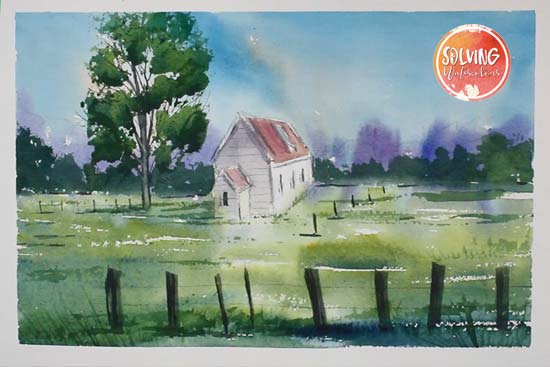
How To Paint An Old Chapel Building In Watercolor
Total Time: 45 minutes
Step 1: Initial Drawing & Wetting The Sky

Analyze the shape of the building, using the principles outlined previously. This old chapel is essentially a box with a tin roof joined to another smaller box with a tin roof.
Starting with the lightest tonal values first, I applied a loose wash of clean water using my 1/2″ Hake brush.
Step 2: Painting The Sky
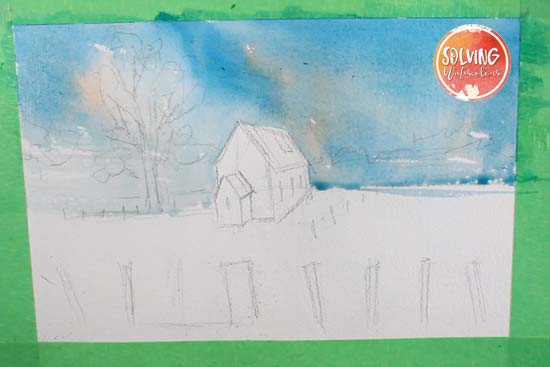
Working from top to bottom I applied a loose wash of Burnt Sienna followed by a wash of Pthalo Blue for the sky. I allowed the two colors to blend into each other naturally without excessive brushing as that would create a dull neutral and it’s important to keep this warm Autumn sky as bright and vibrant as possible.
Step 3: Painting Background Trees
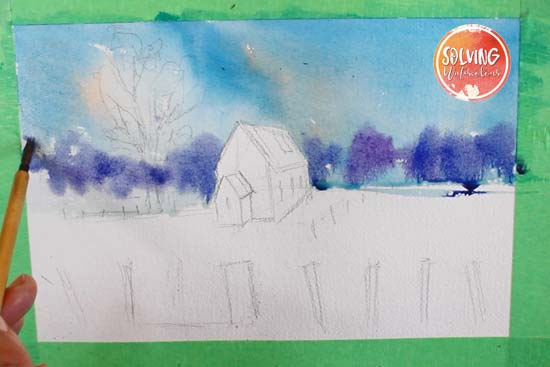
In order to create some color variation and to break up the wall of green, I’ve added a line of distant trees using a mixture of Ultramarine Blue and Dioxazine Purple with a small Bamboo brush. These were added wet into wet and allowed to gently blend into the sky.
Step 4: Adding The Foreground & Tree
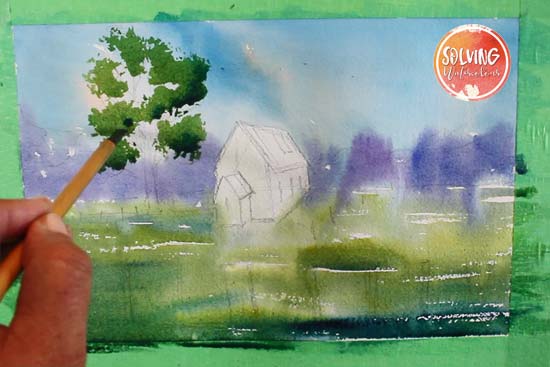
I continued painting from top to bottom, adding the foreground greens by continuing to paint down the paper from top to bottom. Remember that painting should always be angled at 30 degrees or more. The greens were mixed from New Gamboge, Ultramarine and Prussian Blue, I made them progressively darker as they come towards the foreground.
I’ve deliberately left sparkles of white paper here and there to create interesting highlights. I’ve painted around the building but allowed some paint to bleed over the lines as it will look more natural to have some soft as well as hard edges blending the building into the background, especially around the bottom. Try to avoid painting your buildings with completely hard crisp edges or they will tend to look unnatural and “Stuck on”.
Once the background and foreground is completely dry you can add the tree. I recommend adding the foliage first with a bamboo brush and adding the trunk and branches afterwards.
Step 5: Painting The Chapel Building

A flat brush is perfect for painting buildings. I used a mixture of Burnt Sienna and Cadmium Red for the tin roof. I’ve used a pale mixture of dioxazine purple and Ultramarine for the walls. The light source is coming from the right, so that side of the building needs be lighter than the wall that’s facing the viewer. Note the shadows cast by the edges of the roof onto the wall. These little details help to sell the impression of a solid three dimensional structure.
For the windows, I simply turned my flat brush and used it lengthwise to dab in those thin straight lines, with a mixture of Paynes Gray and Ultramarine Blue.
Step 6: Final Touches
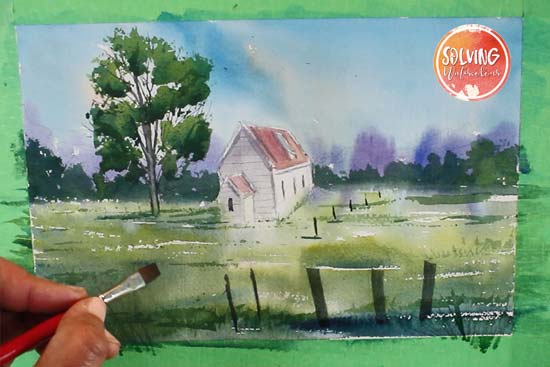
The flat brush is also ideal for painting the fenceposts and their cast shadows along with other small details such as tufts of grass.
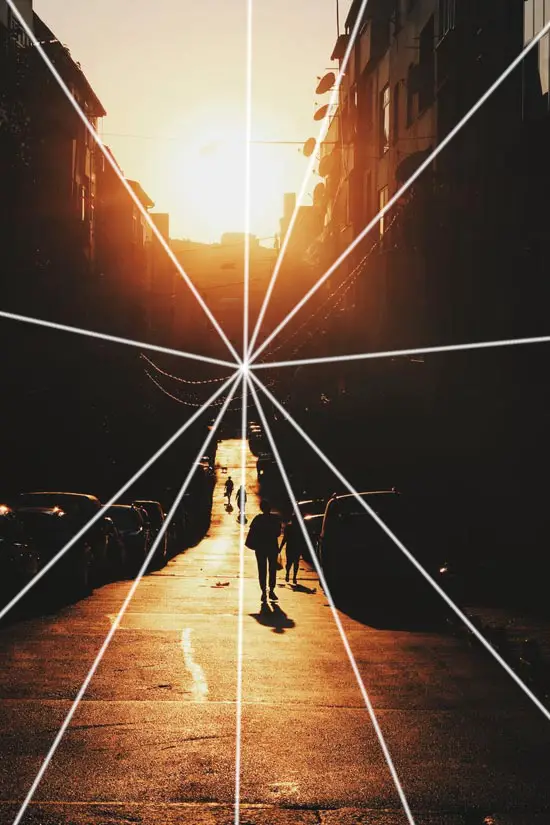
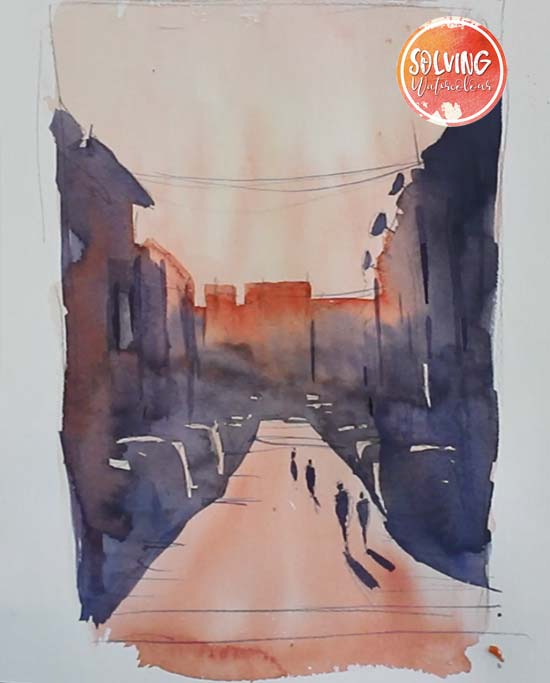
Simple Watercolor Street Scene With Buildings
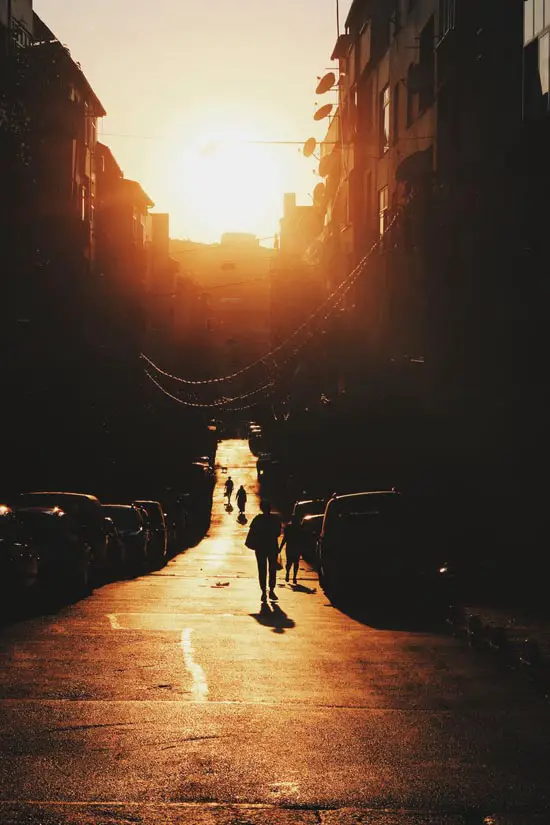
Watercolor works beautifully with strong contrasts. In the reference image above, we have a street scene with buildings that was taken directly into the setting sun creating a high contrast silhouette. We can use silhouettes like this to our advantage when learning to paint simple buildings in watercolor, as although the details are largely obscured, we can hint at them with minimal brush strokes and the viewers mind will fill in the details for us.
We still need to be mindful of perspective though. Note how the lines of the buildings and the road are converging towards a vanishing point in the center of the photo somewhere beyond the buildings at the far end of the street.
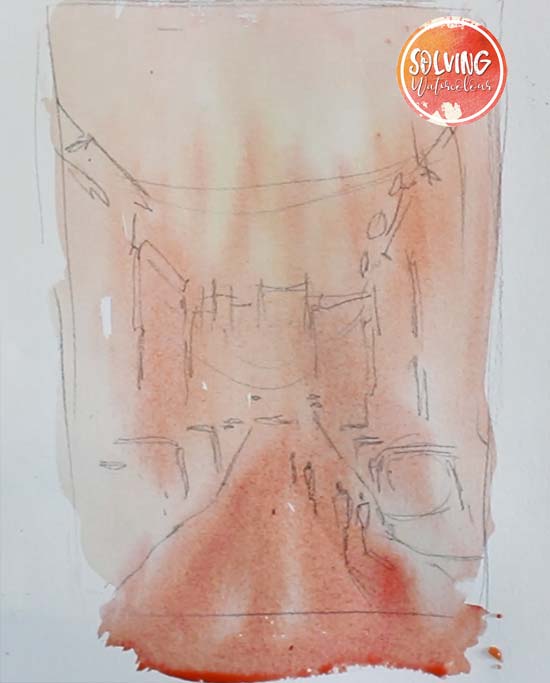
Start with an initial rough sketch and lay down a loose wash of Cadmium Red over the whole drawing. Allow this to thoroughly dry.
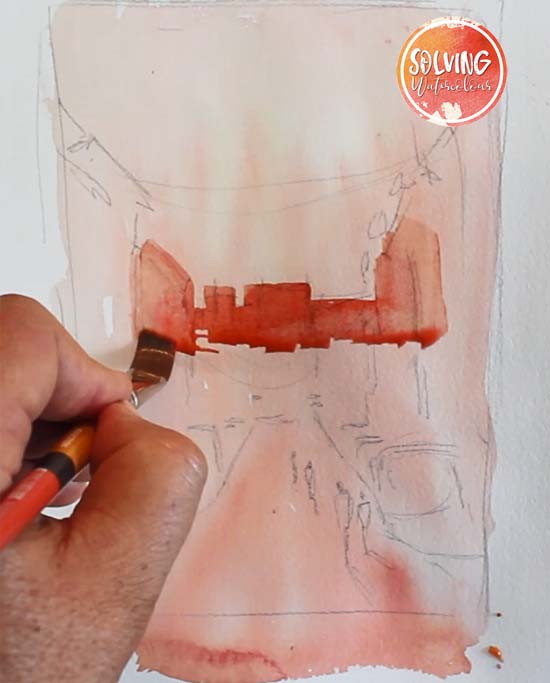
A flat brush is ideal for the straight regular shapes of the buildings. Start painting the buildings with a 1/2″ flat brush laying down an even flat wash. If you’re not sure how to paint a flat wash, this post explains it in detail, but the basic idea is to tilt your painting so that you always have a wet bead of paint at the leading edge of your wash. This allows you to extend the wash down the paper without creating uneven bands of color.
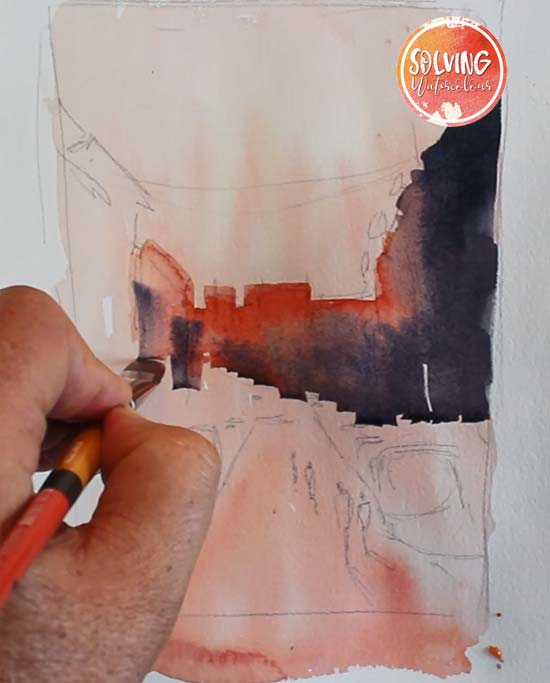
Mix Dioxazine Purple and Paynes Grey to make a vibrant warm dark grey. Keep extending your flat wash adding in the new color and allowing it to blend with the Cadmium Red you’ve already put down.
Create suggestions of parked vehicles at the side of the road by leaving small irregular white shapes of unpainted paper.
When your flat wash is dry you can add suggestions of windows and gaps between buildings by going back and painting rectangular shapes and lines with your flat brush.
Switch to a smaller round brush to add details such as the figures and the satellite dishes, adding shadows underneath your figures will ground them more convincingly in the scene. See this post on adding how to add figures to your paintings. A Rigger is ideal for the really fine details such as wires and antennae.
If you found this post useful check out the links below
How To Start Watercolor Painting: Essential Beginners Guide

You always have such great lessons and demos.
Professional artists are so giving of their time and knowledge……and you never disappoint in either of those areas.
Thank you,
Rhonda
Thanks Rhonda!
Great content! Keep up the good work!