
This simple watercolor sunset is not only easy to do but is a great way to practice wet into wet painting techniques and learn about drying times too.
Materials List
Paints
Ultramarine Blue: Winsor & Newton | Daniel Smith
Paynes Gray: Winsor & Newton | Daniel Smith
Alizarin Crimson: Winsor & Newton | Daniel Smith
Cadmium Red: Winsor & Newton | Daniel Smith
Cadmium Yellow Daniel Smith
Brushes
Rigger Brush (For thin tree branches etc) Buy from Amazon
Princeton Synthetic Kolinsky Mop Brush Buy from Amazon
Princeton “Snap” 1″ Flat Brush Buy from Amazon
Winsor & Newton Series 150 Bamboo Round #6 Buy From Amazon
Paper
Arches watercolor paper block, cold press, 9″ x 12″, 140 pound Buy from Amazon
Miscellaneous
Easy release painters masking tape Buy from Amazon
Adjustable desktop easel Buy From Amazon
Misting spray bottle Buy from Amazon

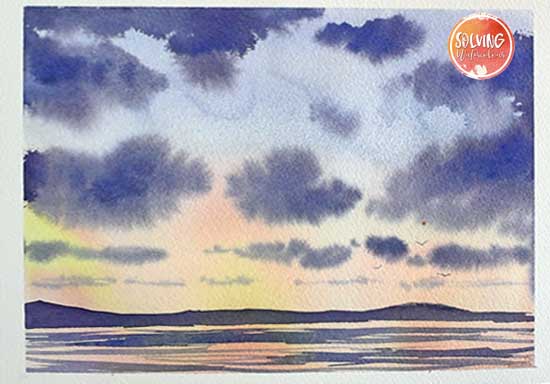
How To Paint A Simple Watercolor Sunset
Total Time: 15 minutes
Step 1: Preparation
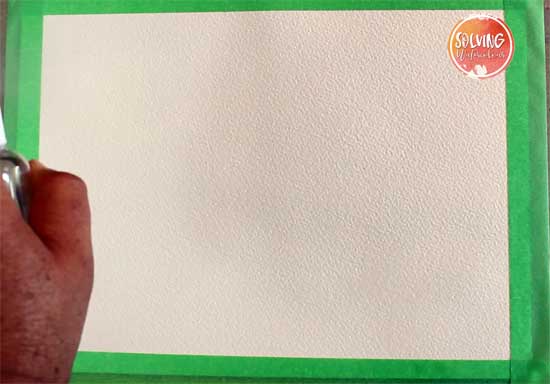
I usually begin a painting by putting strips of low tack masking tape around my paper this preserves a neat white border around the work.
Wet the paper, either with a spray bottle, as I like to do, or simply by wetting the whole sheet with clean water and a large brush.
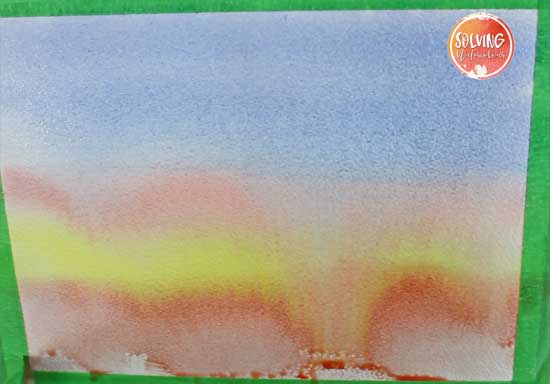
Mix some Cadmium Yellow, Ultramarine and Cadmium Red in separate wells on your palette.
Step 2: Painting The Sky
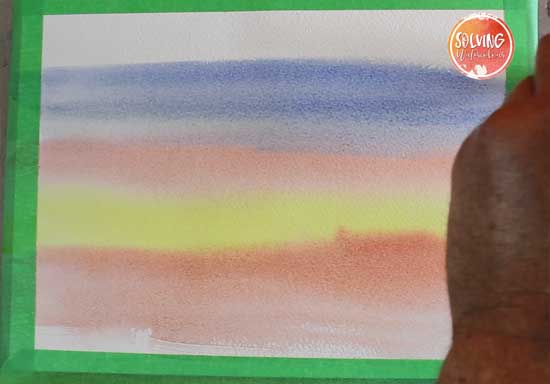
I painted rough stripes of color across the paper with the 1″ flat brush, starting from the bottom of the paper and working up. I began with a red stripe then a stripe of Cadmium Yellow, followed by another stripe of red and finally, a stripe of Ultramarine at the top. You can experiment with other colors. Violet and purple, for instance, could be substituted for blue and red.
Avoid placing complementary colors next to each other as complementary colors will form muddy dull grays and browns when mixed, Yellow and blue are adjacent colors which will make green when mixed, so those should definitely not be placed next to each other either.
For a detailed explanation of color relationships and how to mix watercolors, be sure to check out this blog post.
Step 3: Blending The Sky
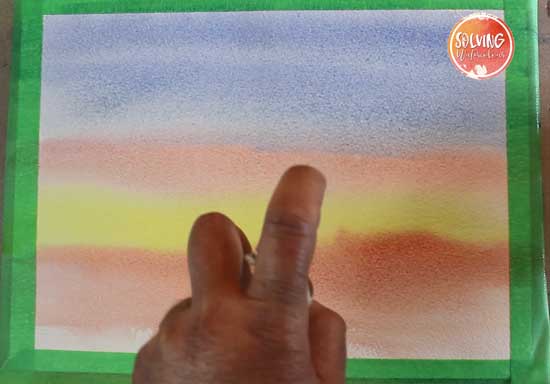
To blend the stripes of color, spray the painting once again with clean water and make sure that your painting is tilted at a steep angle, Allow the stripes of paint to run in to each other so that the lines completely blur.
Step 4: Preparing To Add Clouds
As the colors run and blend with each other, continue to use the spray bottle and where necessary use the flat brush to move the paint around and smooth out any patches of white paper or drips.
As the colors blend and settle. Mix up the cloud color. I’ve mixed a warm purple/gray from Paynes Gray, Ultramarine and Alizarin Crimson.
Step 5: Adding Cumulus Clouds
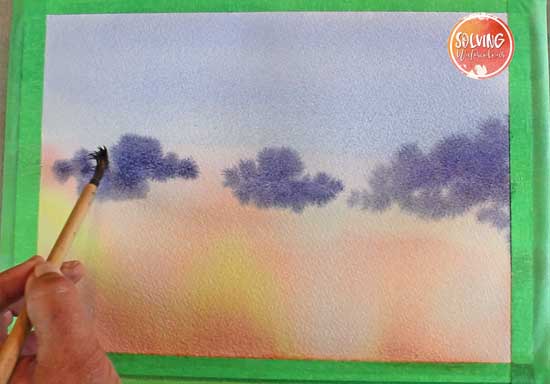
Cumulus clouds are the small fluffy low altitude clouds that appear on hot days. They look particularly spectacular in sunsets.
In order to create the appearance of these Cumulus clouds, I’ve used my number 6 Bamboo brush. This natural haired brush is ideal for creating the appearance of the randomness of nature in such things as foliage and it works well for clouds too.
Timing is important when adding these clouds as the paper cannot be too wet, as the paint will simply start to run and drip uncontrollably. If, on the other hand, the paper is too dry, the clouds will have hard edges rather than the soft fluffy appearance required. In order to get the paper when it has the right amount of wetness, look at it closely under the light. If the paper has a very shiny appearance it’s too wet, so wait for a few minutes until the shine is starting to fade, before adding the clouds.
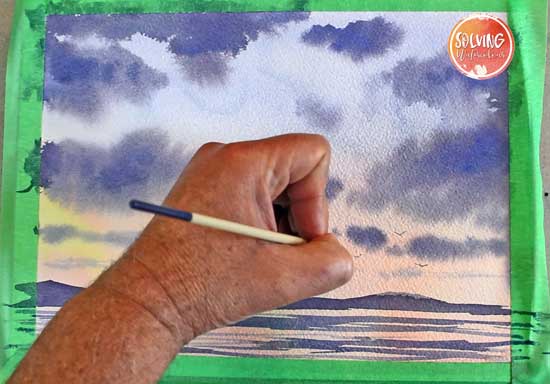
Drop the clouds in with a minimum of brushing and work your way across the paper.
Step 5: Creating Perspective With Clouds
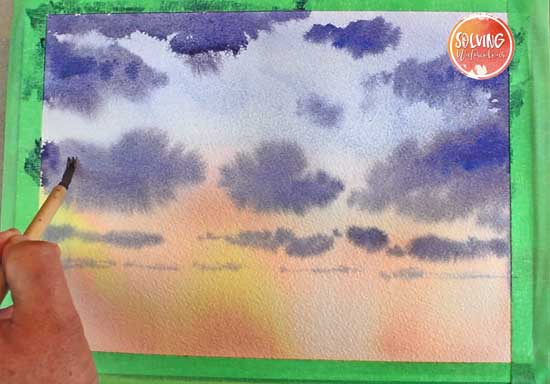
To create the illusion of perspective, paint the largest banks of clouds at the top of the paper and then add additional banks of clouds making progressively smaller towards the horizon.
My paper was starting to get a bit dry at this point. This may happen depending on the temperature and humidity of your workspace. If this does happen, simply wet the edges of your clouds with a little water spray. Don’t overdo it though, as there is a risk that the clouds will start to drip and run. You may also lower the angle of your easel in order to slow down any runs that start to occur.
Step 6: Adding The Midground
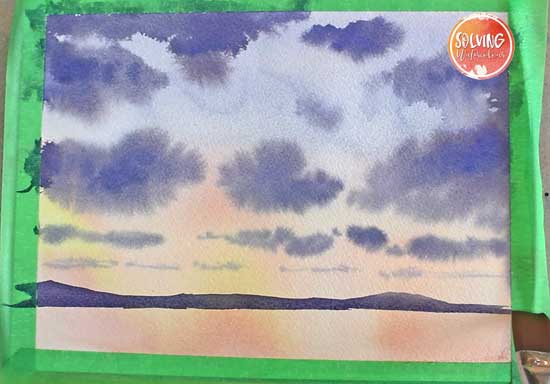
Using the same purple/gray paint mix as before add a strip of land on the horizon. (The horizon is wherever you choose to place it). My preference is to use a flat brush for this as the shape of the flat brush makes it ideal for creating straight edges.
I painted mine freehand hence my line wasn’t perfectly straight you can always place another strip of masking tape along your horizon line to eliminate this problem.
Step 7: Final Details
How To Paint Watercolor Sunsets YouTube Video


Related Tutorials
If you enjoyed this tutorial, be sure to check out the following.
How to paint skies and clouds in watercolor
How to paint seascapes and beaches in watercolor
