How to Add Perspective and Depth to Your Watercolor Landscapes
Are you tired of painting flat, lifeless landscapes? Do you want to learn how to add depth and perspective to your watercolor paintings? In this article, I’ll show you how, using some simple techniques that will take your paintings to the next level.
Table of Contents
Understanding Perspective in Landscapes
Before we dive into the techniques, it’s important to understand perspective in landscapes. Perspective is what gives your paintings a sense of depth and distance. Without perspective, your paintings will appear flat and two-dimensional. To create perspective, you need to understand how objects appear to change as they move away from you.
Types of Perspective
There are two types of perspective: linear and atmospheric. Linear perspective is created by using lines that converge at a vanishing point to create the illusion of depth. Atmospheric perspective, on the other hand, is created by using color and value to create the illusion of distance.
Vanishing Points
Vanishing points are an important element of linear perspective. They are the points on the horizon where all parallel lines appear to converge. By using vanishing points in your paintings, you can create the illusion of depth and distance. See the painting example below.
Techniques for Adding Depth and Perspective
Now that you understand perspective, let’s look at some techniques for adding depth and perspective to your watercolor landscapes.
Overlapping
One of the easiest ways to create depth is by overlapping objects in your painting. By placing one object in front of another, you create the illusion of distance. This is a simple technique, but it’s very effective.
Size and Scale
Another way to create perspective is by using size and scale. Objects that are closer to the viewer will appear larger than objects that are further away. By varying the size and scale of objects in your painting, you can create the illusion of depth.
Atmospheric Perspective
As mentioned earlier, atmospheric perspective is created by using color and value to create the illusion of distance. Objects that are further away will appear lighter in value and cooler in color. By using this technique, you can create the illusion of distance and depth in your painting.
Layering
Layering is another technique that can add depth to your painting. By layering colors and values, you can create the illusion of depth and distance. Start with the lightest colors in the background and gradually layer darker colors in the foreground.
Linear Perspective
Finally, let’s talk about linear perspective. By using vanishing points and converging lines, you can create the illusion of depth and distance in your painting. This technique takes a bit more practice, but it’s very effective.
Tips for Adding Perspective to Your Watercolor Landscapes
Now that you know some techniques for adding depth and perspective to your watercolor landscapes, let’s look at some tips to keep in mind.
Plan Your Composition
Before you start painting, it’s important to plan your composition. Think about the objects you want to include in your painting and how you want to arrange them. This will help you create a sense of depth and distance in your painting.
Start With Light Colors
When adding layers to your painting, start with the lightest colors first. This will help you create a sense of distance and depth.
Use Reference Photos
Using reference photos can be very helpful when trying to add perspective to your paintings. Take a look at photos of landscapes and study how the objects are arranged and how perspective is created.
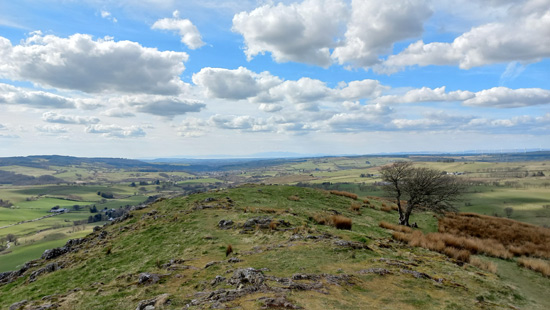
Above is the reference photo that I took for my example painting. It’s the view from the top of Loudoun Hill in Ayrshire, Scotland. Loudoun Hill is the site of an historic battle battle between Robert The Bruce and the English in 1307 but these days it’s a lot more peaceful with 360 degree views of the surrounding countryside occasionally broken up with arrays of wind farms.
Notice how the greens become lighter in the distance and the hills on the horizon appear to be blue. This is an example of atmospheric perspective. The banks of clouds appear to become smaller as they recede into the distance and the lines of the rocks and the hedges become thinner and smaller as they converge towards a vanishing point.
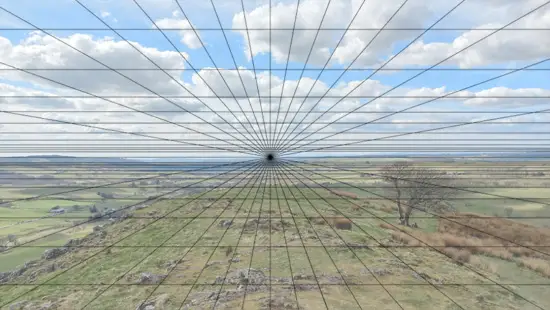
In the image below I’ve overlaid the reference photo with a perspective grid to clarify the concept further. In reality it’s a bit more complicated than this. There are in fact multiple vanishing points. Not all the ground is at the same level and not all the hedge lines run in one direction, but a linear perspective can give us a helpful guideline.
Materials List
Ultramarine Blue: Winsor & Newton | Daniel Smith
Cerulean Blue: Winsor & Newton | Daniel Smith
Prussian Blue: Winsor & Newton | Daniel Smith
Alizarin Crimson: Winsor & Newton | Daniel Smith
Paynes Gray: Winsor & Newton | Daniel Smith | Daniel Smith
New Gamboge: Winsor & Newton | Daniel Smith
Dioxazine Purple: Winsor & Newton | Daniel Smith
Brushes
Rigger Brush ( For thin lines) Buy from Amazon
Winsor & Newton Series 150 Bamboo Round #6 Buy From Amazon
Synthetic Squirrel Flat Brush Buy From Amazon
Winsor & Newton Series 150 Bamboo Round #6 Buy From Amazon
Paper
Arches Watercolor Paper Block, Cold Press, 9″ x 12″, 140 pound Buy from Amazon
Miscellaneous
Adjustable desktop easel Buy From Amazon
Easy release painters masking tape Buy from Amazon
Painting Example: Loudoun Hill View

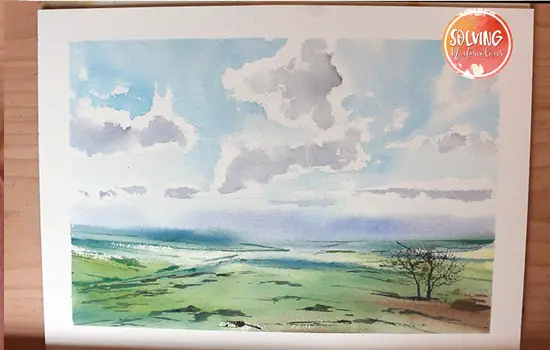
Loudoun Hill View Watercolor Landscape: Step by Step
Total Time: 1 hour
Step 1: Painting the sky
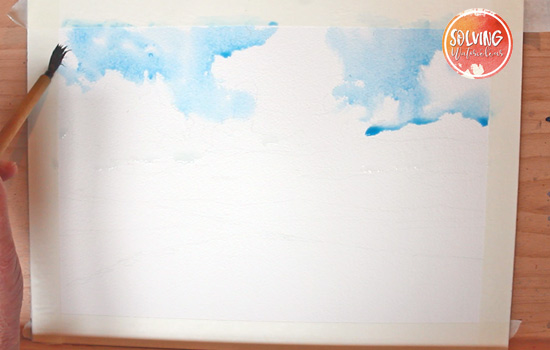
I’ve started my painting from the top and working downwards with my painting angled and about 30 degrees. I’ve blocked in the areas of the largest cloud shapes first with some clean water. here I’m painting around the wet shapes with Cerulean Blue, using a Bamboo brush. I paint up to and around the wet areas allowing the brush to touch the wet paper occasionally as this softens and breaks up the edges here and there creating more natural looking clouds.
Step 2: Adding the Distant Hills
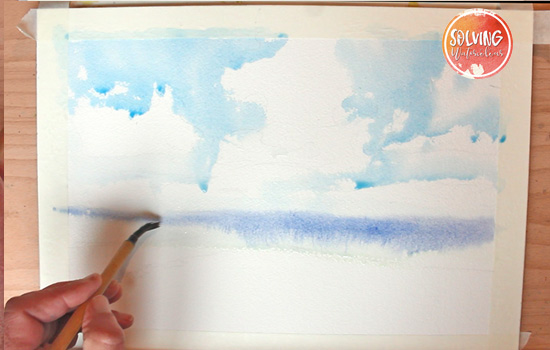
An important part of creating the illusion of depth in a watercolor painting, is to make the distant parts of the landscape less distinct. I’m painting the distant hills by adding a little Dioxazine Violet to Ultramarine Blue and painting it wet on wet with my bamboo brush, this allows the paint to diffuse and create a soft out-of-focus appearance.
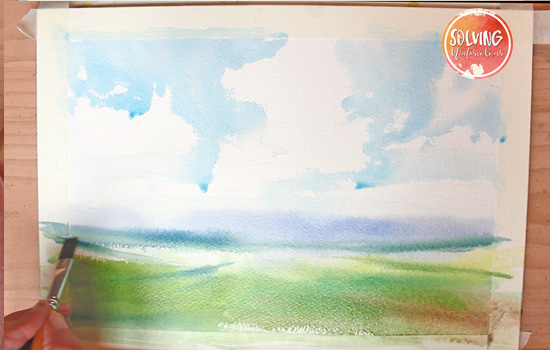
Step 3: Adding the Midground

As I start to paint the fields in the midground I’ve now switched brushes to a 1″ flat brush and I’m continuing to paint wet in wet with a light green mixed from New Gamboge and Ultramarine Blue. I continue to paint into the foreground. To darken the green I’ve added little Prussian Blue to the mixture and I will also blend in a little bit of Burnt Umber in the foreground to warm up the painting with some earthy tones.
Step 4: Adding Distant Trees and Hedges
Water control is important to be aware of at this stage of the painting. The paper is a little bit drier but the shine on the paper hasn’t completely gone. I start to paint the distant trees and hedges. The paper isn’t wet enough for the the color to run and blend uncontrollably and my paint is a slightly thicker consistency but thin enough to continue to diffuse. I’ve added a little bit more Prussian Blue to darken my greens.
Step 5: Adding Shadows to the Clouds
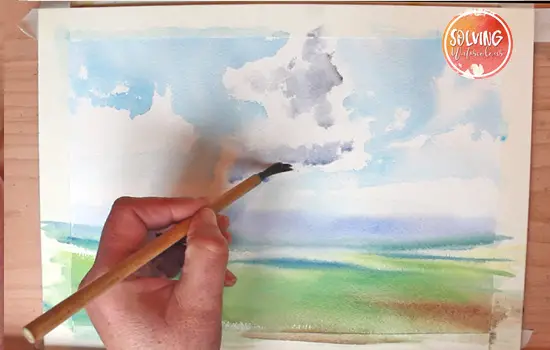
I’ve mixed a warm grey from Ultramarine, Alizarin Crimson and Paynes Grey and I’m adding some shadows to the clouds with a bamboo brush
Step 6: Adding Perspective to the Clouds
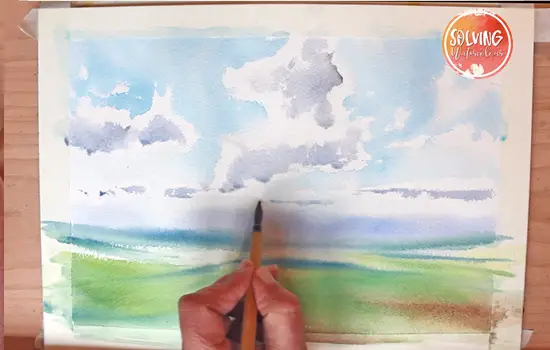
Clouds have perspective too, eventually becoming thin horizontal lines as they recede into the distance. Observing this effect and putting it into your work will reinforce that senses of depth that we are trying to achieve.
Step 7: Adding Perspective Lines

The lines of the hedges will also follow the rules of perspective becoming thinner as they get further away. Remember though that hedges can be orientated in many different ways so they won’t necessarily line up neatly along the lines of a perspective grid but you’ll notice that some do. Here I’m using a small round detail brush to carefully add some hedge lines in a darker green and I’m painting them wet on dry. I want these lines to get gradually thicker as they get closer to the foreground
Step 8: Adding Final Details
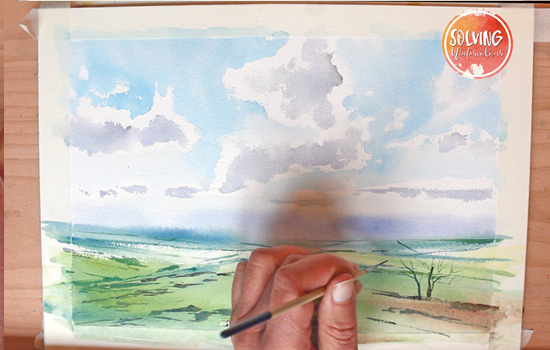
Finally I’m adding the darkest details such as foreground rocks and the tree with a Rigger brush. For these details I’ve mixed up a cool neutral from Ultramarine blue and Burnt Umber.
In conclusion, adding depth and perspective to your watercolor landscapes is essential to create paintings that are vibrant, dynamic, and engaging. By understanding the principles of perspective, using simple techniques, and following some tips, you can take your watercolor paintings to the next level. Remember to plan your composition, start with light colors, use reference photos, and most importantly, practice, practice, practice.

Très jolie démonstration Merci
Merci!