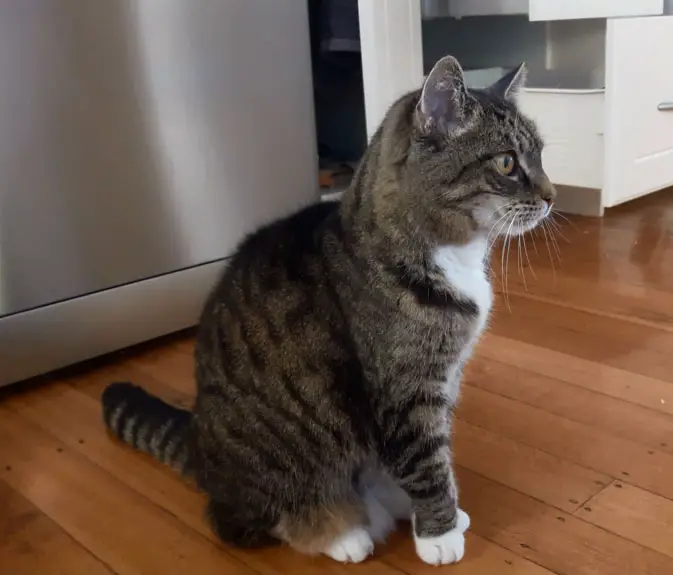
Meet Buffy our grumpy fifteen year old tabby cat. She is the subject of today’s tutorial on how to paint a cat in watercolor. In the reference photo below I managed to catch her in a rare moment, between sleeping and eating!
If you would like to follow this tutorial you can download my drawing and print it on to a sheet of A4 watercolor paper. Remember, when printing on to thick watercolor paper, always use your printer’s rear tray. Using your printer’s cassette tray could cause a jam as the thick paper has to bend round the printer’s rollers.
Materials List
Paint
Ultramarine Blue: Winsor & Newton | Daniel Smith
Paynes Gray: Winsor & Newton | Daniel Smith
Burnt Sienna: Winsor & Newton | Daniel Smith
Cadmium Yellow: Winsor & Newton | Daniel Smith
Brushes
Princeton round detail brush 9650R-2 Buy from Amazon
Winsor & Newton Series 150 Bamboo Round #6 Buy From Amazon
Paper
Arches Watercolor Paper Block, Cold Press, 9″ x 12″, 140 pound Buy From Amazon
Misc
Pebeo Palette Knife Buy from Amazon

According to Wikipedia, The English term tabby originates from the translation of the French phrase “striped silk taffeta,” the root of which is tabis, meaning “a rich watered silk.” This can be further traced to the Middle French atabis (14th century), which stemmed from the Arabic term attabiya.[3] This word is a reference to the Attabiya district of Baghdad, noted for its striped cloth and silk;[4] Itself named after the Ummayad Governor of Mecca Attab ibn Asid such silk cloth became popular in the Muslim world and spread to England, where the word “tabby” became commonly used in the 17th and 18th centuries.
Tabby cats are possibly the most difficult type of cat to paint as there is a lot of complexity to their coats with the colors and stripy patterning. The stripes are a mixture of hard and soft edges and I used a couple of different techniques to create them which I will discuss.
How To Paint A Cat In Watercolor Step By Step
Steps 1 – 3
The first step is to really look at the photo and try and see what colors are their. Notice how the fur has lots of blues and greys but also subtle reddish browns too.
The general approach I used was to lay down a variegated wash of Ultramarine Blue and Paynes Grey on dry paper working from top to bottom with the paper angled at about 30 degrees. The important thing at this stage is to ensure that the edges form a bead just like when painting a regular flat wash.
Painting back into the wet bead of paint will ensure that you can extend the wash smoothly without creating any obvious hard edges and lines.
I left plenty of unpainted white flecks and patches. These are hard-edged highlights. It will be possible to modify them later, if needed, in the subsequent washes.
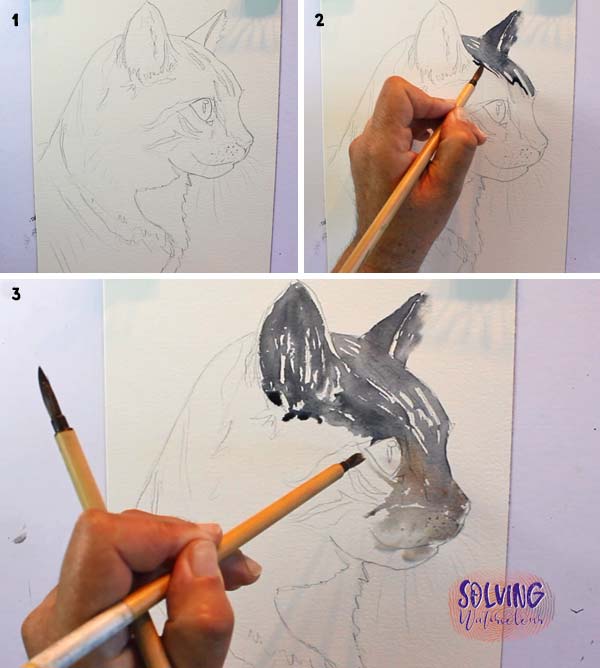
To warm up the blue grey in places, I “charged” the wash with some Burnt Sienna. Charging simply means dropping in additional colors wet in wet, into your wash. creating interesting colour variations. A variegated wash mimics the way that light behaves in reality as objects are never just one flat color. They have localised color and tonal variations as well as being modified by reflected light
Tip: My studio can get quite hot and the paint was drying too fast. In order to stop the beads of paint drying up, you can see in pic 3 above that I’m holding two brushes simultaneously. One brush is loaded with paint and the other just with clean water for rewetting, blending out and softening edges where needed.
Completing The First Wash
I gradually worked my way down from top to bottom just as I would do if I was painting a landscape. The wash is a highly variegated one. I’ve lifted out areas with a damp brush to create lighter tonal variations and as previously mentioned by charging my base blue/grey with Burnt Sienna.
If the Burnt Sienna, which is highly pigmented seems a bit overpowering at this point, it’s important to remember that watercolor paint always dries about 25% lighter than it looks when wet, so if it looks a bit too strong, it’s probably about right.
Steps 4 – 5
With the initial wash painted in I added a bit of Paynes Grey to my brush to indicate the dark stripe at the base of her neck. I’ve left the eye white for now by carefully painting around it. The is important and needs some special attention to get it right.
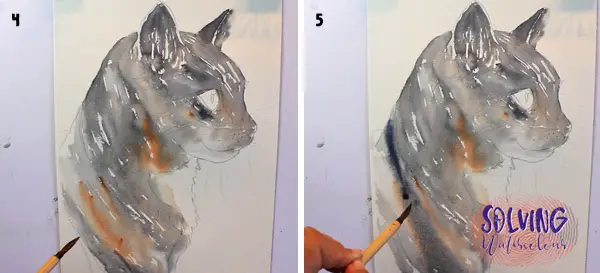
I painted the darker stripes on her back and shoulders by adding lots of Paynes Grey wet into wet and then while it’s still wet, lifting it out where necessary with a damp but clean brush and wiping off the excess paint onto tissue paper. In this way I was able to create bold stripes with edges that were still slightly diffused.
How To Paint Realistic Eyes
In any portrait, whether of an animal or a human, it’s the eyes that really bring it to life so it’s important to take care and be very precise and deliberate when painting them.
Buffy’s distinctly green eyes were created with a mix of 80% Cadmium Yellow and 20% Ultramarine.
When light enters the eye from above , a highlight is created on the top of the iris. I took care to preserve that little highlight by carefully painting around it. I’m removing excess paint from my brush with a piece of tissue.
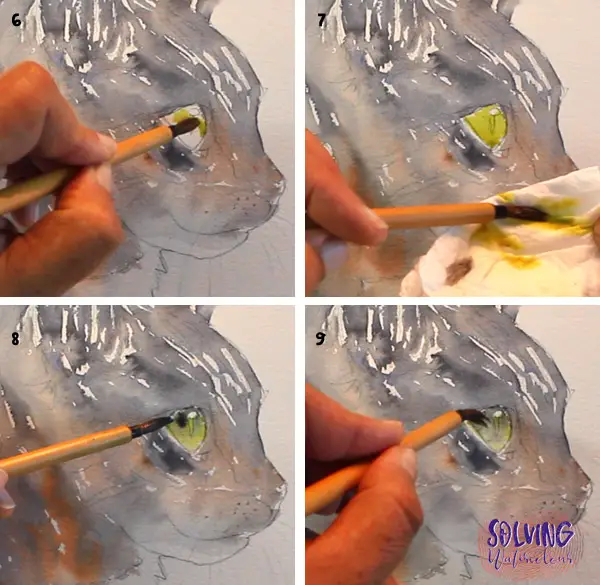
Steps 6 – 9
The darkest part of the eye is the top part immediately around the highlight and the lightest part is the lower half of the eye which is illuminated. To create this effect I dropped in a little bit of Paynes Grey to the light green. Watercolor will only flow where the paper is wet, so don’t worry that the paint will fill that highlight. It just flows around it. I kept lifting out paint from the lower half of the eye with my brush wiping off the excess onto the tissue.
In this way I was able to create a realistic eye by painting a small gradient wash in the eye going from dark green to light green.
Steps 10 -12
I would normally save painting the darkest darks till the very end but occasionally you can break this rule. I really wanted to see how the painting would look with the eye finished as I knew that if the main focal point of the piece, (the eye) didn’t work then I may as well abandon the painting anyway. So I allowed the eye to completely dry first (To avoid adjacent colors bleeding into it), I carefully painted in the dark stripes around the eye and softened the edges with my clean water brush where the stripe blends softly into the nose.
Step 13
I switched my smallest round detail brush for precision when painting the darkest lines around the iris and for the pupil. Again, it’s crucial to avoid the white highlight.
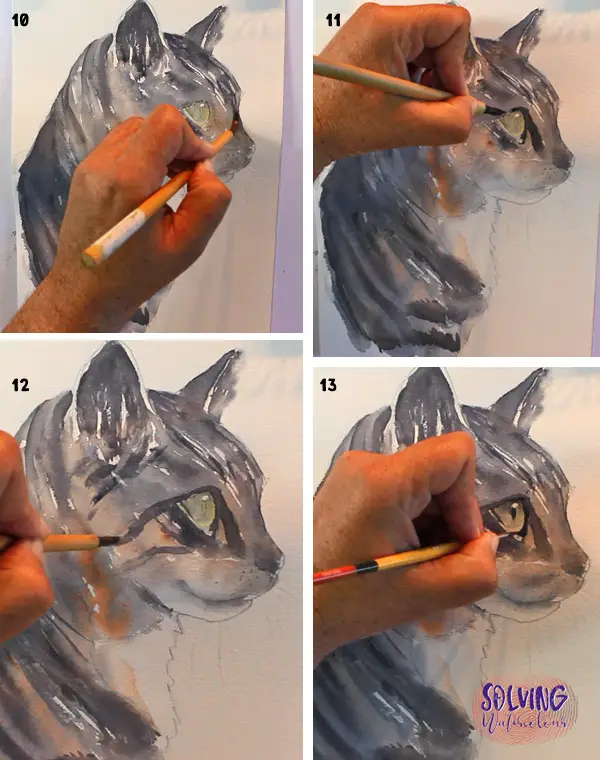
With the eye finished, I was able to move on confidently knowing that the trickiest part of the painting was done.
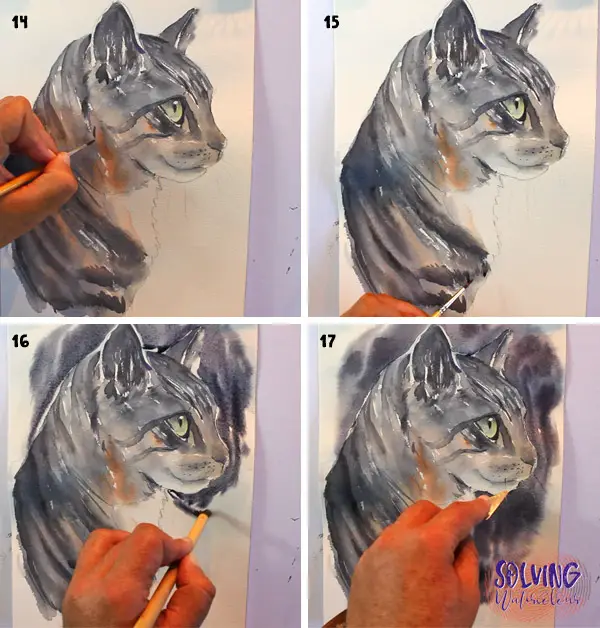
Adding Fur Details & Background Wash
Steps 14 and 15
The round detail brush is perfect for flicking in small tufts of dark hair here and there. I used it sparingly as overworking the painting is all too tempting to do in the final stages.
Steps 16 and 17
I felt that the painting needed a dark background color to create a strong contrast with the white patch of fur on the throat and face. I painted clean water only where I wanted the background to go and simply painted a strong mix of Paynes Grey and Ultramarine into it wet in to wet and allowed it to do it’s own thing. As mentioned previously the paint will only flow where the paper is wet so there is no danger of it running into the cat. Painting the background in this abstract way, allows the watercolor to do its own thing and practically paints itself.
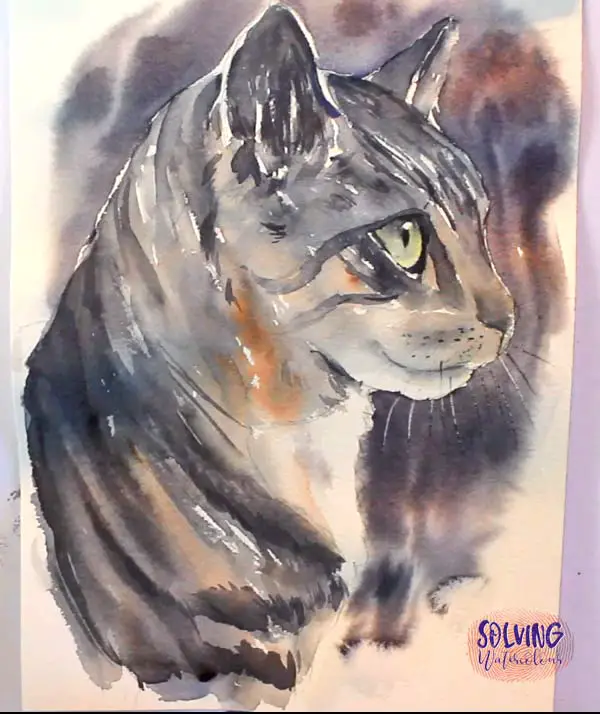
Final Painting
The final result can be seen below. In order to create the whiskers I simply scraped them out of the background paint while it was still relatively wet using the blade of a palette knife.
Watch The Video
Here’s my YouTube shorts video that compresses the actual painting time. (Approx thirty mins) in to one minute of time.
